Tuesday, February 22, 2011

Painting The Roses Red

Paper Rose


Technique: Paper and String

Materials:
an old novel
thin beading wire
acrylic paint
matt spray sealer
hot glue
bamboo skewer
string

Tools:
scissors
paintbrush
wire cutters
hot glue gun

There are plenty of ways to make paper roses, a google search will even pop up with several videos. The way I made mine was a hybrid from floral artistry, first using wires to attach to the petals and leaves, and then using the wires to attach to and form the stem.

Stack five pages from the novel together and cut out 4-6 different size petals. You can do this free form without the need for a template and you will have a more natural looking flower. Start with a small teardrop shape, about the size of the fingernail on your ring finger and work up to larger almost heart shape petals. You will need about 20-25 shapes, depending on how big you want your bloom to be. Cut 2 - 3 leaf shapes as well. Cut one strip of paper about 6 inches long and half an inch wide and fold this in half so it is 6 inches long and one quarter of an inch wide.

Cut 20 or so pieces of beading wire, about twice the length of your index finger, and then fold them over in half so that they are the length of your index finger with a small loop at one end, and the two cut ends at the other. Use small dots of hot glue to attach to the pointy end of the petals.

Using red acrylic paint, colour 2 or 3 petals from each size, so that about one third of your petals are painted red and allow to dry before proceeding.

Put a dab of hot glue on the end of your skewer and attach one end of the long strip you cut, you are attaching the short end in such a manner that the folded edge is facing up and away from the tip of the skewer. Wind it around the skewer to form the inner bud of the rose. Secure with hot glue.

You should now have a skewer with a small spiral of paper stuck at one end, this will act as the foundation for wiring all of your other petals. One petal at a time, hold in place with your fingers until you have the position you desire, then twist the wire around the skewer to secure. Continue in this manner from small petal to large until your blossom is the size you require. Wire two or three leaves into position.

Cut the bamboo skewer and any long wires so that your stem is around 3 - 4 inches in length. Securing with hot glue, wrap string around the stem to cover the wires and give a nice finish. You could use green florists tape here, or ribbon, if you preferred, but I wanted to keep with the paper and string theme.

Monday, February 21, 2011

Primitive Plum Pudding

Primitive Pudding


Technique: No Sew Fabric

Materials:
styrofoam ball
unbleached calico
acrylic paints
string
cinnamon powder

Tools:
pinkingshears or regular fabric scissors
painting sponge or brushes
printer
dusting brush, or a cosmetic blusher brush
hole punch

Cut a small slice from the styrofoam ball so that it has a flat bottom. Cut a circle from the unbleached calico large enough to cover the ball and be tied at the top. I used a dinner plate as a template for mine. Gather and tie off with string.

Using the dusting brush, dust the ornament with cinnamon. Not only does this give it a gorgeous smell but it gives it that aged, primitive appearance. Cut two holly leaf shapes from the calico and paint them green and set aside to dry.

Print the two images below and glue back to back to make a double sided hang tag. Age the holly and the card with cinnamon. Make holes in the holly and tag with a hole punch and tie to the pudding with the string.


Sunday, February 20, 2011

Queen Bee Lightbulb Ornament

Bee My Valentine

Technique: Recycled, General Crafting

Materials:
screw in candelabra light bulb, cleaned out
black and yellow chenille sticks
little bees (mine were made from ribbon)
hot glue
styrofoam ball & paperclay (or large wooden bead)
acrylic paints
glass and tile medium
masking tape
cake decorating stamens
raffia
spray varnish or sealant

Tools:
hot glue gun

Abdomen: Using masking tape create a stripe in the middle of the lightbulb. Following the manufacturer's directions, mix some yellow paint with glass and tile medium and paint the stripe. Allow to dry thoroughly. Apply the little bee's using hot glue.

Thorax: Determine which side of the abdomen is your best side, so that you know which will be your back. Starting at the back wind black and yellow chenille sticks around the screw in part of the globe, securing with hot glue as necessary.

Arms: Find the centre of a yellow chenille stick and fold the ends in towards that. Leave about 1/4" of yellow free at each end (for hands) and wrap the remainder in black chenille, you will most likely need to use two sticks to fully cover the arms. Bend at the elbows and glue into position at the back.

Head: You can get wooden beads that are specifically designed for using as heads on clothespin dolls, but here in Australia they are proving very difficult to source. I have had to become very creative! If you can get those beads, then they are the perfect size, go ahead and use those. If you can't get them, you can use either a small styrofoam ball just as it is, or cover it with a thin layer of paperclay like I did. I prefer the paperclay coating to the plain styrofoam ball because it's a nicer surface to paint on, but do whatever works for you. DO NOT cover a styrofoam ball with polymer clay, the baking process will release toxic fumes from the foam, always use paperclay when using foam.

Give your head 2-3 coats of yellow paint, drying between coats. Paint on details of face, spray with clear sealant or varnish and then wrap black chenille around the rest of the head, using hot glue to secure where necessary. Use stamens or bits of chenille as antennae.

Finishing: Glue head into position on top of the lightbulb. Make a bow out of the raffia and glue onto the back of the bee for wings. Give your bee a little heart to hold. If desired, you can write a cute little phrase on the heart such as "Bee Mine!"

Saturday, February 19, 2011

Pisces Kimekomi Ball

Pisces Ornament


Technique: Kimekomi (Or New Sew Fabric)

Materials:
styrofoam ball
fabric
cord, braid etc
paper
piece of string

Tools:
orange stick (cuticle stick)
scissors
ruler
scalpel
compass

Long before it had the name Kimekomi, I had seen fabric Christmas ornaments at fetes and fairs. Now that it has the name Kimekomi there are of course specialized tools you can buy, but it's not necessary at all.

Firstly, wrap a piece of string around the middle of your styrofoam ball to measure the circumference. Whatever length it is, divide that by six, and mark that on your string. Your ball should have a mould line, a straight line around the circumference. Using the string, mark the 6 segments around the mould line.

There are lots of tutorial videos to show you how to segment Kimekomi balls, this is just how I do it. Using your string, make marks around the ball, then with a pencil, join opposite marks, like a dot to dot around a ball. This should create six evenly spaced segments around the ball, like an orange.

Set your compass to the same width as the segments, and starting at lines that intersect begin drawing circles around your ball. Rather than give you a specific pattern direction, I encourage you to draw circles on the ball until you find a pattern you are happy with.  The larger the pattern segments the easier the ball will be to construct, so bear that in mind. I will often have many circles overlapping before I find a pattern that repeats that I like.  When I did find the pattern I wanted, I outlined the score lines in red, so that it was clear which lines I needed to score.

Score each of these lines lightly with a scalpel, you want to cut down about 1/4" of an inch.

Start with one colour of fabric and cut a piece that is going to be just a bit larger than the segment you wish to cover (you can trim this as you tuck so its better to be generous than skimpy here). Hold firmly in the centre of the fabric and using the cuticle stick, tuck one edge into the groove, and then the other, working each side evenly so that the fabric remains true and doesn't distort and end up uneven. Tuck the points in and trim any excess fabric if necessary. Continue in this manner until all six wedges of fabric have been used.

Chose a cord or braid that compliments your fabric. If using a thin cord this will sit neatly into the channels, and the ends will tuck into the ball nicely. Braid is thicker and will sit over the channel, you can use glue or decorative pins to secure this in place. The same process applies to the hanger. You can push some cord into the top of the ornament with a skewer, or use a decorative pin to secure a loop of braid to the top.

Friday, February 18, 2011

Catching up with Magic Mushrooms!

Once a week I spend the day playing catch up, adding the finishing touches to any projects not quite yet done, taking photos and browsing the net for inspiration, and as always, looking for free patterns and interesting tutorials. To stick to my commitment to posting daily, I'll share with you something that I thought was a fabulous find.

 I love mushrooms, always have.  Even as a kid I would hire books from the library on mushroom types, with a particular fondness for the fly agaric species.


I think it is because mushrooms feature so frequently in fairy tales, and in art wherever there is a mushroom there is a fae somewhere nearby.

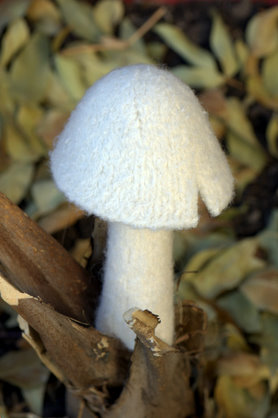
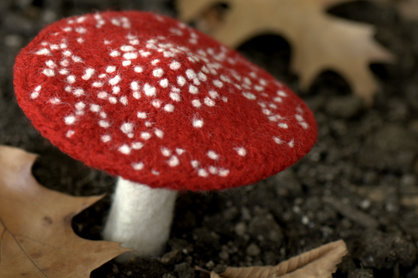
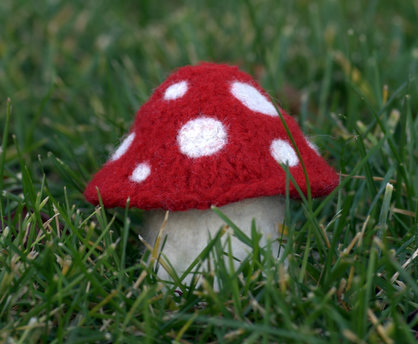
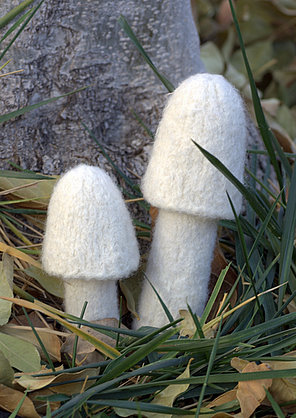
The following mushrooms can be knitted using the free pattern from Kathryn Ivy.


Thursday, February 17, 2011

Cinnamon Anise Cluster

Cinnamon Anise Cluster


Technique: Basic Crafting

Materials:
cinnamon sticks
star anise
raffia
hot glue
rubber band

Tools:
hot glue gun

A classic country style ornament, made in many kitchens over the holidays in dozens of different variations. They are easy to make, the ingredients are easy to get, they fill the home with a beautiful scent and add a simple, rustic appearance to any kitchen or tree.

To make, bind three or four cinnamonsticks together with a rubber band. Wrap raffia around the band to hide and tie to form a bow. With hot glue, attach 2 or 3 star anise buds. Attach a loop off raffia to hang.

You could embellish with ribbon instead of raffia, use nutmeg instead of star anise, or add dried orange or apple slices.

Wednesday, February 16, 2011

Rose Petal Sachet

rose petal


Technique: General Crafting

Materials:
30cm circle of tulle
dried rose petals
rubber band
ribbon
silk or dried rose buds

Tools:
Scissors

A very pretty, and fragrant, ornament that can be hung to add a touch of romance and elegance to a room. Coupled with a vial of rose fragrant oil, it makes a lovely gift.

Lay the circle of tulle on a flat surface and place a handful of rose petals in the centre. Draw up the edges firmly around the petals and secure with a rubber band. Decorate with ribbon, silk or dried roses, baby's breath, whatever takes your fancy.

Tuesday, February 15, 2011

Wedding Corset

Corset


Technique: Sewing

Materials
base fabric of choice
ribbon, lace, trims
tacky glue
filling (either polyfill or herbal)

Tools:
sewing machine
scissors


Many of the materials I used in this corset were remnants from my wedding dress (yes I wore pink).


With the base fabric right sides together, use template above to cut out two pieces.

Cut two lengths of ribbon about four inches in length. Fold and pin into place upside down on the right side, bottom edge of the corset to act as the garter straps. It's kind of hard to explain if you have no sewing experience, the folded edge of the ribbon will be flush with the bottom edge of the corset and the cut edges will be pointing up towards the bra section, so that when you sandwich it back together you will sew over the top of it and catch it in the seam to secure it. Then when you turn it right way out, the two garter straps will be danging down.

Cut a six inch length of ribbon and pin each cut end to a bra cup, loop pointing down, so that when turned right way out it acts as a hanging loop.

Place the other pattern piece, right sides together, over the top and pin into place being sure that the loose ends of the ribbons are not caught in the seams.

Sew, leaving an inch gap at the bottom. Clip curves, turn and stuff. You can stuff with herbs like lavender for a scented corset you can hang in your wardrobe, or use polyfill. Whipstitch bottom gap closed.

OK dull part over, fun part begins! Using tacky glue you can decorate your corset in any way you like. I added some feather boa at the bottom, and found two "buckles" to attach to the ribbons as garter clasps. Hand died lace and gimp braid added the finishing touches.

Monday, February 14, 2011

The Love Bug

Lovebug


MATERIALS:
Small amounts of 8 ply yarn in pink and red
4 mm Crochet Hook (US G/6)
2 Safety eyes or buttons for eyes
Small amount of red felt
1 red pipe cleaner
Nylon stocking
Polyfill stuffing
PVC Pellets or other plastic beads
Craft Glue
Black thread (either regular or preferably, embroidery)

Tools:
Sewing needle

Happy Valentines Day!

This was not at all the project I had planned for today, but the crochet bug has well and truly bitten me, and this love bug was too adorable I couldn't resist.

The original pattern can be found here, and downloaded in PDF format if you prefer.

GAUGE AND FINISHED SIZE: Gauge is not important. Just make sure you make it tight enough so the stuffing doesn’t poke or show through. The Love Bug is about 4 inches tall when complete, not including his love-antennae.


ABBREVIATIONS:
“in loop” = in the adjustable ring
sc = single crochet
dc = double crochet
sl st = slip stitch
st or sts = stitche(s)
sc2tog (sc decrease)= Insert hook into st and draw up a loop. Insert hook into next st and draw up a loop. Yarn over, draw through all 3 loops on hook.
Invdec (invisible decrease) = Like a regular decrease (sc2tog), but work through the front loops only: Insert hook into front loop only of next stitch and draw up a loop. Insert hook into front loop only of next stitch and draw up a loop. Yarn over and pull through all 3 loops on hook. Makes your decreases prettier.

All rounds are worked continuously in a spiral; do not join or turn at the end of rows.


HEAD:

First, cut 2 small hearts out of the red felt. Poke a little hole in the center to push the safety eye through when ready to attach.

Start with an adjustable loop
Round 1: 6 sc in loop
Round 2: 2 sc in each sc around - 12 scs
Round 3: *2 sc in next sc, 1 sc in next sc; repeat from * around - 18 scs
Round 4: *2 sc in next sc, 1 sc in each of the next 2 sc; repeat from * around - 24 scs
Round 5: *2 sc in next sc, 1 sc in each of the next 3 sc; repeat from * around - 30 scs
Round 6: Work 4 rows even (Sc in each sc around)
Round 7: *Invdec or sc2tog, sc in next 3 sc; rep from * around - 24 sc.
Round 8: * Invdec or sc2tog, sc in next 2 sc; rep from * around - 18 sc.
At this point, attach safety eyes to head through center of each felt heart. Embroider eyelashes on. Stuff head with polyfill stuffing.
Round 9: * Invdec or sc2tog, sc in next sc; rep from * around - 12 sc.
Round 10: (Invdec or sc2tog) around - 6 sc.
Fasten off, leaving a long tail. Using a needle, weave the tail through front loops of the last round and pull tightly. Knot to secure. Weave in ends.


BODY:

With Pink, make an adjustable loop
Round 1: 6 sc in loop
Round 2: 2 sc in each sc around - 12 scs
Round 3: *2 sc in next sc, 1 sc in next sc; repeat from * around - 18 scs
Round 4: *2 sc in next sc, 1 sc in each of the next 2 sc; repeat from * around - 24 scs
Round 5: Work 2 rows even (sc in each sc around)
Round 6: Change to Red, * Invdec or sc2tog, sc in next 2 sc; rep from * around - 18 sc.
Round 7: Work 1 row even (sc in each sc around)
Round 8: Change to Pink, work 1 row even (sc in each sc around)
Round 9: Change to Red, work 1 row even (sc in each sc around)
Round 10: Work this row even (sc in each sc around)
Round 11: Change back to Pink, work 2 Invdec or sc2tog over next 4 sc, sc in each of the next 10 sc, work 2 Invdec or sc2tog over next 4 sc – 14 sc
Round 12: Work this row even (sc in each sc around)
Round 13: Invdec or sc2tog, sc in each of the next 8 sc, invdec or sc2tog – 12 sc
Round 14: Work this row even (sc in each sc around)
Fasten off, leaving a yarn-tail long enough to sew body to head.

To stuff the body: Push the nylon stocking into the body so that the opening is matched up with the opening of the body. Fill with the pvc pellets or plastic beads to about halfway up the body. This gives it a bit of weight at the bottom so it doesn’t keep falling over due to his big head. Knot the nylon and cut off any excess. Stuff the rest of the body with polyfill stuffing.

HEART SHAPED WINGS:
(Make 2)

With Red, make adjustable loop
Round 1: 6 sc in loop, sl st to join

Round 1: Ch 4 (counts as 1dc), 3 dc in sl st, dc in next sc, 4 dc in next sc, sc in next sc, 4 dc in next sc, dc in next sc, 2 dc in the sl st that joined, sl st in 4th ch of ch 4, ch 1.

Round 2: sc in 4th ch of ch-4, sc in each of next 4 dc, 2 sc in next dc, 3 sc in next dc, 2 sc in next dc, sc in next dc, sl st in next sc, sc in next dc, 2 sc in next dc, 3 sc in next dc, 2 sc in next dc, sc in each of next 3 dc, 2 sc in sl st, join.

Fasten off leaving a yarn-tail long enough to sew wings to body.


ASSEMBLING:
Sew head to body. Sew wings to body.
Cut the pipe cleaner in 2 pieces and shape a heart on one end. Cut other end to desired length and poke into his little head. Add some dabs of glue to hold them in place.

Sunday, February 13, 2011

Hugs Given Here

Hugs Given Here


Technique: Plastic Canvas

Materials:
8-12 ply wool in various colours
curly hair
gold chenille stick
hot glue

Tools:
scissors
hot glue gun

A favourite of my son's who absolutely adores his hugs! He says I should hang it above my chair.

The original pattern was designed by Susan Leinberger, and can be downloaded from www.freepatterns.com. Membership is required, but it is free, and it's a great resource! Once a member you can download the entire PDF directly from this link.

If you are like me, and prefer to adapt as you go, then the following pattern will be enough of a guide for you. For my version I substituted one of the shades of red for pink, I changed the bow to a halo and I didn't add the eyes because I liked the way it looked with just the lashes.


Saturday, February 12, 2011

Recycled Valentines Ornament

Recycled Valentines Ornament


Technique: Recycled Craft

Materials:
tin can
old valentines card
roses and ribbon
eyelets
Dremel Tool (or nail and hammer)

Tools:
scissors
hole punch and eyelet setter
safety can opener

What a lovely and eco-friendly ornament!

Take the top off a large tin can, I used an 800g tin of peaches. It is important to use a safety opener so that the lid has no sharp edges. Use this to draw a circle on the valentines card and cut it to fit.

Put a hole in the top of the lid for the hanger, and two holes in the bottom. Use what you have, I used a Dremel tool, but you could punch a hole through using a hammer and nail. Put matching holes in the card using the hole punch and place eyelets.

Decorate with ribbon, silk roses or any embellishments that you feel match the card.