Monday, October 10, 2011

Townscape Tea Lights

Townscape Tealights


Technique:  Papercraft

Materials:
grungepaper
musical tissue tape
Barn Door Distress Ink
Townscape On The Edge die
Craft Snow
cardboard tube (ie toilet roll tube)
glitter
adhesive

I saw this idea on Tim Holtz' blog, and this is my spin on his idea.

Cut a piece of grungepaper to the same size as the townscape die and cover it with strips of tissue tape.  Run it through the die cutting machine.  You can see in the photo I have made two different heights, which is simply a matter of trimming the bottom border of the die cut at varying widths.

Cut a piece of cardboard tubing to the same width as the bottom border of the townscape die you just cut and attach with tacky glue or strong double sided tape.  In the one Tim Holtz showed he attached his die directly to the tea light candle, but I wanted a sleeve that I could change according to the season, which is why I attached it to a piece of tubing.

Add a touch of colour using Barn Door distress ink and heat set before applying craft snow to the roof tops and base of the buildings.  You can't see it in the photo, but the snow has a layer of vintage glitter glass added also.

Always, ALWAYS, make sure you use battery operated tea lights, a real tea light would be very dangerous with a paper wrapper so close to the flame.  I think these would look lovely lined up along a mantle piece in different colours and heights.

Sunday, October 9, 2011

October Angels

October Angel


Technique: Crochet

Hi and welcome, I am so glad you found me!

Every week I crochet an angel and send it off to someone who is need of hope through an organization called Angels for Hope. This is fantastic way to let people know that no matter what they are dealing with, that they are not alone. Each week I blog about it in the hopes that someone who wanders this way will read it and spread the word.

October brings with it clear blue skies and rather than the dark, heavy clouds of winter that promise rain, it brings white fluffy clouds that lazily float across the vast expanse of blue.  This was the inspiration for my angels this month.

If you like to crochet and would like to register for Angels for Hope you can do so here. Also, if you know someone who is need of an Angel, you can put in your request there.

Saturday, October 8, 2011

Musical Bauble

Musical Ornament


Technique:  Papercraft

Materials:
sheet music
glass ornament
scissors or paper trimmer

A classical and elegant ornament that is super duper easy to make.  Simply cut music sheets into half inch strips and curl slightly with your finger.  Don't use scissors or anything or it will curl too much, you just want a slight curve so it hugs the curve of the glass.  Insert each strip into the ornament and jiggle it about a bit until there are no more gaps in the glass.  That's all there is too it :o)


Thursday, October 6, 2011

Six Inch Crochet Blanket Sampler - Popcorn Flower

Popcorn Flower


Technique: Crochet

Materials:
8 ply yarn in 3 colours

Tools:
4mm crochet hook

Finished Size:
6 inches

This is another of the blocks from Jan Eaton's book, I'm on a hectic schedule this week so I was thrilled when this block came together correctly the first time, no adjustments necessary!

Wednesday, October 5, 2011

Shabby Chic Teddy Bea Dressing Table Box

Shabby Bea


Technique:  Papercraft

Images:
TeddyBea_90 "Dressing Up" from Teddy Bo

Papers:
Kraft card
Flower Blooms by Pink Paislee

Pens, Pencils, Inks:
Prismacolor pencils

Other:
Matchbox die cutter
white gesso
Tim Holtz Hitch Fasteners
flowers by Kaisercraft
pink chalk
Rock Candy Stickles

The Teddy Bo Top Tip and "homework" assignment at Teddy Bo this week is to make a Shabby Chic creation.  Shabby Chic certainly isn't my natural style so it was a learning experience for me.  I have to say I think I was helped tremendously by the choice of designer paper, which to me sums up Shabby Chic.  Soft colours, vintage roses, cracked paint, I kind of feel like I cheated a bit and let the paper do all the heavy lifting!

I chose the image of Teddy Bea dressing up as I felt it suited the soft, vintage style that is encapsulated by Shabby Chic and coloured her with Prismacolors.  As this style first originated with renovating old furniture, I wanted to make a "piece of furniture" rather than a card, and made a dressing table box (my daughters are often remarking they have no storage for their trinkets and tid bits).

Shabby Bea


The base and lid of the box are made from thick chip board, covered with kraft card.  The match boxes are cut from kraft and lined with the designer paper.  Our Teddy Bo teacher used white spray paint to shabby her paper with, but I chose white gesso and swiped everything in my path with gesso to give a weathered look, and when dry sanded back to distress.

I stamped a Kaisercraft sentiment "Treasure these moments" on the base and sanded it back to age and distress it.  The catcher for the top portion of the card is a strip of lace hand dyed olive green.

Shabby Bea


I'm still quite nervous about lots of layers, and my natural tendency is the "less is more" philosphy so I added as much embellishment to the top as I was comfortable with!  The prima flowers I used have a lovely vintage feel, Bea's boa has sparkly fluff to simulate feathers, and her shoes have silver gel pen.  The little drawers have hitch fasteners by Tim Holtz, which add a nice vintage feel.

If you haven't participated in the Teddy Bo Top Tip Tuesday, it's a lot of fun and if you use a Teddy Bo image they will kindly send you a free graphic as a thank you for joining.  

I am also entering this at:

Simon Says Stamp Challenge:  Sparkle and Bling

Tuesday, October 4, 2011

Merry Christmouse Gift Card

Christmouse Tag


Technique: Paper Tole

Images:
Merry Christmouse Card Kit

Other:
foam adhesive dots

I stumbled across Aimee Asher's site a few days ago while researching my October DT assignment for Christmas Crafting, and fell in love with her cute little Card Buddy's, a series of digital paper tole cards that can be printed and put together very quickly. 

These are meant to be printed on a full size sheet of paper, but the first one I printed accidentally came out half size, so I rolled with it and made this wee little gift tag.

He took no time at all to cut out and the foam dots made quick work of assembling it together. I don't know that I am quite crazy enough to do one for every gift I will give this year though!  I

f you enjoy this style of card making, her site is well worth the visit.  There are dozens of drop dead cute kits to choose from and each kit comes with 6 - 8 printable sheets, including a card liner and a co-ordinating envelope.  At almost half the price of one digi stamp, that is excellent value.

Monday, October 3, 2011

Santa's Other Matchbox Suit!

Santa's Other Suit


Technique:  Papercrafting

Papers:
Crimson Weave by American Crafts
black card
white card

Other:
scrap of black ribbon
silver buckle
sparkly fluff
double sided adhesive
matchbox or matchbox die

Do you ever make something and then a day or two later you see it as a theme on a challenge blog and go Doh!? I just made that! On the 29th I posted my Santa's Matchbox Suit:-


Santa's Suit Matchbox


and the very next day the Christmas Stamping challenge blog listed it's challenge which was to make a holiday card or package with no stamps at all! Well I can't back link and I didn't think I could explain it away with some fuzzy date/time line logic, so the only option left was to make another one, a different one, a better one!

So here is Santa's Second suit, actually looking at the two together the one with rhinestones looks like it belongs to Mrs Claus, doesn't it?

For this entry I have used a strip of white card that has sparkly fluff applied to represent the middle cuff on Santa's coat. I've used the same buckle but a different style of ribbon for the belt.


Matchbox Suits


Just so there is no confusion, the one on the left is the one made specifically for this challenge, the one on the right is the one I made the day before the challenge was listed and is not being entered - I just thought it would be cute to have a side by side shot to compare the two. 

Also going to pop a link over at Make it Monday #57.  If you haven't checked their blog out yet it's pretty fabulous.  It's always anything goes, and rather than a traditional challenge it's a link party where you are encouraged to visit and comment on other blogs.  Being anything goes, there are a vast and wonderful array of all types of projects each week.  AND the winner last week was Avril who left a comment on my entry!  Thank you Avril and congratulations :o)

Sunday, October 2, 2011

October Angels

October Angel


Technique: Crochet

Hi and welcome, I am so glad you found me!

Every week I crochet an angel and send it off to someone who is need of hope through an organization called Angels for Hope. This is fantastic way to let people know that no matter what they are dealing with, that they are not alone. Each week I blog about it in the hopes that someone who wanders this way will read it and spread the word.

October brings with it clear blue skies and rather than the dark, heavy clouds of winter that promise rain, it brings white fluffy clouds that lazily float across the vast expanse of blue.  This was the inspiration for my angels this month.

If you like to crochet and would like to register for Angels for Hope you can do so here. Also, if you know someone who is need of an Angel, you can put in your request there.

Saturday, October 1, 2011

Christmas Crafting Holiday Planner

Christmas Organizer


Papers:
Winter Wings by Webster's Pages

Inks:
Bundled Sage distress ink

Other:
Tags and Name Plates die by Tim Holtz
Nestabilities circles die
Jo Sonja Acrylic Paints: Celadon, Rose Pink, Titanium White
brads

It's time for the fourth challenge at Christmas Crafting, the theme of "Little Robin Red Breast" was chosen by Debbie on the DT, and she totally rocked this one, her card is just amazing!

It's less than 85 days to Christmas and it's never too early to start planning for the holidays!  I found this fantastic little organizer and several tutorials at the Christmas Planner website.  Over at the Organized Christmas website are Christmas planner pages, and pocket planner forms that you can print out, I have used the Christmas Cards list and the Gift List in my project.


Christmas Organizer

I used Webster's Pages paper for my project, I love the vintage/kitch/shabby chic fusion, and the Winter Wings paper fit in perfectly with the theme of "Little Robin Red Breast".  The name plate on the front and on the receipts folder is from the Tags and Nameplate die.  I have painted them in a dusty pink and a celadon green, and then dry brushed over the top with white for a frosty look.


The receipts pocket is a sheet of brown card card adhered to a kraft paper bag, with a  circle cut out at the top.  I have deliberately used paperclips throughout, so that year after year the lists can be reprinted and the organizer can be re-used.  I used to work in retail so I am pretty fussy about keeping hold of receipts for returns and warranties so having a special spot for those was an important feature for me.  The great thing about this organizer is you can customize it, putting in what is important for you.


Christmas Organizer

I hope this project has inspired you to create your own Christmas Planner! Be sure to visit the other DTs blogs and check out their fabulous creations this month.

If you would like to play along, but have dug through your stash and haven't found any robins:

here is an adorable digi stamp of a robin in a Santa hat by Just Some Lines, and
here is a cute little digi of a robin singing by Broken Box Stock,

or if you prefer vintage style

here is a gorgeous winter red robin vintage postcard
here are three vintage christmas images of robins

all are free to download, so I do hope you play along with us!

Thursday, September 29, 2011

Six Inch Crochet Blanket Sampler - Dahlia

Dahlia


Technique: Crochet

Materials:
8 ply yarn in 3 colours

Tools:
4mm crochet hook

Finished Size:
6 inches

This is another of the blocks from Jan Eaton's book, I quite like this one, was quick and easy to put together.  

It's funny when I started the year blogging I did so with a new years resolution to daily creativity and I used the blog simply as a record of that.  I had no followers, I just used the blog as a daily journal.  Now that I have followers I feel a little embarrased some days, most of you probably don't care in the least that I made a crochet block for a blankie!  

Wednesday, September 28, 2011

Santa's Matchbox Suit

Santa's Suit Matchbox


Technique:  Papercrafting

Papers:
Crimson Weave by American Crafts
black card

Other:
scrap of black ribbon
silver buckle
rhinestone brads
double sided adhesive
matchbox or matchbox die

A cute little treat box that can be whipped up in no time at all.  I recently purchased the Quickutz Matchbox Die because I was using so many matchboxes that I felt it was actually more environmentally friendly to cut my own out of card scraps and recycled boxes, than the buy the matchboxes when I don't really need the matches just the boxes.

So my box above was cut from red and black card using the die, but you could just as easily cover a matchbox with coloured card.  The buckle is the type used on wedding favours threaded through a little scrap of ribbon, and a few rhinestone brads popped in for buttons.  You could whip up a dozen or more in an hour I reckon.

Do you ever have too many ideas going around in your head?  So much so that you actually end up spending all your time thinking and none of your time creating?  I am hoping that this clean, quick little project is like a mini detox for my brain LOL

Tuesday, September 27, 2011

Teddy Boo! Halloween Card

Teddy Boo


Technique:  Papercraft

Stamps:
Teddy Boo stamp from Teddy Bo

Papers:
Spook kit by Karla Dudley (available at Design House Digital)
black card
kraft card

Pens, Pencils, Inks etc:
Prismacolour pencils
Black Soot Distress Ink

Other:
corner scroll punch by Fiskars
Halloween die by Sizzix
adhesives
Odorless Mineral Spirits

This is my second attempt at colouring with Primsacolor pencils, I wanted to play with colouring on Kraft card.  A lot of the tutorials I read said that you didn't need to use OMS when working on Kraft, but I chose too use it on my base layer, and then bring in a layer over the top.  I was pretty happy with the way the white looked, and happy enough overall with the Prismacolors to get some more tomorrow :o)

Teddy Boo


One of the issues that had been frustrating me was smearing.  My digis are printed on a laser printer, and the OMS was causing the black print to smear when you rubbed the paper stump over the black lines.  I bought a spray fixative, which worked perfectly on the kraft card so here's hoping it works on plain white card!


Teddy Boo
I'm not scared, I'm not scared, I'm not scared
ok... maybe just a little...

The sketch is from Willow Sketchie Challenge, who are offering a fabulous prize for entering!


Entering this card into the following challenges:

Willow Sketchie Challenge Blog:  Sketch
Teddy Bo:  Things with Wings (bats)
Creative Card Crew:  Easel Card 
Cupcake Craft Challenge: Main image to be a teddy bear 
The Kraft Journal:  Ghosts, Goblins or Witches 
Mygrafico Challenge Blog:  Halloween

Monday, September 26, 2011

Vintage St Nick Ornament

Vintage St Nick


Technique:  Stamping

Stamps:
Bo Bunny St Nick Santa Dear

Pens, Inks etc
Vintage Photo Distress Ink
Versacolor Black Ink
Versacolor Metallic Gold Ink

Papers:
Kaisercraft Timeless Sheet Music paper
sheet music from a hymn book
corrugated card

Other stuff:
Scor-pal
adhesives
glitter
Spellbinders Circle Nestabilities

I adore this Bo Bunny stamp, it's an old release (2009) and I found it by rummaging through a neglected box of stamps at a local scrap book store.  I've stamped St Nick using black ink directly onto a hymn sheet and used black embossing ink to bring him to life.  I finally managed to find someone in Australia who had the circle nestabilities dies (yay!) and have used these to create the the circles for both Santa, the corrugated card and the backing circle.

The rosette is made from two 1.5" strips cut from the Kaisercraft Timeless Sheet Music paper, scored at half inch increments and then joined together.  The edges of just about everything have been inked with Vintage Photo distress ink.  The corrugated card is inked with just a smidge of gold ink and then has a rim of gold glitter applied.  Finally a small piece of gold cord is adhered to the back so it can be hung on the tree.

Linkies:
Make it Monday:  Always Anything Goes

Sunday, September 25, 2011

September Angels

September Angel


Technique: Crochet

Hi and welcome, I am so glad you found me!

Every week I crochet an angel and send it off to someone who is need of hope through an organization called Angels for Hope. This is fantastic way to let people know that no matter what they are dealing with, that they are not alone. Each week I blog about it in the hopes that someone who wanders this way will read it and spread the word.

To celebrate the start of Spring all of my September angels are made with  a soft baby weight yarn with beautiful pastel colours. I can't believe this is the last one for the month already!

If you like to crochet and would like to register for Angels for Hope you can do so here. Also, if you know someone who is need of an Angel, you can put in your request there.

Saturday, September 24, 2011

Christmas Across The Miles

Teddy Bo Postcard


Technique:  Papercrafting

Stamps:
Teddy Bo 128
Postcards from the Mini Holidays set by Tim Holtz

Pens, Inks & Colours:
Prismacolor pencils
Aged Mahogany Distress Ink
Vintage Photo Distress Ink

Papers:
Kaisercraft Dec 25th Collection (Wish)
Graphic 45 Christmas Emporium Collection (Believe)

Other:
adhesive
odorless solvent
paper blending stubs

The challenge at Winter Wonderland this week is to create a card to send to loved ones who live abroad, and further....  "Please be sure to show on your card with your sentiment that this card is going across the miles."

I chose an image from Teddy Bo that features little Bo holding a letter, and I added the sentiment in Gimp (the font is called A Little Pot).

Teddy Bo is coloured with Prismacolor pencils, and this is my very first attempt at trying to colour with these pencils and odorless solvent.  The Teddy Bo blog has a tutorial each week, and if you follow the tutorial and enter using a Teddy Bo image they send you another one free, so he's being popped over there, and a thankyou to Nicole Tietje for writing the tutorial on using Prismacolors.  I need a *lot* more practise but the variation and tone in colour I could get even with no skill was fantastic.


Teddy Bo Postcard


The card is made from a sheet called Wish from the Kaisercraft Dec 25th Collection.  This is the first time I have made a card without using a co-ordinating plain card to make mats, I have just used the front and back as the exterior and interior, this was partially as experimentation and partially to keep the weight of the card down for postage.  The postcard on the front is from Graphic 45, and the postcard inside was made from plain white card, stamped with a Tim Holtz postcard stamp and aged with Vintage Photo distress ink.


Teddy Bo Postcard


A simple card, no bling or frou frou, I have several cards that need to go overseas and I wasn't sure whether this was going to be sent to a male or female so I wanted something with generic appeal, and I wanted something that would post well and not get damaged in transit with little fragile bits.

Thursday, September 22, 2011

Six Inch Crochet Blanket Sampler - Daisy Chain

Daisy Chain


Technique: Crochet

Materials:
8 ply yarn in 3 colours

Tools:
4mm crochet hook

Finished Size:
6 inches

This is another of the blocks from Jan Eaton's book, and this one was perfect, no adjustment necessary, the right size and right number of stitches first time!  I have over 20 squares now and have started blocking them, I'd like to get the blanket completed before the end of the year.

Chester's Music Box

Chester's Music Box


Technique:  Papercraft

Stamps:
Retro Chester by Pollycraft

Pens & Inks:
Copic Pens
Earth Tone: E31, E33, E35
Flesh: E000, E02
Orange: YR02, YR04
Grey: C0, C3, C5, C7, C9
Mustard: Y23, Y26, Y28
Sakura Gelly Roll pen in silver
Spiced Marmalade Distress Ink

Papers:
Xtron by Kaisercraft

The second challenge at LESS-ology is to make a trinket box, and of course you must upcycle at least one item.  So many choices! I chose a box of tea.


Chester's Music Box


The first thing I did was to re-inforce all the edges with tape, the type that picture framers use.  This also hides all the multi-coloured corners.


Chester's Music Box


Then each panel of the box was covered with paper, the edges inked with a little Spiced Marmalade Distress Ink.


Chester's Music Box


Chester has been coloured with Copic pens. I had a little mishap that turned out quite fortuitously.  When I uncapped one of my markers three blobs of ink flew onto the paper, so I had to cut away the background.  This turned out quite well though I thought.


Chester's Music Box

This box is now proudly being displayed in my son's room who is using it to store his Nintendo DS games.

Tuesday, September 20, 2011

Paperclay Gingerbread Ornament

Gingerbread Heart Ornament


Technique:  Stamping

Materials:
air drying paperclay
Gingerbread House Heart by High Hopes rubber stamp
acrylic paints
drying retarder (or stain of your choice)
ribbon, felt & adhesive

This was a very simple ornament to make.  I often prefer working with paperclay because you can use it instantly, it doesn't require conditioning like polymer clay, and there's no baking, no need for separate equipment, no toxicity etc.

Tthought I should add a little more info on the paperclay as a few have never worked with it before.  I use a brand called Darwi, mostly because that is what is available here, but there is also Creative Paperclay and I think even companies like Crayola make a version branded for children.

Paperclay doesn't require any firing, depending on the thickness it will air dry in around 24 hours.  As soon as you open the packet put it in a zip loc bag and only take out as much as you will need.  I find it easier to work with if I wet my hands first, and you will notice that you get a fine, silky "slip" on your hands the same way as you would with real clay.  It needs minimal kneading to get it to soften, and any tears or splits while you are working with it can be quickly and easily repaired with a damp brush.

To make this ornament, roll out a piece of paperclay on a baking sheet or non stick craft mat  with a rolling pin.  Use a firm pressure to stamp your image directly onto the clay.  I used a mounted red rubber stamp  from High Hopes and got a nice, deep, clean impression.  I haven't tried acrylic stamps, so I can't vouch for the success of those, they don't tend to be as deep so it may now give as good as an impression.

With a sharp knife or scalpel cut around the outside of the stamped image, depending on the stamp you used you could use a cookie cutter for this step.  Set aside to dry over night.

Once thoroughly dry the paperclay can be painted.  I gave mine a base coat of a brown biscuit colour and then when that was dry, I mixed a little burnt umber paint with some drying retarder so that I could use it as a stain (which is primarily what ready bought stains are, a colour medium with a drying retarder so you have time to work with it).  Using a soft cloth I rubbed it over the entire 'cookie' making sure it sat heavily in the stamped image to create a contrast.

Once dry I finished with a few coats of spray varnish, adding a ribbon at the back to hang it on the tree and covering the back with brown felt for neatness.

Challenges:

Make It Monday #55:  Anything Goes
Simon Says Stamp:  Sing It (I'll Be Home for Christmas)
High Hopes Stamps:  Home For The Holidays

For more information on paperclay and other air drying clay, The New Clay News is an excellent place to start.

Monday, September 19, 2011

Wassail Package

Wassail Package


Technique:  Papercraft

Stamps:
Chef Tilda
snowflake stamp

Pens & Inks:
Copic Markers
Dusty Pink: R81, R83, R85
Earth Tones: E11, E13, E15, E17, E19, E21, E23, E25, E29
Flesh: E0000, E000, E02
Sakura Gellyroll Pen in white
Versacolor in white

Papers:
brown craft paper
spotty patterned paper is a free download from here

Other:
Threading Water punch by Fiskars
string

Wassailing is the pre-cursor to the Christmas tradition of caroling, wassailing refers to a traditional ceremony that involves singing and drinking the health of trees in the hopes that they might better thrive.

Wassail the beverage is a hot, mulled punch often associated with Yuletide. Historically, the drink was a mulled cider made with sugar, cinnamon, ginger, and nutmeg and topped with slices of toast. Modern recipes begin with a base of wine, fruit juice, or mulled ale, sometimes with brandy or sherry added. Apples or oranges are often added to the mix. 

The tradition, as it was taught to me, included villagers going around from house to house with a wassail bowl (a toasting mug).  At each house their bowl would be filled with a warm alcoholic cider and they would give a loud WASSAIL! (the toast).  There are several versions of wassailing songs that were sung as the wassailers went from door to door, I imagine the more often their wassail bowl was emptied the rowdier they became!

Wassail (mulled wine) is something I make when we celebrate "Christmas in July" or the mid-winter solstice.  One of my friends has often asked me for the recipe, but I have always told it to her verbally, you know how it is "oh its just a bit of this and a bit of that", so this is my gift to her.  Cooking is one of her passions, and she spent a great deal of her childhood in Holland, so little Chef Tilda felt perfect for her.

Wassail Package


I am entering this into the Winter Wonderland challenge this week, which is Girly Christmas (must have an image of a girl).  I doubt it's fancy enough to win anything other than a big smile at Christmas, but that's worth more than anything :o)

Wassail Package


Morgan's Mulled Wine
10 cloves
2 cinnamon sticks
1/4 cup brown sugar
1 roughly grated nutmeg
1 orange, skin intact, sliced
1 bottle of Merlot
Place all the ingredients in a 
crockpot on low for an hour.

Sunday, September 18, 2011

September Angels

September Angel


Technique: Crochet

Every week I crochet an angel and send it off to someone who is need of hope through an organization called Angels for Hope. This is fantastic way to let people know that no matter what they are dealing with, that they are not alone. Each week I blog about it in the hopes that someone who wanders this way will read it and spread the word.

To celebrate the start of Spring all of my September angels are made with  a soft baby weight yarn with beautiful pastel colours.

If you like to crochet and would like to register for Angels for Hope you can do so here. Also, if you know someone who is need of an Angel, you can put in your request there.

Saturday, September 17, 2011

Christmas Tree Altered Book

Altered Book


Technique:  Papercraft

Pens & Inks:
Versacolor metallic gold ink

Papers:
Bo Bunny "Father Christmas Holly"
Paisley Park "Father Christmas Around The World"

Dies:
Tiny Tabs & Tags by Tim Holtz

Other:
hard cover book to be altered
gold mica spray (ie Glimmermist)
gold glitter
gold cord
gold brads
red and gold ribbon
hot glue gun

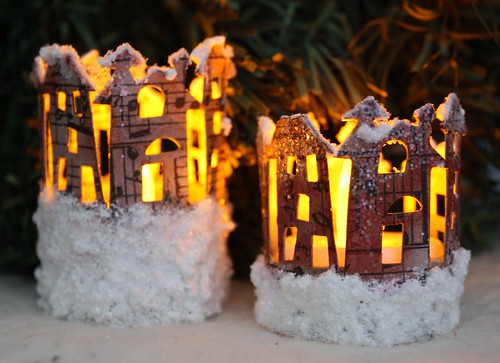
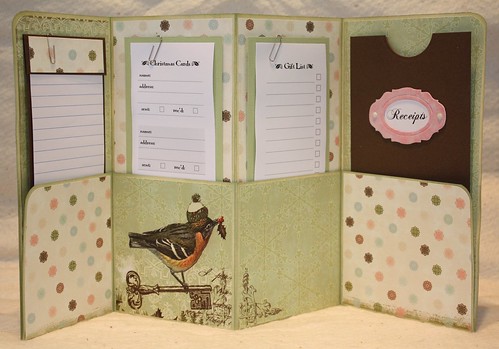
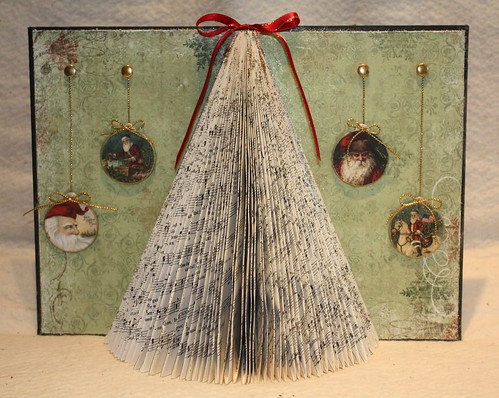
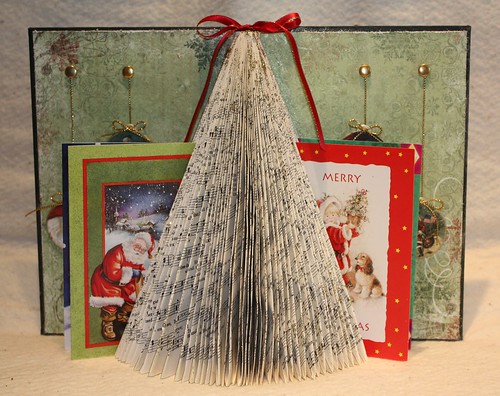
This is my first altered book, and whilst I don't consider it to be "arty" I was pleased with the result, and it suit's me as it's function is a practical one.  The tree in the centre is not just decorative, it's a Christmas card holder.

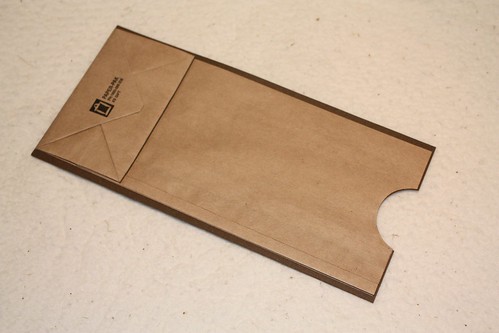
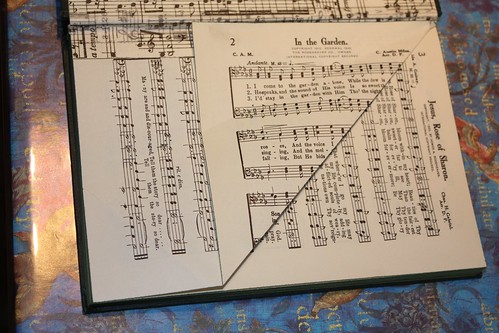
I started with a book called Quartets for Men, which is a book of gospel hymns.  I picked this up at the Salvation Army thrift shop for a song (I made a punny!).  I removed the first and last page because this was a thicker sheet and would have created issues when folded. 


treebook1


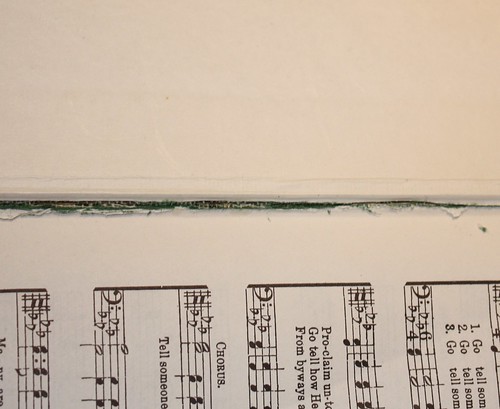
This left a small gap in some places between the meat of the book and the covers, which I sealed up with tissue tape.


Altered Book


Then the hours of folding started, well not really but it did take longer than I expected! 

To create the fold for the tree take the top right hand corner and fold it down to the spine.


Altered Book


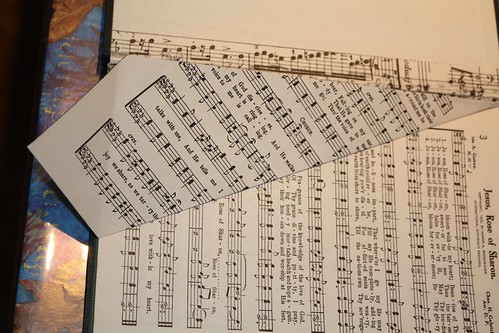
Take that folded edge and carry it in toward the spine once more.


Altered Book


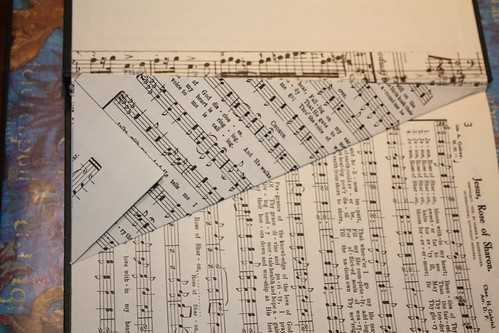
Tuck up the bottom flap.


Altered Book


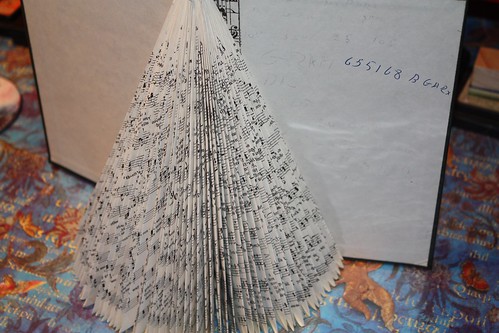
Repeat that for all the pages.  My book was some 200 pages or thereabouts, and I removed around 20 sheets to ease out some bulk.  This was necessary otherwise the bulk of the folded pages would force the covers to extend beyond the flat 180 degrees that I wanted. 


Altered Book


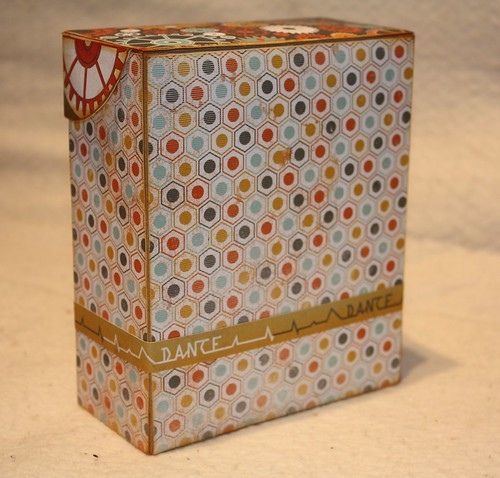
Once all the pages were folded I lined the inside of both covers with the Bo Bunny patterened papper and then misted the entire surface with a gold mica spray, if you do this less is more, you don't want the pages to wrinkle.

When dry I squeezed the pages of the book together and ran a glue stick along the folded edges, not too hard though, you don't want to force glue between the folds so that the pages stick together, and gave a dusting of gold glitter.

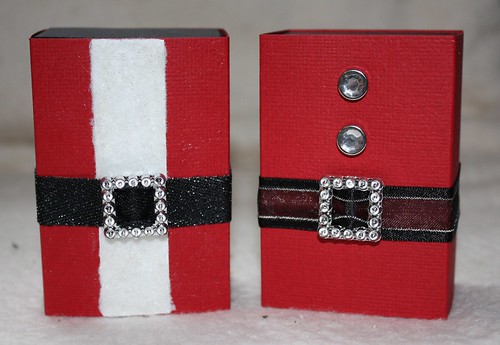
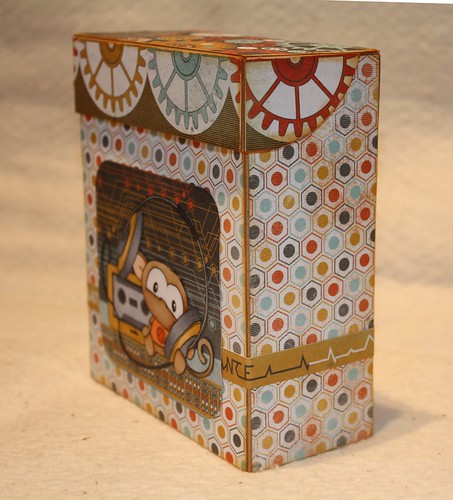
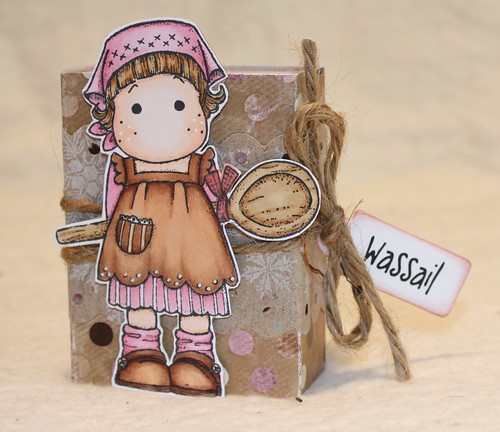
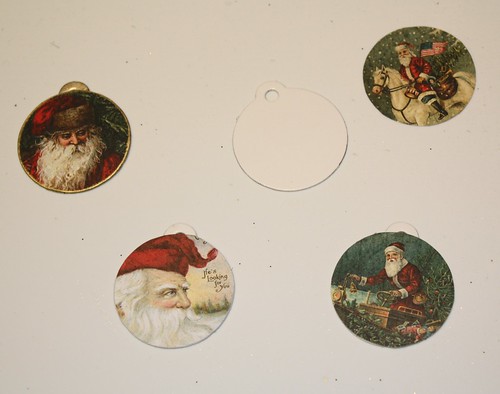
The four little ornaments are made using the Tiny Tags die, which just happens to be the same size as the circles on the Paisley Park paper.  Cut out four tags, and four images of Santa.  Glue the images to the tags and trim any overhang.  Ink around the tag using the Versa metallic gold ink.


Altered Book


The tags are "attached" with a gold brad - what I did there was remove the prongs from the brad and hot glued it into position, that way nothing was sticking through the other side.  The final touch was a red bow atop the tree.

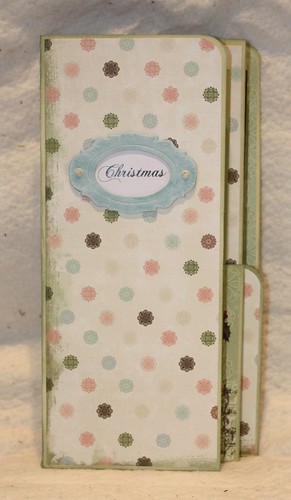
The cover of the book is a faux green leather, and the title of the book is imprinted with gold ink.  I decided not to cover it with paper and just give it a spritz of gold mica.

Here's the tree holding a few Christmas cards.  If you prefer it could be purely decorative and then you could adorn the tree with all manner of bling.


Altered Book


This is being entered into (and was inspired by) the first LESS-ology challenge which is to alter a book.  I am so excited about this challenge, as I love altering and upcycling and that is more within my comfort zone than card making.

Thursday, September 15, 2011

Six Inch Crochet Blanket Sampler - Diamond In A Square

Diamond In A Square


Technique: Crochet

Materials:
8 ply yarn in 3 colours

Tools:
4mm crochet hook

Finished Size:
6 inches

This is another of the blocks from Jan Eaton's book, and this one only took a minor adjustment to get it to a uniform 6" in size. In the original pattern the 6th row is single crochet, to get the block to the correct size I had to do mine as a row of double crochet.

Wednesday, September 14, 2011

Coffin Treat Box

Coffin Treat Box


Technique:  Papercraft

Materials:
card stock
adhesive
white pastel chalk

Tools:
scissors
scoring tool
halloween embossing folder
Sizzix Big Shot

This project comes from Martha Stewart, the links to download the templates and the tutorial video are below:

Coffin lid template
Coffin base template
Coffin treat box tutorial video

For my personal touch, once I had the coffin constructed I embossed a piece of black card using a Halloween Texture Fade, which I sanded lightly and then brushed over with a white pastel chalk.  I also sanded all of the edges of the box to distress and ran the chalk over them as well, I really like the old, dusty look this gives the black card.


Coffin Treat Box