Showing posts with label cats. Show all posts

Wednesday, August 10, 2011

Purrfectly Delightful Card

Purrfectly Delightful


Technique:  Papercraft

Materials:
cat with flower digi from Motivet
co-ordinating bazzil
Basic Grey DP
Copics
Fur: E31, E33, E35, E37
Green: YG61, Y63, YG67
Orange: YR02, YR04, YR07, C1
Distress Ink: Bundled Sage
button
warm and natural batting
adhesive

Tools:
Sizzix Big Shot
Tim Holtz Alerations: Tattered Florals die
Spellbinders leaves die
Spellbinders scalloped circles die

My husband's birthday is next week, and with a little help from the youngest, this is the card we made for him.  Our little one picked the image, he has such a fondness for cats.  Usually I would do a fairly smooth rendering of the fur when colouring, but I wanted to join in on the i-Copic challenge this week to colour fur, so I deliberately tried for a textured look.  I was quite pleased with the result and would probably do it again to simulate long fur.


Purrfectly Delightful


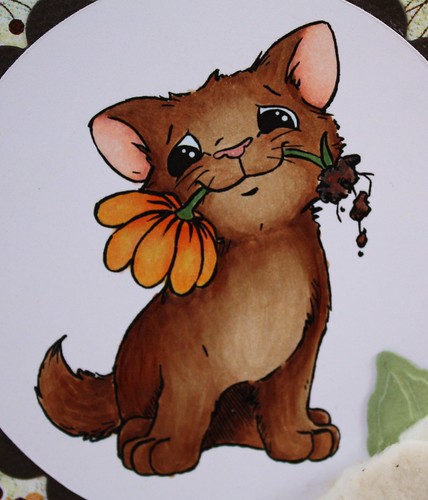
The designer paper is from the Mellow range by Basic Grey, and I chose this before colouring the flower the cat is holding, so that the image would co-ordinate with whatever paper I chose.  I wanted a card and a colour scheme that whilst cute was still decidedly masculine, as it was being given from son to father.

The flower is cut from warm and natural quilt batting, which I left completely untouched as it has a lovely, rustic fleck through it already, and has a vintage leather button in the centre.  The leaves are using a Spellbinder die which is inked with Bundled Sage distress ink along the edges. The scalloped circle is also a Spellbinder nestie.

The sentiment inside reads : "Have a PURR-fectly delightful day".

This card was smaller than I usually make, only 5", whereas most of the other cards I had made 6" square.  The DP was perfect for the image, but pretty busy, I felt it favoured a smaller card.  What is your favourite card size?  I am still experimenting to see which I like best, I think the larger cards favour larger and more flamboyant embellishments.

Challenges:  
i-Copic: Fur
Here Come the Boys: Critters

Monday, March 14, 2011

Angel Kitty

Angel Kitty

Technique: Sewing

Materials:
natural quilt batting
polyester filling
calico thread
7.5mm animal eyes

Tools:
sewing machine
stencil brush

Print and cut out the pattern below.

(pattern up shortly)

Fold the quilt batting right sides together and cut two kitties. The pattern does not include a seam allowance, so be sure to cut out about 1/4 - 1/2 an inch larger.

Take one piece and face it right side up. Insert the animal eyes according to the manufacturers instructions. Mine have a screw type post that you push through the fabric and then a stopper to secure on the other end.

With a needle and thread sew loops for whiskers, securing thread on the wrong side.

Place kitties right side together and sew around edge, leaving about an inch to turn and stuff.

Turn right side out fill with polyfill. Whipstitch the opening together.

With a stencil brush, brush a little highlights on the cheeks and ears. I used pastel chalks, you could use light pink paint and drybrush it on, you could even use cosmetic blush if that is all you have.

Glue a pom pom for the nose, and embellish. I used a gold chenille for the halo, put some adorable wings I found at the two dollar shop, and used a bead and ribbon around the neck.

Tuesday, March 1, 2011

Sardines Please

Sardines Please


Technique: General Crafting

Materials:
clean sardine can
cats with sardines print found here
cardstock
beading wire
embellishments
spray adhesive

Tools:
scissors
wire cutters
Dremel tool

When I saw this sardine can in the store I knew just what to do with it. First step, feed the sardines to the cats (blech). Next, clean the can scrupulously, several times to be sure, and let it air. If, when dry, it has the slightest whiff of anything fishy, soak it in a bleach solution and clean it again.

When dry, use it as a template to cut a piece from the cardstock and one from the print.

Using the spray adhesive, attach the print to the card and fanangle it into the can (by fanangle I mean bend it ever so slightly, only enough to ease it in, not enough to crease it.

Use the Dremel to drill to holes in the top of the can for the hanger. Push a BBQ skewer in through the holes and push the print to the front of the can. Mine was a nice snug fit, but if yours is relatively loose, run a rim of glue around the inside lip of the can and then push the print up against it so it stays put. Leave dry if necessary and make a hanger from the wire and push through the holes, securing with glue if needed.