Showing posts with label clothes pin doll. Show all posts

Thursday, January 4, 2018

Flower "Pin Up" Girl


Technique: crochet, general crafting

Materials:
clothespin
wooden bead for head
beading wire
flesh coloured embroider floss
white chenille stick
crochet thread size 10 in pink and white
acrylic paints
curly dolls hair


Tools:
scissors
hot glue
wire cutters
No 7 steel hook

Follow the directions here for how to create a clothespin doll.

For the dress you can download the pdf from here.

Wednesday, September 7, 2011

Angel "Pin Up" Doll

Angel "Pin Up" doll


Materials:
wooden clothes pin
large wooden bead for the head
acrylic paints for the skin and face
no. 10 crochet thread
steel size 7 crochet hook
flesh coloured embroidery floss
gold chenille stick
curly blonde dolls hair

The craft room is still in various stages of upheaval but I am starting to see the light at the end of the tunnel!

To make this cute little angel, follow the basic instructions in my tutorial on how to make a clothes pin doll to make the body, using the gold chenille stick for her sleeves.

The dress is a free pattern for a halloween angel, but instead of making it in black and orange I did it in white for a traditional angel.

For her hair I have glued a few curls of  dolls hair to the top of the bead, and her shoes are based in gold paint with a dusting of gold glitter over the top.

Monday, May 16, 2011

Candy Cane "Pin Up" Doll

Candy


Technique: crochet, general crafting

Materials:
clothespin
wooden bead for head
beading wire
flesh coloured embroider floss
white chenille stick
crochet thread size 10 in red and white
acrylic paints
knitting yarn for hair


Tools:
scissors
hot glue
wire cutters
No 7 steel hook

Follow the directions here for how to create a clothespin doll.

For the dress you can download the pdf from here.

Monday, April 18, 2011

Elf "Pin Up" Doll

Elf "Pin Up" Doll

Technique: Sewing, Painting, General Crafting

Materials
clothes pin
wooden bead for head
assorted felt
acrylic paints
tacky glue
yarn for hair
Dremel or small drill
flexible but firm wire
chenille sticks
flesh tone embroidery floss
jingle bell and holly embellishments

Tools:
scissors
sewing machine
wire cutter
pinkingshears
paintbrush

Follow this tutorial for a step by step guide on how to get the doll ready up to the dressing stage.

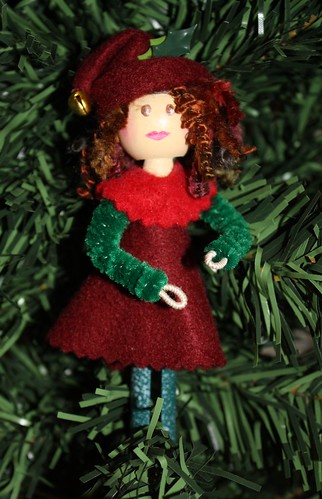
Using the templates below, cut one of each from felt.


Sew or glue the edges of the hat together, turn right side out and fold up the lower edge to form the brim. Sew or glue the edge of the dress and turn right side out. Glue into position right up in the 'underarm' section of the doll. Cut a small strip of contrasting felt, using pinkingshears to get the zig zag edge and glue into place around the neck of the doll, this is the collar of the dress.

Paint the details onto her face, glue yarn into place for her hair. With needle and thread attach a jingle bell to the end of her hat, and then attach the point of the hat to the brim to fold it over as shown in the photo. Tuck a few holly leaves into the brim.