Wednesday, August 31, 2011

Six Inch Crochet Blanket Sampler - Granny in Chains

Granny in Chains


Technique: Crochet

Materials:
8 ply yarn in 3 colours

Tools:
4mm crochet hook

Finished Size:
6 inches

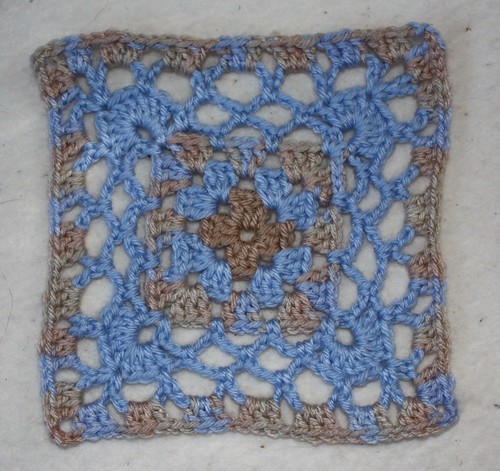
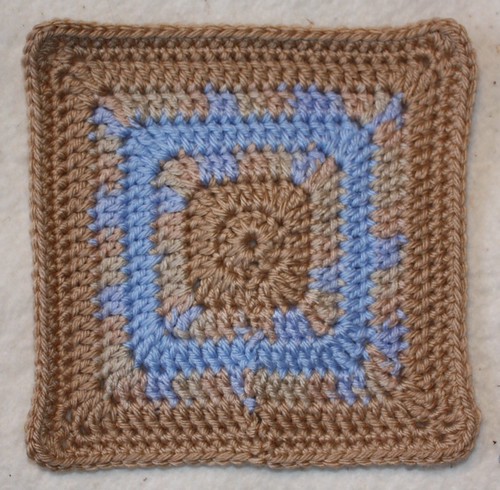
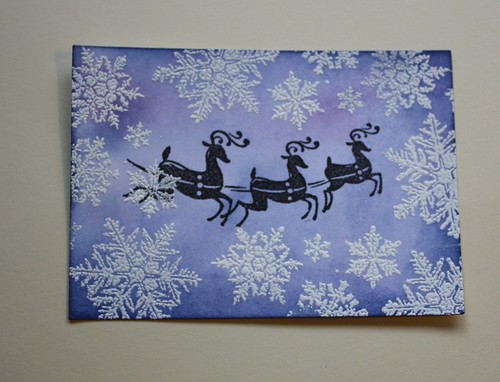
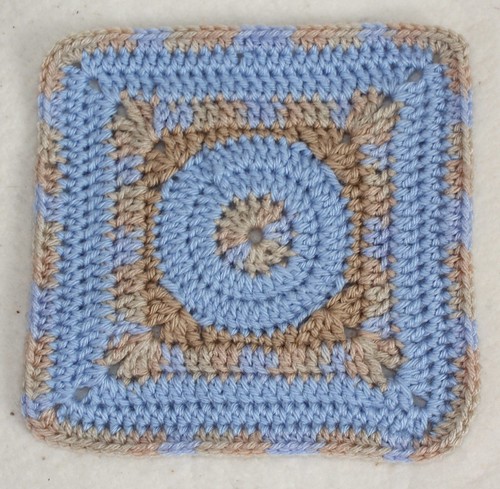
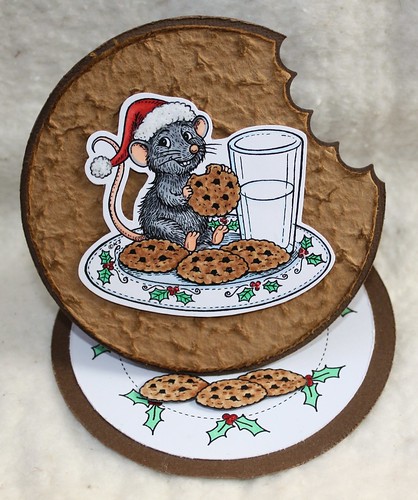
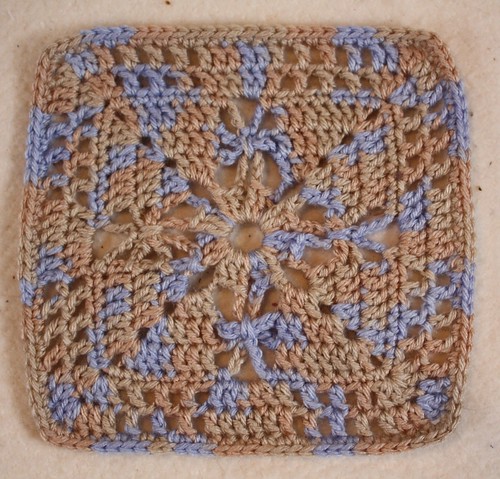
I've been working with Jan Eaton's patterns, which are all meant to be a uniform 6" in size and are not, which has (by necessity) taught me how to make little tweaks here and there to get right.  This led me to trying other patterns to see if I could adapt them.  The following was originally an 8" block that I have adapted to fit the 6" size I need for my sampler.  I chose the name Granny in Chains, because it is essentially a granny square in both the centre and the edges with two rounds of chain stitches in the middle.

Round 1:  With size G (4mm) hook, ch 4, 2 dc in rth ch from hook (first 3 chs count as first dc), ch 2, [3 dc in same ch, ch 2] 3 times, slip stitch into 3rd chain of beg ch-3.  Fasten off.

Round 2:  Join next colour in any ch sp, ch 3 (counts as first dc), (2 dc, ch 2, 3 dc) in same ch sp (corner), ch 1, [(3 dc, ch 2, 3 dc) in next ch sp (corner), ch 1] around, join in 3rd chain of beg ch-3.  Fasten off.

Round 3:  Join next colour in any ch-2 sp, ch 3 (counts as first dc), (2 dc, ch 2, 3dc) in same ch sp, ch 1, *3 dc in next ch sp, ch 1**, (3 dc, ch 2, 3 dc) in next ch sp, ch 1, rep from * around, ending last rep at **, join in 3rd ch of beg ch-3.  Fasten off.

Round 4:  Join next colour with sc in any corner ch sp, ch 5, sc in same ch sp, *[ch 5, sc in next ch sp] twice**, ch 5, (sc, ch 5, sc) in corner ch sp, rep from * around, ending last rep at **, ch 2, join with dc in beg sc forming last ch sp.

Round 5: Ch 1, sc in this ch sp, ch 1, *9 dc in corner ch sp, ch 1, sc in next ch sp**, [ch 5, sc in next ch sp] twice, ch 1, rep from * around, ending last rep at **, ch 5, sc in next ch sp, ch 2, join with dc in beg sc forming last ch sp.

Round 6:  Ch 1, sc in this ch sp, *ch 6, sk next ch sp and next st, sc in next st, ch 6, sk next 2 sts, (sc, ch 6, sc) in next st, ch 6, sk next 2 sts, sc in next st, ch 6, sk next st and next ch sp, sc in next ch sp, ch 6**, sc in next ch sp, rep from * around, ending last rep at **, join with sl st in beg sc.  Fasten off.

Round 7:  Join 3rd colour with sl st in any corner ch-5 sp, ch 3 (counts as first dc), (2 dc, ch 3, 3 dc) in same ch sp, * ch 1, [3 dc in next ch sp, ch 1] 5 times**, (3 dc, ch 3, 3 dc) in next corner ch sp, rep from * around, ending last rep at **, join in 3rd chain of beg ch-3.  Fasten off.

I think this makes around 20 blocks now, halfway to a blankie!

Tuesday, August 30, 2011

Wine Bottle Tag

Wine Bottle Tag


Technique:  Papercraft
Materials
designer paper
glitter
adhesive
ribbon

Tools:
Sizzix Big Shot
Tim Holtz Tiny Tags die
corner chomper
circle die or template

The theme this week at Winter Wonderland was to trim a tree.  It's taken me all week to get motivated for this one, I almost thought I was going to miss this week.  But that is what I love about challenges, and they wouldn't be a challenge if they didn't push me and force my mind in directions it wouldn't normally go.

Anyway, the designer paper is from Webster's Pages, which you can get digitally, but this one I bought from my local store.  The tag is a strip of paper 11" x 3.5", scored at 3.5" to create the top part of the tag.  The corners have been rounded and I used a circle template to make the hole for the hanger.

The baubles are both little round tags cut from the tiny tags die which have beengiven a liberal coating of  vintage style glitter, but any circle punch or die would work.  I've used some thin gold cord to create the hangers and tie tiny bows at the top of each ornament, and a strip of red ribbon with a bow across the top.  I wish I had been able to capture the glitter better on camera, the baubles sparkle like jewels, so pretty!

Monday, August 29, 2011

Witches Shoe Treat Holder

Witches Shoe


Materials:
shoe template from Skip To My Lou
FREE halloween digi paper from here
black card
adhesive

Tools:
scissors

This project has everything I love.  It's cheap as chips, no die cutting machine or dies necessary, just a printer, some card and a pair of scissors.  The template is free, as is the designer paper I used.  It's super simple to put together, making several would be fairly painless which makes them ideal party favors.

I printed the patterns onto the thickest card that my printer will take, and cut both out.  I then used this as a template to draw around to cut one shoe from black card and one shoe lining from the designer paper. Score on the lines indicated and glue to secure.  It really is as simple as that!  The longest part was creating the template, once that part is done I reckon you could whip up several of these in no time at all.

I've gone for a Halloween theme, but with some red glitter you would have a pair of shoes Dorothy would be envious of, or you could use white card for a bridal shower favor, or bling it up for a twenty first.  You could of course add a lot more embellishments than I have, a tag, some paper lace, rhinestones, buttons etc, but I love that these look great even with just a simple bow.


Witches Shoe
Mmmm candy corn!  so good, but hard to get here in Australia, and expensive!


Sunday, August 28, 2011

August Angels

August Angel


Technique: Crochet

Hello to my new followers, I'm so glad you joined me :o)

Every week I crochet an angel and send it off to someone who is need of hope through an organization called Angels for Hope. This is fantastic way to let people know that no matter what they are dealing with, that they are not alone. Each week I blog about it in the hopes that someone who wanders this way will read it and spread the word.

I was inspired by an unseasonal bout of warm weather to make all of my August angels out of a white yarn that has flecks of pastel colours running through it, with a copper halo to signify the unusual sunshine.  This is the last angel for August, new colours next month to celebrate the arrival of Spring.

If you like to crochet and would like to register for Angels for Hope you can do so here. Also, if you know someone who is need of an Angel, you can put in your request there.

Saturday, August 27, 2011

Vintage Valise Mini Album Pt 1

Valise Album


Technique:  Papercrafting

Materials:
thick cardboard
adhesive
designer paper
Tim Holtz Ideology large binder spine
tissue tape
Distress Inks (black & walnut)

Tools:
Sizzix Big Shot
Tim Holtz Vintage Valise die

I recently worked with a digital stamped called First Snow, and it got me thinking about the first time I saw snow.  It never snows where I live, we're close to sea level and too close to the coast line.  We will, on occasion, get a light snowfall in the Mt Lofty Ranges, a 90 minute drive from where I live, but the snow is so light and so briefly lived that it would be gone in the time it took to travel there!

The first time I saw snow was in Mt Hood, Oregon.  I visited there in October around a decade ago, and Mt Hood is high enough and cold enough that it has snow all year around, so my friends took me to see it.  I was so excited!  I remember being near the ski lodge and there was patches of snow around on the ground.  "SNOW" I squealed.  I was told that it was most certainly not snow, it was "snirt", what happens to snow when it melts and mixes with dirt.  They did take me further up the mountain to where the snow was still around knee deep.

Anyway, the memories got me digging through my photos, plane tickets, postcards and other junk, which led to wanting to take them out of the dingy box they have been sitting in and into an album or junque journal.

The cover is made from a sheet of thick cardboard, I used the backing board to a sketch pad cut down to 14" x 4.5".  It has then been scored at 4.5" and 6" to create a 1.5" width spine.  This is slightly larger than the valise die, and just big enough to fit a 5" x 6" glossy.  A decade ago digital photography was almost unheard of, so I have a handful of actual photo's I would like to preserve.

Valise Album


I used tissue tape on all the edges and to re-inforce where I scored the spine.  The interior of the binder has a world map glued into position, with another piece of tissue tape that has the dictionary definition of "journey" on it.

The exterior of the binder has the vintage valise pieces.  I had a piece of leathery looking paper in my stash that I used for the suitcase.  The bindings were made from some scraps of grungepaper, inked with black distress ink, and the whole binder has had liberal applications of walnut stain ink.

Valise Album


I was inspired to create this by the Simon Says Stamp and Show challenge theme this week which was travel.  I didn't get enough time to even start on the inside of the album pages, so I'm just entering the binder and I'll fill in the pages over the coming weeks.

Thursday, August 25, 2011

Six Inch Crochet Blanket Sampler - Solid Square

Solid Square


Technique: Crochet

Materials:
8 ply yarn in 3 colours

Tools:
4mm crochet hook

Finished Size:
6 inches

The original pattern comes from the book 200 Square Crochet Blocks by Jan Eaton. I have been regularly making one per week, with the goal that by the end of the year I will have enough to put together a blanket.  This block was a very simple construction, but like many of the patterns in the book (despite the claim that they are all six inches and totally interchangeable), it required an extra row to give it the correct number of stitches to make it a 6" square.

Wednesday, August 24, 2011

Christmas ATC Swap

Technique:  Papercraft

Materials:
Distress Inks:
* Stormy Sky
* Dusty Concord
*Chipped Sapphire
* Bundled Sage
Versacolour white ink
white embossing powder
Rock Candy Stickles
Sparkly Fluff
Glossy Accents

Tools:
heat gun
Spellbinders Leaves die

Arline at Christmas Crafting is hosting an ATC swap and as I have just been announced as one of the design team I wanted to participate. (What emotion is elation and terror mixed together?! LOL)

This is my first ATC, and as I started researching techniques and tutorials I realized that he only standard thing about an ATC is the size, everything else is totally up to the artist.  It can be flat, have dimensional elements, be painted, drawn, stamped, stitched, it really is a 3.5" x 2.5" anything goes.

I thought I would take you through the steps I took to create my ATC.

Smear some distress inks onto the work surface, here I have used Dusty Concord and Stormy Sky.  I know the craft sheets are very popular, but I actually like using my tile more.  It has weight so it doesn't shift about on the table, it doesn't stain and most importantly it doesn't absorb or 'store' colour.  Also, it cost me $1.00 at the local hardware store :o)

ATC


Spritz the inks with some water and then dip and swirl the ATC into the ink.  Turn right side over and allow to dry.


ATC


I used the snowflakes stamp from the Tim Holtz mini holidays stamp set to stamp a pattern around the edges of the card, which I embossed for a raised texture.


ATC


Ink the edges of the card with Chipped Sapphire.


ATC


Stamp the reindeer in the middle of the card.


ATC


The trees were quite fun to make, although rather labour intensive!  Using the leaf die from Spellbinders I cut out a pile of little frond shapes from plain white card.  To give them some colour I sponged them with Bundled Sage ink.


ATC


Each little frond then got it's own sprinkling of Sparkly Fluff to simulate snow.


ATC


The trees each took 8 fronds glued in a layer to complete.  Three across the bottom row, three on the next row, and then two more to form the peak. 


ATC

Once secure, they got a further dusting of sparkly fluff to fill in any gaps in the branches and some rock candy stickles for extra glisten, and a little bit of glitter in each of the corners.

These are on their way to the lovely Arline for the Christmas Crafting ATC Swap. Hop on over to the Christmas Crafting website if you would like to join in :o)


Tuesday, August 23, 2011

All Wrapped Up

Mummy Cork*it


I've spent two days struggling with my copics.  I usually buy my blending card from a local store, and it's sold unlabelled so I don't know what brand it is, but I like it.  When I visited a different store they sold the branded Xpress card so I bought some of that and I hate it!  I feel like it is less 'absorbant' than the other, so it doesn't take long for the ink to start pooling on top of the page, and then once that happens it starts streaking.  As I was working with brown all I achieved was various shades of mud, streaky horrible mud.  I should have been colouring pigs!  

So time to put the pens down for a bit.

This little guy is made from crochet, but he is dead easy (I made a punny!).  The body is done in crochet then slipped over a champagne cork, so he is only a wee little thing.  A cute little desk companion for halloween, or lovers of old spooky movies and all things generally macabre.

You will need 8ply wool in white and grey and a 3mm crochet hook.

To begin start with a magic circle in grey wool.

Round 1: 1 6 sc Round 2: 2 2 sc in ea sc (12)
Round 3: 3 [2sc, sc] x 6 times (18)
Round 4: 4 sc around (18)
Round 5: 5 sc around (18)
Round 6: 6 sc around (18)
Round 7: sc around (18)
Round 8: sc around (18)
Round 9: sc around (18)

Switch to white yarn
Rounds 10 - 17: sc around

Instead of binding off at the end of round 17, chain 400, this will form the bandage wrap that goes around the mummy.  Bind off.

Slip the body over a champagne cork, it will be a tight fit but the yarn will stretch.  Once he is all snug and cozy start wrapping the bandages around the mummy, securing with a few small pins or dab of glue.  I used 7mm plastic eyes that I bought at the local craft store, the kind intended for making soft toys.  Use an old knitting needle to poke holes in the cork where you want the eyes, and then just press into place.

If you don't have an old champagne cork, well, this is the perfect excuse to buy a bottle, I know I need to!

Monday, August 22, 2011

Naughty or Nice Inc Christmas Card

Naughty or Nice Card


Images:
Naughty or Nice Inc Labels by Two Peas in a Bucket
Xmas Hottie by Kenny K
Maude Christmas by Just Inklined

Pens & Inks:
Copic markers
Prismacolour pencils
odourless blender
paper blending stick
Black Soot Distress Ink
silver glitter gel pen

Oh what fun I had on this card!  The inspiration came from the Winter Wonderland challenge this week which is to make something for the men/boys.  This gives me a chance to use the sexy images from Kenny K, but then I also found Christmas Maude who, intentionally or by sheer co-incidence, looks like the Xmas Hottie will in about 50 years time!  

The sentiment on the front of the card is my own concoction, printed onto a Naughty or Nice Inc label.  As I got several laughs whilst showing the men around the house I am hoping that the card is funny to most, and not just myself!  The tickets and tags inside the card are once again from the Naughty or Nice Inc kit.


Naughty or Nice Card


I also had a lot of fun making several of my own elements on this card.  The wordy paper used throughout has the lyrics to "Santa Clause is Comin' to Town" repeated across, and then inked with Black Soot.


Naughty or Nice Card


Both ladies have been coloured with Copics and shaded with a black prisma pencil., and they both have some sparkly fluff and glitter for the fur trim on their outfits.  Maude has some silver glitter gel pen on her glasses to make them sparkle, and some Stickles glitter glue on the cuffs to her stockings and gloves. 

Naughty or Nice Card

Challenges:

Winter Wonderland:  Cards for men/boys
Kenny K's Krafty Girls: Layers (layers inside and out, felt like I was making a Sarah Lee Danish!)
Sparkles Forum Challenge:  For the boys
Christmas Card Challenges:  Glitter (Maude's glasses and cuffs on stockings and gloves)
Totally Papercrafts:  Christmas in August
ABC Christmas Challenge: Based on a quote or song (Santa Claus is Comin' to Town)

Sunday, August 21, 2011

August Angels

August Angel


Technique: Crochet


Hello to my new followers, I'm so glad you joined me :o)

Every week I crochet an angel and send it off to someone who is need of hope. This is fantastic way to let people know that no matter what they are dealing with, that they are not alone. Each week I blog about it in the hopes that someone who stumbles across my blog will read it and spread the word.

I was inspired by an unseasonal bout of warm weather to make all of my August angels out of a white yarn that has flecks of pastel colours running through it, with a copper halo to signify the unusual sunshine.  After a few days of wet weather the sun is out again, the puppies are out playing in the long grass and I'm about to go out and join them!

If you like to crochet and would like to register for Angels for Hope you can do so here. Also, if you know someone who is need of an Angel, you can put in your request there.

Saturday, August 20, 2011

Haunted Lantern

Haunted Lantern

Materials:
black card stock
adhesive
corrugated card
white pastel chalk
acetate

Tools:
glue gun
cutting and scoring equipment
Sizzix Big Shot
halloween embossing folder

Ever since I stumbled across this tutorial by Norma to make a paper latern I have been itching to have a go.  Initially I intended to make one using traditional halloween colours, but this (like my last halloween box) had a mind of it's own.

The tutorial is very simple and easy to follow, with lots of photo's.  The only thing I did differently was to use Glossy Accents as my adhesive rather than double sided tape, as it grabs quickly and doesn't come apart.

I embossed plain black card using a Sizzix Halloween embossing folder and sanded it back to distress the pattern, then rubbed a white pastel chalk over the raised areas to highlight it even further.  You could use an ink pad, but the pastels are quite 'dusty' which gave a really nice effect when softened with a brush. 

Haunted Lantern


The roof has corrugated card panels painted black, dusted up with white pastel chalk also.  The roof is the lid to the box, and this comes off so that you can fill the lantern with treats.  I 'spookiefied' the lantern by draping hot glue gun threads around the base and the roof seperately, so that when the lid comes off it's not going to take all the webbing off, although the great thing about this technique is the more broken and twisted the threads become the more authentic it will look.

Thursday, August 18, 2011

Six Inch Crochet Blanket Sampler - Spinner

Spinner


Technique: Crochet

Materials:
8 ply yarn in 3 colours

Tools:
4mm crochet hook

Finished Size:
6 inches

The original pattern comes from the book 200 Square Crochet Blocks by Jan Eaton. I have been regularly making one per week, with the goal that by the end of the year I will have enough to put together a blanket.  This block came together pretty easily, which unfortunately cannot be said for all of Ms Eaton's patterns, either I am terrible at crochet or her patterns are rife with errors, and many take a lot of adjustments to get a uniform 6" in size.

Wednesday, August 17, 2011

Poorly Chester Get Well Card

Poorly Chester

Images:
Poorly Chester from Pollycraft

Papers:
Kaisercraft "Prairie Lane"
AC Cardstock Lagoon: Weave

Pens and Inks:
Copic Markers
silver gel pen
white gel pen
red gel pen

As I was doing my morning coffee, catching up on the blogs I like to check in on, I found this post on Paper Canteen Creations.  In summary:

My brother's dear friend and former roommate, Ryan, was involved in an accident on a Saturday afternoon in April 2011 in New Orleans, while riding his bike to meet up with friends.  The facts of the accident remain unclear but Ryan did sustain a brain injury.  As a side note - Ryan moved from CA to NOLA after Katrina to live there and help/work with the relief efforts to help the citizens of NOLA rebuild.  Ya...he's an amazing young man.  

So - what am I asking of you?  I'm asking you to think of him, send blessings, prayers, white light, love and healing (however you manifest those thoughts and feelings) in the form of cards to send his way.

I am such a softie for good causes, and already regularly contribute to Angels for Hope, I just couldn't resist whipping up a get well card to send off.  There is also a very, very generous thank you pack being sent out by the organizers to all who participate and send in a card.  Visit the link for full details, the mailing address for the card and instructions.

The adorable Chester available at Pollycraft is cute, but not girly cute, so great to put on a card for a male.  The brown and blue tones coupled with the clean and simple design are also suited to a masculine card.  The tip of the thermometer is coloured with a silver gel pen for a metallic feel, likewise the 'mercury' in the thermometer has been touched with red metallic pen.  Although you can't really tell in the photo, the thermometer has a coat of Glossy Accents to make it look like glass.  As a finishing touch I reinforced the white dots on Chester's eyes with a white gel pen.

This sweet little card is on it's way to Ryan, along with all the white light and fluffy bunny energy I could muster!  :o)

Tuesday, August 16, 2011

Cookie Card

Bigsby's Cookies


Technique:  Papercraft

Images:
Bigsby Cookies digi
free holly image from here

Papers:
tan mulberry paper
dark brown Bazzill paper

Pens & Inks:
Copic Markers
Walnut Stain distress ink

Other:
Merry Christmas sentiment by Tim Holtz
glitter glue

When I checked what the challenge was at Karen's Doodles this week I could have sworn black and blue it was was to make a shaped card, and as I had never tried making one, I was so eager to participate.  LOL when I actually went to enter the card, it turns out the challenge was actually for Fancy Folds, yeah it's really been that kind of week!  Anyway...

I won three digi's for participating in their challenge recently and chose the cute little Bigsby eating Santa's cookies, and I had it in my head to do a round cookie shaped card.  I am not sure that what was in my head translated to paper, but this is the adventure I had!

First came the round card.  I don't have a round die set yet, so I used my trusty Fiskars template.  I cut a 4.5" x 9" piece of dark brown card and scored it in half, then slipped the template over the top, making sure that the top edge was not being sliced so it formed the fold.  I can tell you the very next thing I invest in will be a set of circle dies!


I wanted to make an easel card, so I cut another circle from the same card that would form the top.  To give the impression that a bite had been taken out of it, I used a scalloped circle die to form a chomp mark.


Bigsby's Cookies


The circle with the bite mark is then adhered to the base card. You could put the bite mark anywhere, but I aligned it near the top so that when it was open it had a cute little outline.


Bigsby's Cookies


The "cookie" that Bigsby is on is a circle cut from a sheet of tan coloured mulberry paper. The texture was just perfect for a cookie. I repeated the bite marks and distressed the edges with a paper distressing tool, and brushed over the edges and the raised parts of the paper with walnut stain ink.


Bigsby's Cookies


The bottom plate, well I was actually going for a plate! Using a free holly image I found, and Microsoft Word, I created a dotted circle and surrounded it with holly. When it was cut out I thought it reasonably resembled the plate that Karen had drawn in the original digi. The Merry Christmas sentiment is from Tim Holtz Mini Holiday stamp set. I printed Bigsby twice, and used just the cookies to form the prop for the easel.


A little bit of glitter glue on the holly berries and Bigsby's Cookies was done.


Bigsby's Cookies


Challenges:
Karen's Doodles: Fancy Folds (here's hoping an easel card qualifies!)
Pollycraft:  Distressing

Monday, August 15, 2011

Toby's Bath Time

Bath Time Toby


Technique:  Papercraft

Materials:
white card, white card and more white card!
white ribbon
adhesive
Toby Tumble Bath Time digi
glitter glue
Copic markers

Tools:
Sizzix Big Shot
raindrop embossing plate or folder
polka dot embossing plate or folder

When I pick a challenge for inspiration, it's usually to try and challenge myself.  I still have a lot of techniques and styles to explore, and I love challenges that take me out of my comfort zone.  So last week when I did a white on white challenge and created my Humbug! box, I felt a little like I had cheated myself. out of fully exploring the technique as  I deliberately chose a small medium so that the amount of white was minimal.

So this week when Simon Says Stamp had a white on white theme, I had another go.  It's amazing how different whites can be!  I used a pure white Bazzill for the base of the card, some plain white card went through the Sizzix for embossing, a white doily and white ribbon.  As this is a bath tub scene and there is so much extra white in the image, I added a little pop to the bubbles (I made a punny) with glitter glue.

Bath Time Toby


I felt the key to creating an interesting all white card was either to be totally minimalist (which I did last time) or to have a lot of different textures.  The polka dot and raindrop patterns both suited the bath time image, and are separated by the lace of the doily.  Hehe the ribbon at the bottom is placed in such a manner as to hide where I have lopped off some of the original digi.  The original image has a puddle of water, a towel and some clothes, none of which I wanted to use, so I cut them off but that left a small notch in the lower right bath tub leg, hence the ribbon.

Challenges:
Cuddly Buddly: Anything Goes
Simon Says Stamp:  All White (except the coloured image)

Sunday, August 14, 2011

August Angels

August Angel


Technique: Crochet

Every week I crochet an angel and send it off to someone around the world that I don't know who is need of hope. This is fantastic way to let people know that no matter what they are dealing with, that they are not alone. Each week I blog about it in the hopes that someone who stumbles across my blog will read in the hopes that word will spread.

I was inspired by an unseasonal bout of warm weather to make all of my August angels out of a white yarn that has flecks of pastel colours running through it, with a copper halo to signify the unusual sunshine.  The red heart is a glass bead, and is part of the Angels for Hope symbol, to let the recipient know that someone loved them enough to send them an angel. 

If you would like to register for Angels for Hope you can do so here. Also, if you know someone who is need of an Angel, you can put in your request there.

Saturday, August 13, 2011

Christmas Lights

Tilda with Christmas Lights


Technique:  Papercraft

Materials:
Free christmas lights digi here
Tilda sitting with candy rubber stamp
Momento Tuxedo Black ink
Copics markers
silver gel pen
Glossy Accents
silicone
corrugated card
designer paper
tissue tape
silver beading wire
adhesive


Tools:
scallop border punch
scissors

This cute little Tilda isn't perched on a card, but rather a 4" pizza box, you can find an excellent tutorial at Split Coast Stampers.


Tilda with Christmas Lights


The Joyeux Noel comes from a Bo Bunny paper, fussy cut around the edges and inked up a bit, and the scalloped bottom is cut from the same paper.  Tilda's perch is a strip of corrugated card, inked with white versa ink and then a strip of tissue tape is places across the middle.  A length of silver beading wire has been twisted around the strip of card and little curlicues formed at top and bottom.


Tilda with Christmas Lights


The Christmas lights are a free digi you can find here.  I reduced them in Word so they were size appropriate and then once coloured I used a silver gel pen on the screw part of the bulb, and glossy accents on the glass part.

Going back to my old habits I have used silicone to adhere Tilda and the light bulbs.  Silicone is used in 3D decoupage (also called paper tole) and it is preferable to mounting foam as you can use tiny little amounts, it adheres to just about anything rapidly and the pieces can be angled for further dimension.  The only thing you must do if you use silicone is seal the back of your images with an acrylic medium (glossy accents will work), otherwise it will form a stain over time.

Challenges:
Winter Wonderland:  Light It Up

Friday, August 12, 2011

Catching up with 365 Projects

Once a week I spend the day playing catch up, adding the finishing touches to any projects not quite yet done, taking photos and browsing the net for inspiration, and as always, looking for free patterns and interesting tutorials.  Today I wanted to share a book.

Did you undertake a 365 project this year?

Noah Scalin, author of the book 365:  A Daily Creativity Journal encourages us to choose one theme, and then every day for a year, create something that fits with that theme.  For Noah it was skulls, and he made them out of every material imaginable, truly pushing his creative limits. His book is filled with 365  creative prompts to kick start our creativity in just about any medium.

Day 13 suggests "Use tea leaves or tea bags (used or unused) or even just liquid tea (in a cup or not) to create something today."  For us traditionally crafty folk this could mean staining or antiquing paper, yarn, ribbon or fabric with tea, or using tea bag folding.  For those with a flair in the kitchen it can mean creating your own unique blend of tea (something I love doing!).

The book and ideas have really caught on, and he has a website for other 365 enthusiastists to share their blogs.

The projects are vast and inspiring, here are just a few from some very talented and creative people:

365 flowers in Project Bloom
365 ATC's in A Creation Per Day
365 projects from recycled materials in 365 Do-overs
365 owls in Owl A Day


The Light Side of the Pullover
My favourite 365 compilation

365 Stormtroopers is my personal favourite, a series of images that capture the shinanigans of two stormtroopers.

My original intent was to create a Christmas ornament each day, which then got expanded and enlarged to encompass crafting something every day.  Prior to this I hadn't crafted much of anything for a few years, and the gears were rusty, the ideas came slowly and at first it was quite an effort to rekindle the fires.  I'm 9 months into my 365 project and each day I can't wait to get the boy to school, get the chores done and spend time in my craft room. 

Do you think you will undertake a 365 project next year?

Thursday, August 11, 2011

Six Inch Crochet Blanket Sampler - Seville


Seville

Technique: Crochet

Materials:
8 ply yarn in 3 colours

Tools:
4mm crochet hook

Finished Size:
6 inches

The original pattern comes from the book 200 Square Crochet Blocks by Jan Eaton. I am a bit behind on posting my blocks, although I have been regularly making one per week, with the goal that by the end of the year I will have enough to put together a blanket.

Wednesday, August 10, 2011

Purrfectly Delightful Card

Purrfectly Delightful


Technique:  Papercraft

Materials:
cat with flower digi from Motivet
co-ordinating bazzil
Basic Grey DP
Copics
Fur: E31, E33, E35, E37
Green: YG61, Y63, YG67
Orange: YR02, YR04, YR07, C1
Distress Ink: Bundled Sage
button
warm and natural batting
adhesive

Tools:
Sizzix Big Shot
Tim Holtz Alerations: Tattered Florals die
Spellbinders leaves die
Spellbinders scalloped circles die

My husband's birthday is next week, and with a little help from the youngest, this is the card we made for him.  Our little one picked the image, he has such a fondness for cats.  Usually I would do a fairly smooth rendering of the fur when colouring, but I wanted to join in on the i-Copic challenge this week to colour fur, so I deliberately tried for a textured look.  I was quite pleased with the result and would probably do it again to simulate long fur.


Purrfectly Delightful


The designer paper is from the Mellow range by Basic Grey, and I chose this before colouring the flower the cat is holding, so that the image would co-ordinate with whatever paper I chose.  I wanted a card and a colour scheme that whilst cute was still decidedly masculine, as it was being given from son to father.

The flower is cut from warm and natural quilt batting, which I left completely untouched as it has a lovely, rustic fleck through it already, and has a vintage leather button in the centre.  The leaves are using a Spellbinder die which is inked with Bundled Sage distress ink along the edges. The scalloped circle is also a Spellbinder nestie.

The sentiment inside reads : "Have a PURR-fectly delightful day".

This card was smaller than I usually make, only 5", whereas most of the other cards I had made 6" square.  The DP was perfect for the image, but pretty busy, I felt it favoured a smaller card.  What is your favourite card size?  I am still experimenting to see which I like best, I think the larger cards favour larger and more flamboyant embellishments.

Challenges:  
i-Copic: Fur
Here Come the Boys: Critters

Tuesday, August 9, 2011

Tea Time Card

Toby Tea


Technique:  Papercraft

Materials:
patterned paper
co-coordinating card
Tea Time digital stamp
Copics
Blue: B91, B93
Purple: BV000, BV02, BV04
Toby: E31, E33, E35
Chair: E35, E37, E29
Pink Icing: R81, R83, R85
Inner Ear: E00, E02

Tools:
Scor-pal
Sizzix Big Shot
scalloped circle die
1" circle die or punch

Bundled with the June issue of Craft Stamper magazine came a free Toby Tumble acrylic stamp, which was designed especially for the magazine by Cuddly Buddly.  There is also a two page spread with gorgeous examples by Kim McFarlane the graphic designer who runs Cuddly Buddly.  Unfortunately the stamp was not included free for US readers, however you can get the digi from the Cuddly Buddly website here.  


Toby Tea


This image is perfect for a tea bag card, a little gift card that you can tuck tea bags into for every day gifts, hostess favours, teachers gifts etc.  While I love making elaborate, detailed, labour intensive projects, I also like to have on hand a range of projects I can whip up in an emergency and still feel good about the gift I am giving.  This is one of those projects :o)

The tutorial for the card can be found here on Split Coast Stampers. 

Challenges:

Cuddly Buddly - add stitching
Frosted Designs - hand colouring


Monday, August 8, 2011

Humbug! A Sweet Treat

Santa Called


Technique:  Papercraft

Materials:
white card
"Santa Called" image from here
sentiment from here
tickets from here
large matchbox

Tools:
printer
snowflake embossing folder or plate
sizzix big shot
border punch

The theme this week at Winter Wonderland is white on white, only the image is allowed to be coloured.

I looked through the other cards entered into the challengee and was in awe, but as I was looking at these beautifully embossed and die cut creations I was thinking to myself that I couldn't make anything like that because I have so few dies and tools still.

So for this challenge I wanted to do something totally different, go back to grass roots and make something that was fun, clean and crisp, and easily duplicated for very little cost.  This is also equally suitable to give to kids and boys/men of all ages.

I have used an oversized matchbox as the base for my easel card, measured the sides and face of the box and multiplied that by two, and then measured the height of the box and cut a strip of paper to suit.  I ran this through my sizzix with a Fiskars snowflake plate, but Fiskars plates can also be used with a texturing tool which is only a few dollars, and it will give the same embossed effect.  Alternatively you can buy pre-embossed and textured papers in the scrapbooking section of most craft shops.

Santa Called


The easel card is made just like any other easel card, and I made sure that I attached the base of the card to the matchbox first, then glued the wrapper of the top of that, for a neat, seamless top. 

The ticket I made myself, with a combination of the blank ticket template I listed above and the sentiment, simply merging one of the top of the other so I had the sentiment I wanted.

I lined the inside of the box and the front panels of the drawer with the same snowflake pattern, in fact the whole box was made with about half a sheet of plain white card, very economical!  A little diamond set brad forms the knob on the drawer.

Santa Called


Inside I have placed hard boiled sweets that we call humbugs, perfect for those who go around during the holiday season exlaiming Bah!  Humbug!


Sunday, August 7, 2011

August Angels

August Angel


Technique: Crochet

Every week I crochet an angel and send it off to someone around the world that I don't know who is need of hope. This is fantastic way to let people know that no matter what they are dealing with, that they are not alone. Each week I blog about it in the hopes that someone who stumbles across my blog will read in the hopes that word will spread.

As we had an unusual stretch of sunshine for what is supposed to be the coldest month of the year, I was inspired to make all of my August angels out of a white yarn that has flecks of pastel colours running through it, with a copper halo to signify the unusual sunshine.  The red heart is a glass bead, and is part of the Angels for Hope symbol, to let the recipient know that someone loved them enough to send them an angel. 

If you would like to register for Angels for Hope you can do so here. Also, if you know someone who is need of an Angel, you can put in your request there.