Showing posts with label paper tole. Show all posts

Thursday, November 1, 2012

Cookie Factory Recipe Album

Cookie Recipe Album


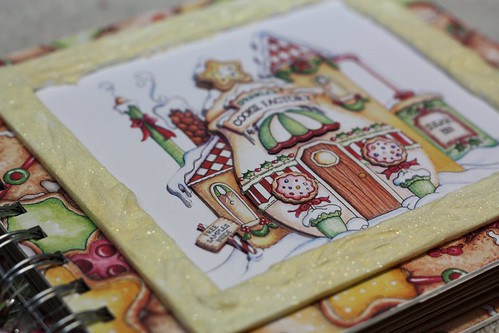
The challenge this month at Christmas Crafting! was to use decoupage.  I have a thing for recipe albums at the moment, and when I went through my stash and rediscovered my Santa's Village Collection by Laurie Furnell, I knew I wanted to make a recipe album with her gorgeous artwork.


To start I printed off four copies of the cookie factory image and sealed the back of them with Liquitex Gloss Medium (Modge Podge will do the same thing).  This is important because the Liquid Scrap Dots that I used for dimension is essentially the same stuff as silicone and will leach through the back of unsealed paper leaving a dark spot.

Once sealed, I set aside one image to be used as the base and then cut up each of the remaining three images for layering.  Most kits purchased today have done the guess work for you, but it's not that hard to look at an image and think about the perspective and then cut out what will be the background, middle and foreground.

Cookie Recipe Album


I didn't get too intensive with the layering as this is a functional item and I didn't want either too much height, or fiddly bits that might drop off when the album is used.

The yellow frame I made with scrap cuts of chipboard adhered together in two layers, and then covered it all with Jo Sonja Texture Paste.  This is a thick, white paste that lets you create dimension, in this case I used it to make the frame look like it was covered in frosting.  Once dry I painted with acrylic paints and dusted with glitter.

Cookie Recipe Album


Once the image and frame were ready it was just a matter of assembling them onto the cover.  The front and back covers are thick chipboard covered with papers included in the Santa's Village kit, and the interior pages are all cut from plain Kraft card.  I inked the edges of all of the pages with white ink to give it a 'dusted' appearance, and then used the Zutter to punch and bind it all together.

Cookie Recipe Album


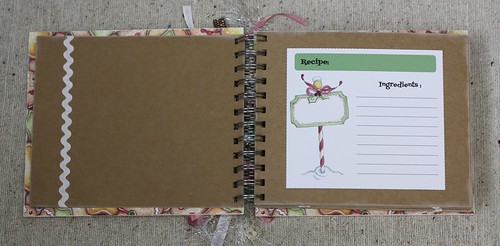
The recipe card was created using Word and the elements from the Santa's Village kit.  There are 18 pages in the album in total, 9 of which have the recipe card on the front and back, and the remaining 9 have been decorated with either white rick rack to simulate the icing on gingerbread, or with ribbon and 'gumdrop buttons'.  I left 9 blank pages so that the recipient could either put in photographs or use it as a scrap book and glue in recipes found in magazines.

Cookie Recipe Album


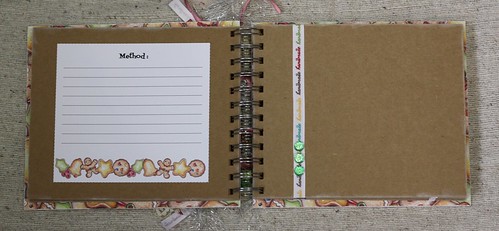
The finishing touch was to decorate the wire binding with ribbons and fibres. Don't tell anyone but this hides any imperfections in the binding!


Cookie Recipe Album
 
I hope I have inspired you to go and create something fabulous using the decoupage technique.  Remember you don't need to purchase special kits, just find an image that you like and use your own perspective to create dimension. 

Linking this up at Make It Monday:  Challenge #113

Tuesday, October 4, 2011

Merry Christmouse Gift Card

Christmouse Tag


Technique: Paper Tole

Images:
Merry Christmouse Card Kit

Other:
foam adhesive dots

I stumbled across Aimee Asher's site a few days ago while researching my October DT assignment for Christmas Crafting, and fell in love with her cute little Card Buddy's, a series of digital paper tole cards that can be printed and put together very quickly. 

These are meant to be printed on a full size sheet of paper, but the first one I printed accidentally came out half size, so I rolled with it and made this wee little gift tag.

He took no time at all to cut out and the foam dots made quick work of assembling it together. I don't know that I am quite crazy enough to do one for every gift I will give this year though!  I

f you enjoy this style of card making, her site is well worth the visit.  There are dozens of drop dead cute kits to choose from and each kit comes with 6 - 8 printable sheets, including a card liner and a co-ordinating envelope.  At almost half the price of one digi stamp, that is excellent value.

Wednesday, January 5, 2011

Mouse Christmas Carol Paper Tole

Mouse Christmas Carol Paper Tole


Technique: Paper Tole

Materials:
christmas card or image that you like
spray Sealant
600gsm card stock
silicone
PVA glue

Tools
scissors
scalpel or hobby knife
paintbrush
styrofoam pad
paper tole tool
high resolution colour printer

Paper tole, or 3D decoupage as it is often called, is where you use one image that you have cut several times, and then layer to give a three dimensional effect.


Once you have found an image that you want to use, you must make 5 to 6 copies of the image. If it is an image you found online, or the one above, simply print it a few times on the same sheet of paper. Use high resolution paper and print at the highest quality you can. If you are using a christmas card you will need to scan it in and then reprint several copies (or purchase several cards!)

The first step is to seal the backs of the images. The silicone that we use to raise each layer will leave a dark spot on your paper unless you protect it with a sealant first. Seal the front and back with the spray sealant.

Glue one image to the card stock, this will be the base upon which you build the rest. For mine, I cut closely around the music sheet, eliminating all of the red background, but you could keep that in if you prefer.

I won't give exact directions on what to cut as you may have chosen a different image to mine. Look at your picture and try and divide it into background, middle and foreground. For the mouse carollers I cut all three mice as one piece, and then from another sheet I cut the heads and scarves of all the mice. Then from another sheet I cut their ears. What we are looking for is pieces that can be layered to give depth and perspective.

Once you have cut the pieces you want to use it's time to give them a little shaping. A paper tole tool is a simple shaping tool, with a blunt end designed for making soft curves, and a sharper edge designed for scoring and creasing. Lay the first piece you want to add onto a foam board or piece of styrofoam and gently rub over it in small circles. If you don't have a paper tole tool you could use a marble to get the same effect. Gently rub until you have put a little shape into the piece. Now turn it over and mark in any creases, pleats or folds. Take a small piece of silicone onto a toothpick, no bigger than the pip in an orange, and place several dobs on the back of your image and then place it onto your backing image and line the two up as precisely as you can. This will now become the foundation for the rest of the pieces so it is important that it is well supported.

Working now with the mid-ground images, do the same, shape them and then place them onto the ornament with small amounts of silicone. The silicone doesn't take long to adhere and set, but you should ensure that it has a firm hold before attaching a new piece, or as you are sliding it into position you could upset the layer beneath.

For the final pieces, the ones that are going to be in the most foreground, try and work a little more detail into the shaping and be a little creative with the silicone to add angles. For example with the ears on the mice, they would be touching at the point where they join the head, but they could be angled away from the head and lifted just as real ears would be.

When you are happy with the piece, allow it to set up properly for a few hours and then give another coat of sealant. Attach a hanger to the back of the ornament.