Technique: Painting, Decoupage, Mixed Media
Materials:
wooden coaster
acrylic paints
all purpose glue and sealant such as Modge Podge
alphabet chipboard cutouts
scraps of red and green fabric
flexible wire
Tools:
paintbrush
scissors
sandpaper
wire snips
needle nose pliers
hot glue gun
Today was the first day back at school after more than six weeks of holidays! As much as you love your kids, by the end of the holidays they are bored and restless, and I am usually frazzled! I only have one child of school age, and he started upper primary today. The little man was quite excited, and proclaimed he felt rather "upper".
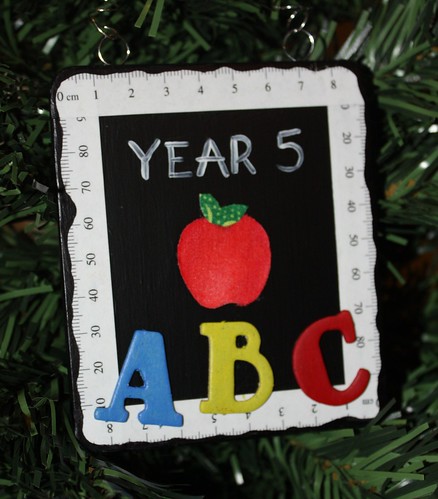
Give the coaster two coats of black acrylic paint, sanding lightly between coats, and then a coat of sealer.
This site has a wide variety of paper rulers available to print out. In Australia we are metric, but there are imperial rulers available also. Print out the ruler of your choice and cut strips that will become the border of your "chalkboard" (a little trivia here in Australia we call it a black board, because, well, it's black!!). Once your ruler strips are trimmed, glue into position and allow to dry.
Paint your chipboard letters in bright primary colours and allow to dry. Glue into position along the bottom of the board. Cut a small circle from the red fabric for the apple, and a few leaf shapes from the green fabric. Glue these into position in the middle of the board. With white acrylic and a fine brush, write the year or grade level of your child. Allow the entire project to dry thoroughly and give a finishing coat of sealer.
Wrap the wire around a pencil about a dozen times and then slip off. Bend and stretch as necessary to form a hanger. Make two loops of wire and hot glue to the back of the coaster, then attach the hanger through the loops.
On the reverse of the coaster, which I haven't photographed for privacy reasons, I have glued the school logo, and also made a note of what his teacher's name is and what class room number he is in for this year.

