Showing posts with label christmas ornament. Show all posts

Sunday, January 7, 2018

Santa's Secret Window Frame Ornament


I know that Christmas is over and everyone has packed away their tree, however it is a great time to get junky ornaments at a clearance price and repurpose them into something nicer.

For this project I used the Tim Holtz Window and Window Box die to cut the frame from thick card stock which I painted with acrylics. I printed the Santa image (below) twice and used one for the background image and the other I cut away the background and used foam dots to layer him onto the background to give Santa some 'pop'. The little gem on the front was repurposed from a junky ornament.


If you would like full step-by-step directions on how to create this ornament you can find them on this page.


Entering this into the following challenges:

Crafter's Castle: Anything Goes
Crafty Hazelnuts Christmas Challenge: Anything Goes


Saturday, October 8, 2011

Musical Bauble

Musical Ornament


Technique:  Papercraft

Materials:
sheet music
glass ornament
scissors or paper trimmer

A classical and elegant ornament that is super duper easy to make.  Simply cut music sheets into half inch strips and curl slightly with your finger.  Don't use scissors or anything or it will curl too much, you just want a slight curve so it hugs the curve of the glass.  Insert each strip into the ornament and jiggle it about a bit until there are no more gaps in the glass.  That's all there is too it :o)


Monday, September 26, 2011

Vintage St Nick Ornament

Vintage St Nick


Technique:  Stamping

Stamps:
Bo Bunny St Nick Santa Dear

Pens, Inks etc
Vintage Photo Distress Ink
Versacolor Black Ink
Versacolor Metallic Gold Ink

Papers:
Kaisercraft Timeless Sheet Music paper
sheet music from a hymn book
corrugated card

Other stuff:
Scor-pal
adhesives
glitter
Spellbinders Circle Nestabilities

I adore this Bo Bunny stamp, it's an old release (2009) and I found it by rummaging through a neglected box of stamps at a local scrap book store.  I've stamped St Nick using black ink directly onto a hymn sheet and used black embossing ink to bring him to life.  I finally managed to find someone in Australia who had the circle nestabilities dies (yay!) and have used these to create the the circles for both Santa, the corrugated card and the backing circle.

The rosette is made from two 1.5" strips cut from the Kaisercraft Timeless Sheet Music paper, scored at half inch increments and then joined together.  The edges of just about everything have been inked with Vintage Photo distress ink.  The corrugated card is inked with just a smidge of gold ink and then has a rim of gold glitter applied.  Finally a small piece of gold cord is adhered to the back so it can be hung on the tree.

Linkies:
Make it Monday:  Always Anything Goes

Wednesday, June 22, 2011

Silver Swirl Carved Ornament

Silver Swirl Carved Ornament

Technique:  Papercrafting

Materials:
600 gsm card stock
background paper
adhesive
Distress Inks
* Faded Denim
* Stormy Sky
Number 10 crochet thread
craft metal sheet
snowflake sequins
Perfect Pearls
silver ink

Tools:
Sizzix Big Shot
Tim Holtz Alterations
* Carved Ornaments
* Mini Flourish
1.5mm crochet hook

The challenge at Simon Says Stamp and Show this week is to Show Some Metal.  As expected many of the DT examples and entries have a vintage meets industrial come grungy feel as is true to the Tim Holtz style.  I wanted to do something a little different, and use plenty of Tim Holtz tools and techniques, but come up with something unexpected.

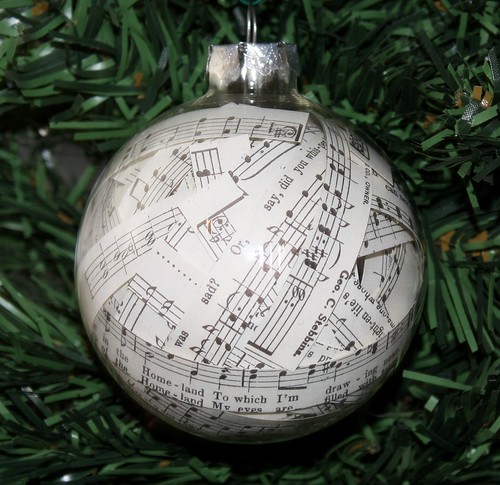
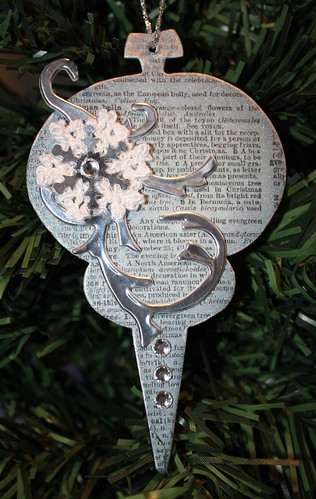
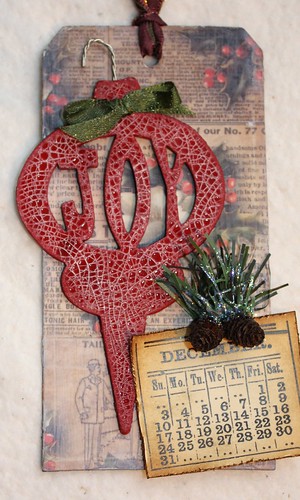
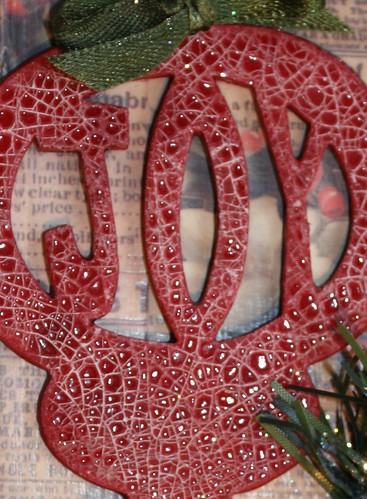
Cover both sides of plain card stock with a background paper, I chose a dictionary paper with Christmas definitions, but I plan to do others with music paper in a red and gold theme, lots of scope for creativity.  When it's properly dry run it through the Sizzix with the carved ornament die.  Ink up the edges with distress inks, I wanted a blue and silver theme so I have used stormy sky and faded denim. 

I have made my own home made version of Perfect Pearls using white pearl cosmetic mica (think mineral make up), added to a mixture of water with just a few drops of gloss medium to act as a fixative.  Once upon a time I taught soap making and I have copious amounts of cosmetic glitter and mica in a vast array of colours sitting on the shelf doing nothing.  I imagine for most its simply easier to use Perfect Pearls or Glimmer Mist or similar product.  The front and back of the ornament are spritz with a white pearl glimmer.  Finally, ink the edges with silver ink, I used Versacolour for the metallic inks, I love their thick, sticky texture.

Adhere a piece of silver craft metal to an offcut of card stock and run it through the Sizzix using the mini flourish die to create the silver flourish.

Make one snowflake following the directions below.  The original pattern can be found here.

Ch 4, sl st into 1st ch OR make magic ring.

Round 1: Ch 5 (counts as 1 dc and ch 2), sc in ring, *ch 2, dc in ring, ch 2, sc in ring; repeat from * 5 times; ch 2, sl st in 3rd ch of starting ch 5 for a total of 6 petals. Do not pull magic circle too tight.
Round 2: In same ch as sl st, work: sc, ch 3, sc in 2nd ch from hook, ch 1, dc, ch 2, sl st in top of dc just worked, ch 3, sc in 2nd ch from hook, ch 1, sc, ch 3, sc in 2nd ch from hook, ch 1; in next dc and in each of next 5 dc around work: *sc, ch 3, sc in 2nd ch from hook, ch 1, dc, ch 2, sl st in top of dc just made, ch 3, sc in 2nd ch from hook, ch 1, sc, ch 3, sc in 2nd ch from hook, ch 1; sl st in starting sc of this row; bind off. Weave in ends.

Finishing is simply a matter of adhering the layers onto the base ornament and adding a bit of bling.

Tuesday, June 14, 2011

Christmas Altered Domino

Santa Domino


Technique:  Collage/Papercraft

Materials:
domino
paper images
glue or gel medium
acrylic paints
800 grade sandpaper
Christmas bling
varnish or sealant

Tools:
scissors
Dremel Tool

This is worked on one of the white plastic dominoes.  Next set I buy I think I will look for a set of wooden ones, they will be much easier to attach fittings too.  The white plastic type are quite difficult to drill through, and they let off a horrible stink, which leads me to think that the fine white dust can't be terribly good for you.

Prepare your domino by first drilling a hole at the top for the hanger, and at the bottom for the bling.

Lightly sand the domino to give the glue and paint a tooth to adhere too.  Using gel medium, or your glue of choice, attach an image to both front and back of the domino.  Let dry thoroughly and sand the edges of the image to ensure a flush fit.  Use a skewer to poke through where you drilled the holes.

Paint the edges with acrylic paint, and when dry finish with a coat of varnish, or sealant, whichever you prefer.  Attach a hanger and some bling.

Wednesday, June 1, 2011

Joy Christmas Tag

Joy Tag

Technique:  Papercrafting

Materials:
grungepaper ornament base
600gsm card stock
glue
Antique Royal Coat
embellishments
Tim Holtz Distress Inks:
* Vintage Photo

Tools:
Tim Holtz Alterations:
* Tags and Bookplates die
Sizzix Big Shot
scissors
paintbrush


A few days back I showed you how I made the crackled grungepaper ornament.  The post is here in case you missed it.  

Today I am going to use the ornament to create my version of Tim's tag:


First off, here is the link to Tim's ornament, and his step by step instructions.  I haven't really deviated much in the way of technique, the main difference is I have chosen to use a few different materials.

The backing paper I used is a sheet of vintage Christmas decoupage paper which I aged with some antique Royal Coat (same stuff as Modge Podge), and then gave it a light sand and a white wash (literally a wash of watery white paint to lighten it).

I wanted to do something a little different with the cracked ornament also, so I sanded it lightly.  The sanding causes fine white dust, which falls into and fills the cracks, causing the white contrast.  I love this effect, it really brings out the cracks.

Joy Tag Closeup

Monday, May 30, 2011

Cracked Ornament

Cracked Ornament


Technique:  Papercrafting

Materials:
balsa wood ornament base
chipboard frame
glue
image of Santa
spray adhesive
tiny brass screws
gold leaf
600gsm card stock
scrap acetate
embellishments as desired


Tools:
Tim Holtz Alterations:
* Tags and Bookplates die
Sizzix Big Shot
scissors
screwdriver
paintbrush

A few days back I showed you how I made the basla wood base for this ornament.  The post is here in case you missed it. 

Here's how I finished off that ornament.

Run some 600gsm card stock through the sizzix with the tags and bookplate die.  I love this die!  Keep the oval bookplate, and put the rest away for another day. 

Use the bookplate as a template to choose an image of santa from an old card or wrapping paper and cut to just smaller than the plate.   Repeat this process but with a scrap piece of acetate to form the 'glass' of our frame. 

Lightly coat the front of the plate with spray adhesive and lay it sticky side down onto a sheet of gold leaf.   You can buy gold leaf size that is a tacky adhesive especially for gold leaf, but spray adhesive will do the job too.  Tear away the excess and use a soft brush to gently go over the entire surface to encourage adhesion and show up the highlights.  You now have a gilded frame.  You could of course use a real metal fitting, such as the type found in the Ideology range, or you could use a brooch finding, anything you like really, but I think the gold leaf really brings it to life.

To complete the frame, put a rim of glue around the edge of the acetate and glue to the underside of the book plate, then put a rim of glue around the image of santa and glue the image to the acetate.  Voila!  A gold frame.

All that is left to do now is screw the frame into place with some tiny brass screws, and glue on your embellishments.  I used two teeny pine cones and a strip of ribbon.

Tuesday, May 17, 2011

Easy Gold Leaf Ornament

Gilded Bauble

Technique: Basic Crafting

Materials:
3 sheets gold leaf
empty glass bauble

Tools:
tweezers

A beautifuly simple yet stunning ornament that has a beautiful glow from the refraction of light through the glass and onto the gold leaf.

Tear the sheets of gold leaf into 8 pieces. Can be as rough and ragged as you like. Using the tweezers place the pieces of gold leaf into the bauble. Replace hanging cap and enjoy. The simple things in life are often the best!

Monday, April 18, 2011

Elf "Pin Up" Doll

Elf "Pin Up" Doll

Technique: Sewing, Painting, General Crafting

Materials
clothes pin
wooden bead for head
assorted felt
acrylic paints
tacky glue
yarn for hair
Dremel or small drill
flexible but firm wire
chenille sticks
flesh tone embroidery floss
jingle bell and holly embellishments

Tools:
scissors
sewing machine
wire cutter
pinkingshears
paintbrush

Follow this tutorial for a step by step guide on how to get the doll ready up to the dressing stage.

Using the templates below, cut one of each from felt.


Sew or glue the edges of the hat together, turn right side out and fold up the lower edge to form the brim. Sew or glue the edge of the dress and turn right side out. Glue into position right up in the 'underarm' section of the doll. Cut a small strip of contrasting felt, using pinkingshears to get the zig zag edge and glue into place around the neck of the doll, this is the collar of the dress.

Paint the details onto her face, glue yarn into place for her hair. With needle and thread attach a jingle bell to the end of her hat, and then attach the point of the hat to the brim to fold it over as shown in the photo. Tuck a few holly leaves into the brim.

Wednesday, March 9, 2011

Crochet Bell

Crochet Bell


Technique: Crochet

Materials:
8ply yarn

This pattern is worked in the round.

Crochet 4 ch and form a ring with 1 sl st
ROUND 1: 6 sc in ring.
ROUND 2: 2 sc in each sc = 12 sc.
ROUND 3: * 1 sc in first sc, 2 sc in next sc *, repeat from *-* = 18 sc.
ROUND 4: * 1 sc in each of the first 2 sc, 2 sc in next *, repeat from *-* = 24 sc.
ROUND 5 to 14: 1 sc in each sc.
ROUND 15: * 1 sc in first sc, 2 sc in next sc *, repeat from *-* = 36 sc.
ROUND 16: 1 sc in each sc.
ROUND 17: * 4 ch, 1 sc in first ch, skip 1 sc, 1 sc in next sc *, repeat from *-*.
Cut and fasten thread.

HANDLE: Crochet 1 sc at the top of the bell with 1 thread Cotton Viscose – leave approx 1 meter [1.1 yds] for making the clapper afterwards. Work 30 ch and fasten with 1 sl st at the top. Cut the thread.