Thursday, June 30, 2011

Six Inch Crochet Blanket Sampler - Tic Tac Toe

Tic Tac Toe


Technique: Crochet

Materials:
8 ply yarn in 3 colours

Tools:
4mm crochet hook

Finished Size:
6 inches

The original pattern was designed by Bonnie Pierce and can be found here. I found that the block size was not 6" at all, so I made some alterations. The pattern I used looks like this:

Row 1:  Using first colour, ch 12. Dc in 6th ch from hook, (ch 1, skip 1,dc 1) 3 times. (4 ch 1 sps) ch 4, turn (counts as dc, ch 1 on next row)

Rows 2-4:  dc in next dc, (ch 1, dc in next dc) 2 times, ch 1, dc in 3rd ch of ch 4, ch 4 turn FO color B at the end of row 4, do not ch 4. Do not turn.

Round 5: switch to second colour, work in corner (2sc, ch 1, 2 sc), (2sc in next sp) twice, work corner. Join w/ sl st.

Round 6:  sl st in next st, and in corner ch 1 sp, (ch 3, dc, ch 2, 2dc) in corner, work 8 dc across to corner (2dc, ch 2, 2 dc) Join w/ sl st FO

Round 7:  switch to third colour, join in corner, (ch 3, dc, ch 2, 2dc), (ch 1, sk 1, dc) 6 times, ch 1, work corner (2dc, ch 2, 2dc) cont. around, join w/ sl st

Round 8:  sl st to corner, 3 sc in corner, sc in each st and sp (17 sc), corner 3sc. Continue around. FO

Round 9:  with first colour, join in corner, work [2dc, ch 1, 2dc] in corner st, work 19 dc across

Round 10: sl st to corner, dc in each dc, 6 dc in each corner

Finish off and weave in all ends.

Wednesday, June 29, 2011

Shabby Snowman

Shabby Snowman


Technique:  Papercraft

Materials:
corrugated card
acrylic paints
blue mica (or perfect pearls)
glitter
music paper
craft snow
snow sprinkles
crackle medium
glossy accents
Distress Ink
* Faded Denim

Tools:
Tim Holtz Alterations
* Winter Wonderland die
* Tags and Bookplates die
Movers and Shapers die
* JOY
Sizzix Big Shot

The challenge at Simon Says Stamp and Show this week is to Show a Word

The tag is made from corrugated card and the top layer is peeled back to shabby it up and show the corrugations underneath. You will notice from the photo below that I have left the part that sits under the snowman's belly intact, to allow for smooth adhesion of the layers that will be applied there.  It's then painted with white acrylic paint, faded denim distress ink, pthlao blue acrylic paint,and blue mica.

Shabby Snowman Parts

Cut three snowmen from corrugated card, cutting JOY into the belly of one and cutting out an oval in the belly of the other, and reserving the last to cut out a hat, a nose and an arm.  Cut an oval out of music paper and glue that down under where the belly will be, then glue the snowman with the oval in his belly over the top of that.

Dry brush the entire piece with craft snow, piling it up in places where it would build up naturally, such as the top of the hat, and make a nice pile of it inside his belly oval, but not that high that you can't glue the top snowman into place.

Paint the snowman's spare parts and paint the snowman with the joyful belly. Apply a coat of crackle medium to the snowman and let that dry completely, then highlight the cracks with faded denim ink, this gives it an icy look. Glue the joyful snowman and all the pieces into place with glossy accents and brush again with craft snow, piling it up again around the spaces in the word JOY. Add a touch of glitter for some sparkle, I also added some snow 'sprinkles' which is essentially a white, non sparkly glitter that looks like snow.

Try as I might I couldn't get the camera to pick up all the details, the crackle on the snowman glitters like ice, the snow drifts inside his belly sparkle, the blue mica shimmers which is a lovely contrast to the matte snow sprinkles.  The whole tag has such lovely texture, I wish it snowed here in South Australia!

Tuesday, June 28, 2011

Easy Marbled Gold Ornament

Golden Bauble

Technique:  General Crafting

Materials:
glass ornament
gold spray paint
gold mica powder

I had seen tutorials and photos online for faux glass mercury ornaments and thought they looked fabulous.  My own attempts turned out horrendously!  I don't know what I did wrong, whether the spray paint I used was too cheap or what it was.  The instructions all say to spritz the inside of the ornament with water (which acts as a resist) and then squirt in a few bursts of metallic spray paint.  What happened for me was the propellant caused the water to freeze and I just got a nasty mess :(

This decoration was created out of an ornament I was almost prepared to give up on.  I had sprayed the inside with gold spray paint, no water or anything else, just the gold spray paint and swirled it around inside before inverting it over a small jar and allowing the excess to drain, hoping to get the same effect without using the water.  As it was draining, the particles in the paint separated and it dried in a random, blotchy manner, with lots of clear glass showing through. These are the darker gold areas that you see in the photo.

Then I saw a project where they had mixed perfect pearls and water to colour the inside of a glass ornament, and I thought why not use the copious amounts of mica I have lying about.  Micas are shiny minerals, and they provide the colour for lots of products, including paints and cosmetics.  Perfect Pearls is a mixture of mica with a fixative that bonds with water so that when they are mixed they form a water soluble paint, like H20's. 

I have a large quantity of cosmetic grade mica just sitting about the house gathering dust so I tossed about half a teaspoon of dry powder into the ornament and shook it about.  The mica powder is so fine and light that it adhered to the slightly tacky surface inside the ornament and suddenly I had a beautiful two tone gold ornament!  The photo doesn't show the beautiful shimmer that it has from the mica, but it does show you the two tone effect.

So to cut a long story short, to recreate your own, follow these simple steps:

1)  Remove the cap from a glass ornament and spray the inside with metallic gold spray paint and invert to let the excess drain out.  Leave to dry overnight.

2)  Put half a teaspoon of dry mica powder, such as Perfect Pearls, into the ornament and shake about.  Replace cap and hang on tree!


Monday, June 27, 2011

Pretty in Pink Winter Wonderland Challenge

Winter Fairy Card

Technique:  Papercraft

Materials:
cardstock
designer paper
Distress Ink:
* Victorian Velvet
* Bundled Sage
* Vintage Photo
* Aged Mahogany
watercolour paper
Wee Stamps Digi Winter Fairy
Sparkly Fluff
pink glitter glue
various embellishments

Tools:
paper cutting/scoring tool
Fiskars Border Punch
printer

The challenge over at Winter Wonderland this week is Pretty in Pink  As my range of copics is still very limited to traditional Christmas reds and greens, that meant using a water colour palette with my distress inks and choosing a dusty pink, so I wanted a project that was a little vintage, but not the grungy type of vintage that is so popular, I wanted a soft, feminine feel.

I found the idea for the 'book card' here.  The photos are clear and easy to follow, and the measurements in metric, which is a bonus for me!  All the edges on my card are sponged with Victorian Velvet, and I used a Fiskars border punch for the edges.  If you haven't made one of these before they come together quickly and easily and are perfect for giving small gifts inside.

Open Card


I purchased the Wee Stamps Winter Fairy digi from Cuddly Buddly because it allows me to download instantly, rather than waiting for someone to email me the image.  She is printed with a laser printer onto water colour paper and then painted using the palette listed above.

Her wings are highlighted with glitter glue, and her fur trim is done with Sparkly Fluff.

The sentiment I used for inside the book is from here.  Tonnes of fabulous word art freebies on the site, so spend some time checking it out.

The designer paper I used was a digital freebie that you can download here.  Another site with a large selection of free digital papers to download, worth the visit.


Side View

I had a great time putting this card together, learning some new techniques and a new card style.

Sunday, June 26, 2011

June Angels

June Angels

Technique: Crochet

Every week I crochet an angel and send it off to someone around the world that I don't know who is need of hope. This is fantastic way to let people know that no matter what they are dealing with, that they are not alone. 

For June I have decided to make white angels with a silver halo.

If you would like to register for Angels for Hope you can do so here. Also, if you know someone who is need of an Angel, you can put in your request there.

Saturday, June 25, 2011

Jack Skellington Part 6

Jack Skellington Ornament

Technique: Freehand Drawing

Materials
white acrylic paint
glass bauble
Bic Mark It pens

Add a little water to the white paint until it is the consistency of pouring cream. Pour into the bauble and swirl around to coat the inside fully and then tip upside down and drain. I have a little lab beaker that I use for this, works a treat!

Draw Jack's details onto the bauble with a black permanent marker. If you make a mistake simply dip an orange stick or toothpick into some isopropyl alcohol and rub away the boo boo. This is the sixth and final Jack Skellington bauble in a series of Nightmare Before Christmas Ornaments.


Set 6 Jack Skellington Ornaments


Jack Skellington Ornament

Jack Skellington Ornament

jack3Jack Skellington Ornament

Jack Skellington Ornament

Jack Skellington Ornament

Jack Skellington Ornament

Thursday, June 23, 2011

Crochet Snowflake

Crochet Snowflake


Technique: Crochet

Materials:
Size 10 crochet thread

Tools:
1.5mm crochet hook

The original pattern, and many more snowflake patterns, can be found here at Snowcatcher. This wonderfully talented women is passionate about raising money for MS. If you like this pattern please, please go visit her site and consider making a donation.

Snowcatcher writes: If you enjoy my patterns, please consider making a tax-deductible contribution to the Colorado Chapter of the National Multiple Sclerosis Association. I'll be riding the MS-150 in June to show my support for eight relatives, friends and relatives of friends who battle the disease every day.


Wednesday, June 22, 2011

Silver Swirl Carved Ornament

Silver Swirl Carved Ornament

Technique:  Papercrafting

Materials:
600 gsm card stock
background paper
adhesive
Distress Inks
* Faded Denim
* Stormy Sky
Number 10 crochet thread
craft metal sheet
snowflake sequins
Perfect Pearls
silver ink

Tools:
Sizzix Big Shot
Tim Holtz Alterations
* Carved Ornaments
* Mini Flourish
1.5mm crochet hook

The challenge at Simon Says Stamp and Show this week is to Show Some Metal.  As expected many of the DT examples and entries have a vintage meets industrial come grungy feel as is true to the Tim Holtz style.  I wanted to do something a little different, and use plenty of Tim Holtz tools and techniques, but come up with something unexpected.

Cover both sides of plain card stock with a background paper, I chose a dictionary paper with Christmas definitions, but I plan to do others with music paper in a red and gold theme, lots of scope for creativity.  When it's properly dry run it through the Sizzix with the carved ornament die.  Ink up the edges with distress inks, I wanted a blue and silver theme so I have used stormy sky and faded denim. 

I have made my own home made version of Perfect Pearls using white pearl cosmetic mica (think mineral make up), added to a mixture of water with just a few drops of gloss medium to act as a fixative.  Once upon a time I taught soap making and I have copious amounts of cosmetic glitter and mica in a vast array of colours sitting on the shelf doing nothing.  I imagine for most its simply easier to use Perfect Pearls or Glimmer Mist or similar product.  The front and back of the ornament are spritz with a white pearl glimmer.  Finally, ink the edges with silver ink, I used Versacolour for the metallic inks, I love their thick, sticky texture.

Adhere a piece of silver craft metal to an offcut of card stock and run it through the Sizzix using the mini flourish die to create the silver flourish.

Make one snowflake following the directions below.  The original pattern can be found here.

Ch 4, sl st into 1st ch OR make magic ring.

Round 1: Ch 5 (counts as 1 dc and ch 2), sc in ring, *ch 2, dc in ring, ch 2, sc in ring; repeat from * 5 times; ch 2, sl st in 3rd ch of starting ch 5 for a total of 6 petals. Do not pull magic circle too tight.
Round 2: In same ch as sl st, work: sc, ch 3, sc in 2nd ch from hook, ch 1, dc, ch 2, sl st in top of dc just worked, ch 3, sc in 2nd ch from hook, ch 1, sc, ch 3, sc in 2nd ch from hook, ch 1; in next dc and in each of next 5 dc around work: *sc, ch 3, sc in 2nd ch from hook, ch 1, dc, ch 2, sl st in top of dc just made, ch 3, sc in 2nd ch from hook, ch 1, sc, ch 3, sc in 2nd ch from hook, ch 1; sl st in starting sc of this row; bind off. Weave in ends.

Finishing is simply a matter of adhering the layers onto the base ornament and adding a bit of bling.

Tuesday, June 21, 2011

Country Snowman Snowcone

Country Snowcone


Technique: No Sew Fabric

Materials
styrofoam cone
styrofoam ball of a complimentary size to the cone
scrabs of fabric
buttons or eyes for stuffed toys
coloured pencils
sandpaper
cotton bud
foam glue
white quilt batting
black embroidery floss
raffia
small cuphook

Tools
scissors
serrated kitchen knife
embroidery needle
hot glue gun

Isn't he adorable! He's really easy to make too.

Start with your foam pieces. You want the ball to be a good enough size that it proportionally looks like a scoop of ice cream when placed on top of the cone. Now take a serrated knife and cut off a third from the ball, this helps it sit better and makes it look like the scoop of icecream is sitting inside the cone, just like a real one. I also dug out a little bit from the top of the cone with a teaspoon to give a little cavity for the fabric to sit in, so that the ball would sit flush on top of the cone.

Starting with the head, no glue yet, drape a piece of batting over the ball and draw in the V shape for his mouth. Using the black embroidery floss backstitch in the detail of his mouth. Now you can use foam glue and glue the piece of batting onto the ball, smoothing over the surface and pulling the pleats underneath to get it as flat as possible around the ball.. Once smoothed over I used an elastic band to secure it underneath while I set it to dry for an hour.

Choose a fabric for the cone and glue to cover. You could use 2.5" squares that you have tattered slightly for a more country look if you wish. I used one piece and started by folding a corner over the bottom tip of the cone, and then wrapping around and securing with glue, kind of like wrapping a present. Trim the excess at the top to about half an inch, and secure the excess into the recess you made with foam glue.

Once the head is dry, trim the batting underneath the ball. Use hot glue to secure the head to the cone. Rub a pink coloured pencil against sand paper so that you get pink coloured dust. Rub over the snowman's cheeks for colour. I used 7.5mm black eyes with screw points designed for use in stuffed animals for the eyes, these are great as you can screw them into the foam and they sit securely. If you cannot get any of these, buttons will be fine, I used a red button for the nose attached with hot glue.

I tore a one inch strip of checkered fabric from an old shirt and wrapped this around the join between cone and head as a scarfe, together with some raffia. To hang, screw a small cuphook into the top of the head.

Monday, June 20, 2011

Bentley With Poinsettia Christmas Card

Bentley with Poinsettias


Technique:  Papercraft

Materials:
cardstock in red, white and black
cobweb paper in red
glue stick
gold glitter glue
Sparkly Fluff
PVA glue
Bentley with Poinsettias digital stamp
Peeled Paint Distress Ink
No 10 red crochet thread
gold leaf

Tools:
paper trimmer & scorer
snowflake embossing plate
1.5mm crochet hook
2.00mm crochet hook
Sizzix Big Shot
Tim Holtz Alterations die
* Mini Flourish
* Tags and Bookplates
Copic markers:
Browns:  E31, E33, E37
Greens: G02, G05, G07
Reds:  R22, R27, R29
Greys: C-0, C-3, C-5


Christmas Flowers was the theme for the challenge over at Winter Wonderland this week and this gorgeous little Bentley digital stamp was perfect.  Bentley is coloured with copic markers, with a touch of gold glitter glue in the centre of the poinsettia.  His little friend has a touch of Sparkly Fluff to trim the hat.

The card is a 6" easel card made from red card stock.  Although it doesn't show up in the photo the white card has been run through the Sizzix to emboss a snowflake pattern onto it.  Two strips of red cobweb paper have been criss crossed over the white card, and then the image of Bentley was mounted to a piece of black card and glued into position.

The flourish is from the Tim Holtz Mini Flourish die, cut out of white card and coloured with copics and distressed with Peeled Paint ink.

The pattern for the poinsettias is actually a snowflake pattern.  Make two, one with each size of crochet hook, this will give you a large flake and a small flake.  When layered they will look like a flower.  The centre of the flower is made with gold seed beads and PVA glue, with a touch of gold glitter glue.


Crochet Poinsettia


The original pattern can be found here.   

Ch 4, sl st into 1st ch OR make magic ring.
Round 1: 12 sc in ring; sl st in starting sc. Pull magic circle tight, but leave opening big enough to allow stitches inside it to lay flat.
Round 2: *Ch 2, dc in next sc, ch 2, sl st in next sc; repeat from * around 5 times, sl st in sc of final sl st of Round 1.
Round 3: *Ch 4, dc in next dc, ch 4, sl st over next sl into sc below; repeat from * around 5 times, sl st in final sl st of Round 2.
Round 4: *4 sc in next ch 4 sp, ch 2, dc in next dc, ch 2, 4 sc in next ch 4 sp; repeat from * around 5 times, sl st in final sl st of Round 3; bind off. Weave in ends.


To prop the easel card open I created a 'santa buckle' using the rectangular book plate covered with gold leaf.  I have left the centre blank to hand write the recipients name.

I hope you enjoyed my card, it is only the second one I have made, and my first attempt at colouring with copics.

Sunday, June 19, 2011

June Angels

June Angels

Technique: Crochet

Every week I crochet an angel and send it off to someone around the world that I don't know who is need of hope. This is fantastic way to let people know that no matter what they are dealing with, that they are not alone.

For June I have decided to make white angels with a silver halo.

If you would like to register for Angels for Hope you can do so here. Also, if you know someone who is need of an Angel, you can put in your request there.

Thursday, June 16, 2011

Six Inch Crochet Blanket Sampler - Coffee With Cream

Coffee & Cream

Technique:  Crochet

Materials:
8 ply yarn in 3 colours

Tools:
4mm crochet hook

Finished Size:
6 inches


The original pattern comes from the book 200 Square Crochet Blocks by Jan Eaton.

Wednesday, June 15, 2011

White Rabbit Belated Birthday Card

belatedrabbit

Technique: Papercraft

Materials:
210gsm card stock, cream
Tim Holtz Distress Inks:
* Vintage Photo
linen paper
Graphic 45 Halloween in Wonderland Papers
* Jaberwocky
* Curiouser and Curiouser
Christina Re "faux" wax seal
glue stick or similar adhesive

Tools:
printer
photo editing software, I use Gimp because it's free
paper distressing tool
Alice In Wonderland brush, free download from here
Beyond Wonderland font, free download from here

This week's challenge over at Simon Says Stamp and Show is to Show Your Distressed/Torn Edges. Once again I really enjoyed this challenge, because what I started with was so different to what I ended with, and what I thought I wanted to make was nothing like what I actually made!

The other thing I love about the challenges is figuring out what I can do for little or no expense.  It's not that I am a tightwad (well maybe a little) but money I don't spend on something I can make myself is money I can spend on something else I can't, such as a die for my sizzix!  In this case I could spend $30 on an Alice rubber stamp set, or download the photoshop brush set for free, which then allows me to resize, recolour and re-edit any way I see fit.  Digital 'stamping' is limited by what you can run through your printer, but that still leaves an enormous scope for creativity.

The first thing I started with was an image of the white rabbit printed onto linen paper.  I knew that I wanted him to be on a scroll or banner.  Initially I fooled around with making him a banner with a fringed bottom, but the scroll looked nicer.  It's roughed up around the edges with the paper distressing tool and then inked vintage photo before curling up the short edges to create the scroll.

The rest is really just a matter of layering and assembly.  The card is an easel card made from 210gsm weight cream card, aged with vintage photo.  Then a layer of Curiouser and Curiouser, distressed and aged.  Then a piece of Jabberwocky was torn for the front and inside panel, and (you guessed it) aged with vintage photo ink.

The sentiment was perfect for a belated birthday, it's printed out on linen paper using the font Beyond Wonderland.  A little white rabbit card cut from the Jabberwocky paper acts as the prop for the easel card when it's open to prevent it from closing shut.  The faux wax seal was the finishing touch.

I played around with lace and flowers and flourishes, but I liked the clean, masculine feel.

Tuesday, June 14, 2011

Christmas Altered Domino

Santa Domino


Technique:  Collage/Papercraft

Materials:
domino
paper images
glue or gel medium
acrylic paints
800 grade sandpaper
Christmas bling
varnish or sealant

Tools:
scissors
Dremel Tool

This is worked on one of the white plastic dominoes.  Next set I buy I think I will look for a set of wooden ones, they will be much easier to attach fittings too.  The white plastic type are quite difficult to drill through, and they let off a horrible stink, which leads me to think that the fine white dust can't be terribly good for you.

Prepare your domino by first drilling a hole at the top for the hanger, and at the bottom for the bling.

Lightly sand the domino to give the glue and paint a tooth to adhere too.  Using gel medium, or your glue of choice, attach an image to both front and back of the domino.  Let dry thoroughly and sand the edges of the image to ensure a flush fit.  Use a skewer to poke through where you drilled the holes.

Paint the edges with acrylic paint, and when dry finish with a coat of varnish, or sealant, whichever you prefer.  Attach a hanger and some bling.

Monday, June 13, 2011

Snowman Shaker Ornament

Snowman Shaker Ornament

Technique: Die Cutting/Papercraft

Materials:
600gsm card stock
Tim Holtz Distress Inks:
* Faded Denim
acrylic paints
gel medium or adhesive of choice
old Christmas card
snowy glitter
scrap of acetate
craft snow
spray matte varnish

Tools:
Sizzix Big Shot machine
Tim Holtz Alterations
* Winter Wonderland die
* Base tray or Tags and Bookplates die
Tim Holtz Movers and Shapers
* Joy die
scissors
scalpel
Dremel tool

Run four sheets of card stock through the sizzix to get five snowman die cuts.  Put one through again using a base tray and the movers and shapers mini die to cut out the word JOY.  I don't have a base tray, but the tags and bookplates die has a large enough recess to fit the snowman into without cropping anything off him.

Stack the JOY snowman on top of one of the other snowmen and trace around the inside of the oval.

Snowman Shaker
Draw around the inside oval.
When you take away the JOY snoman you will have a series of dotted lines where you drew around the oval, fill in the blanks and you should have an oval shape like this:

Snowman Shaker
You should have an oval like this.
Use a craft scalpel or knife to carefully cut this oval shape out.  Now use that snowman to draw an oval on a second snowman blank and cut that out.  Confused?  You should now have:

1 x snowman with the word JOY cut into his belly
2 x snowman with ovals cut into his belly
2 x snowman with no alterations, put one of these aside for now, and use one as the base

Use the snowman with an oval belly as a template to cut a scene from the Christmas card.

Making the base: 
Glue the two snowman with ovals to an unaltered snowman base and allow to dry.  Glue the scene from the Christmas card into the recessed oval.

Decorating the top:
Take the JOY snowman and cut away his right arm.  Paint him white and ink the edges with a touch of faded denim distress ink.  Take the spare snowman and cut away his left arm, his hat and his nose.  Paint the hat black, the arm brown and the nose orange.  You can also paint the right arm on the base construction while you have the paints out.  Spray the snowman with a coat of matt varnish (you do this step now so it doesn't blemish the acetate).

Putting it all together:
You should have a base that has an oval recess with an image glued inside.  Cut a piece of acetate about a quarter of an inch larger than the oval recess.  Place a little snowy glitter inside the recess and glue the piece of acetate into place to seal it inside.  Glue the snowman with the JOY belly into place over the top of that and then glue the hat, nose and arm into place.  When dry drill a hole through the hat to hang him by and then add some craft snow.

Sunday, June 12, 2011

June Angels

June Angels

Technique: Crochet

Every week I crochet an angel and send it off to someone around the world that I don't know who is need of hope. This is fantastic way to let people know that no matter what they are dealing with, that they are not alone.

For June I have decided to make white angels with a silver halo.

If you would like to register for Angels for Hope you can do so here. Also, if you know someone who is need of an Angel, you can put in your request there.

Saturday, June 11, 2011

Make Your Own Blending Tool (for around 20 cents)

Technique:  Woodcraft

Materials:
pine wood plank 45mm wide
velcro, hook part only
sandpaper

Tools:
jigsaw or handsaw
scissors

A few weeks ago, for my birthday, I splurged and invested in a moderate amount of stamping supplies.  By moderate I mean a few hundred dollars.  There was a die cutting machine, a few die plates, some distress inks and a Ranger Blending Tool with foam pads.

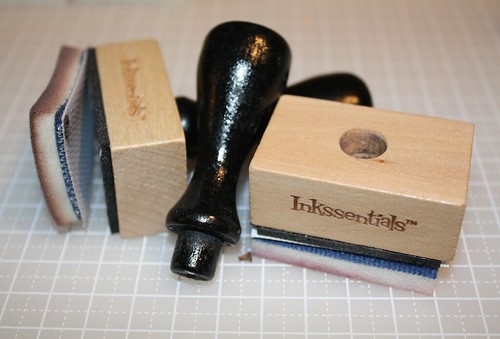
The blending tools are pretty essential, and they get used for just about everything. Below are images of the tools as you would buy them from your local craft store.  In Australia the tool itself will cost you approx $8, in the States about $5.


The wooden tool has a velcro hook strip on the flat part, and the foam pads have a soft fuzzy blue size which attaches to the velcro.  I have bought two of these tools, and was so disappointed in the quality I will never buy another.

Broken blending tools

The first one I bought, you can see to the left in this photo, the first time I tried to replace the foam pad, the velcro strip stuck to the foam pad and tore away from the wooden base., and now it continually flops the base.  Very poor adhesion on the velcro. 

The second one I bought came out of the box with the handle broken.  $8 each!!  I know a dob of glue and it would have been fixed, but that isn't the point.  I expect a little quality control.  When I opened the package  on the second and held both pieces in my hand, the penny dropped.  That's just a block of wood with velcro on it.

The foam pads are 45mm x 30mm in size.  A trip to the local hardware store and I found 1.8m length of pine that would suit.  1.8m is enough to make 60 blending tools, and it cost me $1.80 to buy.  That is 3 cents each for the wooden bases.  Three cents!

Make marks along the pine at 30mm intervals.  Using either a hand saw, or a clever hubby with a jigsaw, cut the pine into little blocks.
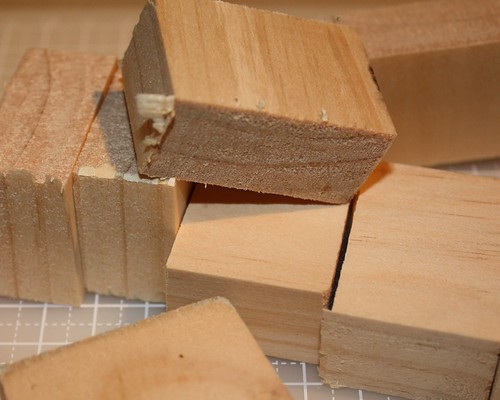
Freshly cut blocks
Freshly cut blocks

The pine is lovely to work with, and sands easily. Take a piece of sandpaper and go around all the cut edges.  This step only takes a few minutes and a little bit of elbow grease.  You could apply a sanding sealer or stain if you wanted too, but there's no fear of splinters once you sand it back.

Blocks after sanding
Sand the edges a little

I tried two types of velcro on my blocks, one pre-purchased sticky back velcro, the other sew on velcro that I glued onto the wood.

Sticky Back Velcro (the expensive but instant method)
I bought this from the hardware store, a brand especially designed for heavy duty applications, such as holding up heavy tools.  It forms a strong bond in 60 seconds, and a near permament bond after 24 hours. The packet cost me $4.00 and it had enough velcro hook to make 7 blocks. That's 71 cents for the velcro.

Sew On Velcro (the cheaper but longer method)
I bought some sew on velcro from the haberdashery store, doesn't really matter what brand but mine was Velcro brand.  I paid $3.50 for half a metre of 50mm wide, which will cut down to 16 strips.  That's 21 cents for the velcro.  This needs to be glued on, and of course you will need to wait for the glue to dry.  Use something with a strong bond, like Tarzan Grip.
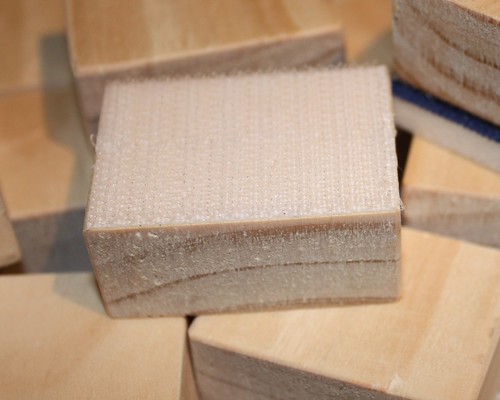
Block with velcro
Attach velcro

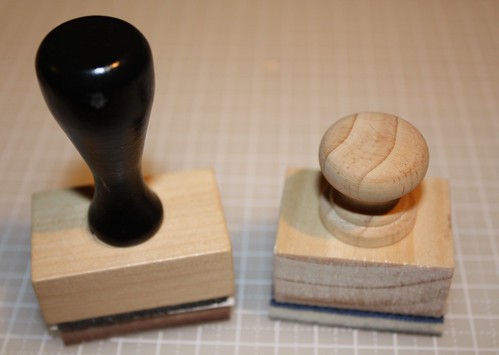
If you like you can glue on your own handle. Visit the knobs and handles aisle of the hardware store and you will be sure to find a large selection. The one I used here is intended has a flat base so it is a simple matter of a dollop of glue or liquid nails and its on for good. The knob is optional, and will add a little more to the cost., about a dollar.  After having to use the broken Ranger one without the knob, I kind of prefer not to have the handle now, so I left mine without, but I wanted to show you what it looks like with a handle if you prefer.

So here is the side by side comparison.

Comparison between blending tools


The one from Ranger cost me $7.95. The ones I made cost me 74 cents (for the sticky back velcro version)  and 24 cents (for the plain backed velcro that was glued on).  The savings on one blending tool is enough to buy a new colour of distress ink.  Tonight I made a dozen, saving myself well in excess of $85.00.

Thursday, June 9, 2011

Crochet Snowflake

Crochet Snowflake


Technique: Crochet

Materials:
Size 10 crochet thread

Tools:
1.5mm crochet hook

The original pattern, and many more snowflake patterns, can be found here at Snowcatcher. This wonderfully talented women is passionate about raising money for MS. If you like this pattern please, please go visit her site and consider making a donation.

Snowcatcher writes: If you enjoy my patterns, please consider making a tax-deductible contribution to the Colorado Chapter of the National Multiple Sclerosis Association. I'll be riding the MS-150 in June to show my support for eight relatives, friends and relatives of friends who battle the disease every day.


Print the above image out onto ordinary paper. Tape the piece of paper to a sheet of styrofoam. Tape a piece of baking paper or wax paper over the top of that. This creates a non stick blocking template. The above grid allows you to easily line up your snowflake spokes so they are symmetrical.

Blocking Board

In a small bowl dilute a little white glue until it is the consistency of pouring cream. Saturate the snowflake and squeeze well to force out any excess. Make sure you are using rust free pins, and pin to your template. Give a sprinkle of glitter if you like, I like quite a bit as I use them on the tree and really makes them sparkle. Allow to dry for 24 hours and then remove the pins and peel away from the paper. You can re-use that printed template several times.


Blocking a Snowflake

Wednesday, June 8, 2011

Winter Bird Cage Ornament

Winter Birdcage Ornament


Technique:  Die Cutting/Scrapbooking

Materials:
1.5mm balsa wood
acrylic paints
silk flowers and leaves
pva glue
winter fabric
adhesive crafting metal
snowflake sequins
tissue paper
Versacolour silver ink
seed beads

Tools:
Sizzix Big Shot die cutting machine
Tim Holtz Alterations Caged Bird die
Tim Holtz Alterations Tattered Floral die

Cut a piece of balsa the length of the die cutting plate and glue the fabric to the front and back using PVA glue.  Allow this to dry overnight, it's quite nasty to run a wet surface through the die cutter, so be patient!  Once cut, ink the raw edges of the die with the silver ink.
The bird was made using the left overs from making this snowflake embossed ornament

Run a stack of six sheets of tissue paper through the sizzix with the tattered floral die and ink the edges with the silver ink.  Stack one flower on top of the other, rotating each one slightly and securing with a dot of glue.  Place a bead of glue in the centre and add a few seed beads for the flower centre.  Leave it to dry thoroughly, then 'fluff' up the layers of the flowers to give volume and dimension.

Embellish with snowflake beads, silk leaves, ribbon or anything that you like.

Tuesday, June 7, 2011

Halloween in Wonderland Tag

Fears and Dreams Tag


Technique:  Papercraft

Materials:
tag
Tim Holtz Distress Inks:
* Aged Mahogany
* Spiced Marmalade
* Vintage Photo
* Walnut Stain
* Sage Green
* Peeled Paint
Wonderland Classifieds paper by Graphic 45
double sided adhesive foam
embellishments
ribbon

Tools:
Sizzix Big Shot
Tim Holtz Texture Fade:
* Halloween Night & Poison
paper distress tool
blending tools
scissors
stapler

This week's challenge over at Simon Says Stamp and Show is to Show a Tag.  I have been dreaming about my Halloween in Wonderland paper from Graphic 45 all week, so this was the excuse I needed to play.

The base tag was made out of left overs from last week's project, which was 600gsm inked with sage green and peeled paint and then splattered with droplets of water.  After die cutting my tag, I than ran it through the Big Shot using the Halloween Night Texture Fade to emboss.  The raised areas are inked with spiced marmalade, vintage photo and walnut stain.

Alice is cut from the Wonderland Classifieds paper.  I cut away her broomstick because I made a little one to replace it.  I also cut a slit across her arm where the broom handle sits so I could slide in the little wooden one I made.  The image of Alice is already yellow with some red distress so I didn't add anything further to her.

The sentiment is a Tim Holtz stamp, inked with Aged Mahogany and roughed up around the edges.  I think this sentiment is perfect for the Alice theme, as I think both her fears and dreams lay down the rabbit hole.  The poison comes from a piece of grungepaper embossed with the Poison label Texture Fade.  First I inked the texture fade with black and then ran through the grungepaper, then inked it with a little red and green.


Fears and Dreams Tag

Monday, June 6, 2011

Hot Chocolate Tag

Hot Chocolate Tag


Technique: Stamping

Materials:
Holly Cheer Cocoa digital stamp
watercolour paper
Tim Holtz Distress Inks:
* Sage Green
* Aged Mahogany
* Vintage Photo
corrugated card
eyelets
ribbon

Tools:
printer
scissors
blending tool
aqua brush
corner punch
eyelet setter
Big Shot die cutting machine
Tim Holtz Alterations
* Tags and Bookplates die

The details haven't come up as nicely in the photo as I would have hoped, but this really is a lovely tag.  The combination of rustic corrugated card, with the lacy scallops on the edges, the soft vintage colouring from the distress inks, and the hand made 'designer paper' featuring the word chocolate, it all fell into place beautifully.

Create the base tag and a square book plate out of corrugated card using your Big Shot and the tags die.  If you have a sizzix and don't have the tag die yet, it's awesome!  If you don't have a sizzix or similar you can cut a tag from corrugated card manually.

Print or stamp your image onto water colour paper.   Using an aqua brush and the distress inks listed, colour in the mug of cocoa.  When finished, cut your image out.

You can download the word art I created here.  It's nothing flash, simply the word chocolate in a font called Everyday Ghost repeated down the page.  This part didn't pick up well in the photo, but it's repeated in a very pale sepia colour except for the word that is framed by the book plate, which is in a dark brown.  I printed this onto a piece of linen card, used the punch to create the decorative edges, and then aged them with vintage photo distress ink.

Chocolate Background Paper


Once your components are complete, its a simple matter to glue the layers in place.  Set the plate into place over the word chocolate and secure with co-ordinating eyelets.

I made this tag especially for the Winter Wonderland Challenge this week, the theme this week is "The Foods of Christmas".

Sunday, June 5, 2011

June Angels

June Angels

Technique: Crochet

Every week I crochet an angel and send it off to someone around the world that I don't know who is need of hope. This is fantastic way to let people know that no matter what they are dealing with, that they are not alone.

For June I have decided to make white angels with a silver halo.

If you would like to register for Angels for Hope you can do so here. Also, if you know someone who is need of an Angel, you can put in your request there.

Saturday, June 4, 2011

White Rabbit Altered Domino

White Rabbit Domino


Technique: Collage/Papercraft

Materials:
domino
Jabberwocky paper by Graphic 45
glue or gel medium
clear crackle medium
acrylic paints
fine grade sandpaper

Tools:
scissors
Dremel tool

Use the dremel to drill a hole in each end of the domino.  Lightly sand the domino to give the paint and glue a better surface for adhesion and wipe clean to remove any dust.

Cut your image to size and glue into position with your glue of choice, or gel medium, which I love using for these dominos.  You can glue just on the flat side of the domino and leave the other side plain, or you can glue images on both sides, or you can glue over the side with dots and paint the flat side, whichever sparks your imagination!  I like covering both sides with images, that way there is no right or wrong way to hang them on the tree.

When dry, sand the edges of the paper to ensure they are flush with the domino and paint the edges.  When the paint is dry apply a coat of crackle medium.  Allow to dry off overnight and finish with a coat of varnish or sealant.  Apply bling and hang.  I have used gold crochet thread and antique gold style beads.

Friday, June 3, 2011

Catching up with The Vintage Moth

Once a week I spend the day playing catch up, adding the finishing touches to any projects not quite yet done, taking photos and browsing the net for inspiration, and as always, looking for free patterns and interesting tutorials. To stick to my commitment to posting daily, I'll share with you something that I thought was a fabulous find.

Whilst blog hopping for the Simon Says Stamp Challenge I came across The Vintage Moth, a collection of free antique and vintage images for mixed media artists.  There is the usual selection that you can expect to find in a free graphics collection such as victorian postcards, vintage advertisements, black and white photos.  My favourites, however, are the dictionary pages encompassing the words that are commonly used by artists such as love and creative.

No need to chop up a dictionary for paper to use as a background when you can just print out the sheet you want :0)


Thursday, June 2, 2011

Six Inch Crochet Blanket Sampler - Anemone

Anemone


Technique:  Crochet

Materials:
8 ply yarn in 3 colours

Tools:
4mm crochet hook

Finished Size:
6 inches

The original pattern comes from the book 200 Square Crochet Blocks by Jan Eaton.