Showing posts with label sewing. Show all posts

Friday, February 10, 2012

Pretty In Pink Card

Pretty In Pink

Card Positioning Systems is celebrating their 5th Anniversary by releasing a sketch a day for 15 days.

This card is my interpretation of the day eleven sketch.


Finally, a sketch that came together painlessly!  I knew the instant I saw this sketch what elements I was going to use, and the longest part of the whole card was making the skirt.

The background paper is from the Sweet Nothings collection by Kaisercraft.  The dress form is cut using the Sewing Room die by Tim Holtz from a scrap of cream toned paper on chipboard.  The tickets are by Tim Holtz also, and the crochet skirt is by me. 

Tuesday, February 7, 2012

Vintage Sewing Card

Vintage Sewing Card

Card Positioning Systems is celebrating their 5th Anniversary by releasing a sketch a day for 15 days.

This card is my interpretation of the day eight sketch. 


The card base is Kraft once again, the patterned paper with the sewing patterns is called Dressform from the Timeless Collection by Kaisercraft, and the centre panel is from the Domestic Goddess series by Graphic 45.  A paper doily provides the lacey ruffle and the accent is a paper rose made from coffee filter paper and the Rose Creations die by Spellbinders.


Sunday, February 5, 2012

Retro Sewing Card

Sewing Card

Card Positioning Systems is celebrating their 5th Anniversary by releasing a sketch a day for 15 days. 

This card is my interpretation of the day six sketch. 


This card was made with a Vintedge kit by Ruby Rock-It, on a Kraft base.  The kit was fantastic value, 6 different paper designs (2 of each for 12 sheets total), plus stickers and die cuts for $10.  I used the Tim Holtz Sewing Room Alterations die to cut two bobbins and wound embroidery floss around the centre and attached them as accents.  There is also a yellow bobbin inside next to the sentiment which reads:  "May your bobbin always be full".

I'm still not sure if I like this card, retro is not something I have played around with much.  I am sure if I pop in a fat quarter of quilting fabric the recipient won't care what the card looked like ;o)

Tuesday, March 8, 2011

Cupcake Ornament

Cupcake Ornament


Technique: Sewing

Materials:
pink and brown felt
matching thread
beads
ribbon
quilt batting

Tools:
scissors
sewing needles

Use the template below as a pattern and cut out two of the tops in pink, and two of the base in brown, and one of each from the quilt batting. Use your printer settings to resize for a larger or smaller cupcake.


Sew the beads onto one cupcake top. Sandwich together the bottom layer so that it is brown/batting/brown and whipstitch the three outside edges together. Repeat with the top so that it is pink/batting/pink and whipstitch together, leaving the scalloped edge free.

Nest together the base and the cupcake top, slipping the base in and under the scalloped edge. Secure with pins so it doesn't slip and whipstitch all the way around to secure. Attach a ribbon to the top to hang.

Tuesday, February 15, 2011

Wedding Corset

Corset


Technique: Sewing

Materials
base fabric of choice
ribbon, lace, trims
tacky glue
filling (either polyfill or herbal)

Tools:
sewing machine
scissors


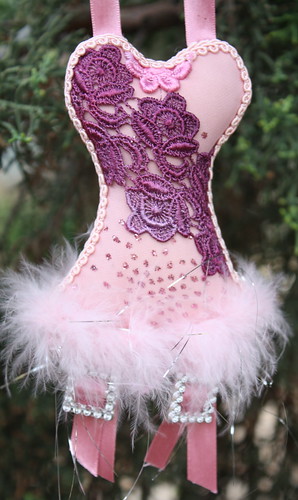
Many of the materials I used in this corset were remnants from my wedding dress (yes I wore pink).


With the base fabric right sides together, use template above to cut out two pieces.

Cut two lengths of ribbon about four inches in length. Fold and pin into place upside down on the right side, bottom edge of the corset to act as the garter straps. It's kind of hard to explain if you have no sewing experience, the folded edge of the ribbon will be flush with the bottom edge of the corset and the cut edges will be pointing up towards the bra section, so that when you sandwich it back together you will sew over the top of it and catch it in the seam to secure it. Then when you turn it right way out, the two garter straps will be danging down.

Cut a six inch length of ribbon and pin each cut end to a bra cup, loop pointing down, so that when turned right way out it acts as a hanging loop.

Place the other pattern piece, right sides together, over the top and pin into place being sure that the loose ends of the ribbons are not caught in the seams.

Sew, leaving an inch gap at the bottom. Clip curves, turn and stuff. You can stuff with herbs like lavender for a scented corset you can hang in your wardrobe, or use polyfill. Whipstitch bottom gap closed.

OK dull part over, fun part begins! Using tacky glue you can decorate your corset in any way you like. I added some feather boa at the bottom, and found two "buckles" to attach to the ribbons as garter clasps. Hand died lace and gimp braid added the finishing touches.

Sunday, January 30, 2011

Felt Donut

Felt Donut


Technique: Sewing

Materials:
pink and brown felt
bugle beads
stuffing
ribbon

Tools:
needle and thread

Using a circle template draw a 3 1/2" circle onto a piece of paper. Trace a 1" circle size in the middle of the 3 1/2" circle so that you have a donut shape. If you do not have a circle template, a regular drinking glass and a shot glass will give the same result. Cut out the donut so that you have your paper template.

Cut two donuts from brown felt and one from pink felt. Working with just the pink layer, attach bugle beads to resemble sprinkles.

Layer all three pieces together and whip stitch the centre circle with pink thread. Working with only the two brown layers and brown thread, whipstitch the outside of the donut, leaving a 1" gap. Insert stuffing, pushing all the way around the donut with a chopstick until it is evenly distributed and firm to the touch. Whipstitch closed the last inch.

Switch back to the pink thread and whipstich down the outside edge of the pink felt. Stitch a piece of pink ribbon in place if you wish to hang the donut.

Saturday, January 29, 2011

Distressed Gingerbread Cookie

Distressed Ginger Ornament


Technique: Sewing, Painting

Materials:
calico fabric
acrylic paints
buttons
"jingle" bell
embroidery floss
scrap plaid fabric
wire
sandpaper
quilt batting
sea sponge
sandpaper

Tools:
sewing machine
sewing needle
hot glue gun
stippling or stencilling brush
thin paint brush
pinkingshears

Cut two 5" squares from the calico and one or two 5" squares from the batting (depending on thickness of batting and how thick you would like your cookie). Make a sandwich from the calico and batting so that you have one layer of calico, one or two layers of batting and then a layer of calico. Using a large glass or a circle template draw a circle onto the calico. Take 'sandwich' to sewing machine and sew along the drawn line. Cut circle out with pinkingshears.

Now that you have your base cookie, it's time to get creative. Using two or three different tones of brown and the sea sponge dapple over the cookie, being sure to get into the groove caused by the sewing and the edges. Allow to dry overnight. Using the sandpaper distress the top of the cookie, be light in some areas, firmer in others. Scrunch the cookie up to force creases and sand right over the top of the scrunched fabric. When you have finished sanding, wipe over the cookie with a damp sponge.

Using the stencilling brush and a little red paint, dry brush in high lights for the cheeks. Using the thin brush and white acrylic thinned down a little, draw the wavy line around the outside of the cookie. When dry sew on the buttons for eyes and the jingle bell for a nose. Use either black paint or black embroidery floss for the eye brows to give the cookie a worried look (she's a distressed cookie, get it?!)

Make a loop from the wire and push the ends into the top of the cookie between the layers of batting and calico, then bend the tips so that it doesn't just slip right out again. Cut a strip from the plaid fabric and form a bow, then adhere using hot glue.