Showing posts with label Simon Says Stamp. Show all posts

Saturday, August 27, 2011

Vintage Valise Mini Album Pt 1

Valise Album


Technique:  Papercrafting

Materials:
thick cardboard
adhesive
designer paper
Tim Holtz Ideology large binder spine
tissue tape
Distress Inks (black & walnut)

Tools:
Sizzix Big Shot
Tim Holtz Vintage Valise die

I recently worked with a digital stamped called First Snow, and it got me thinking about the first time I saw snow.  It never snows where I live, we're close to sea level and too close to the coast line.  We will, on occasion, get a light snowfall in the Mt Lofty Ranges, a 90 minute drive from where I live, but the snow is so light and so briefly lived that it would be gone in the time it took to travel there!

The first time I saw snow was in Mt Hood, Oregon.  I visited there in October around a decade ago, and Mt Hood is high enough and cold enough that it has snow all year around, so my friends took me to see it.  I was so excited!  I remember being near the ski lodge and there was patches of snow around on the ground.  "SNOW" I squealed.  I was told that it was most certainly not snow, it was "snirt", what happens to snow when it melts and mixes with dirt.  They did take me further up the mountain to where the snow was still around knee deep.

Anyway, the memories got me digging through my photos, plane tickets, postcards and other junk, which led to wanting to take them out of the dingy box they have been sitting in and into an album or junque journal.

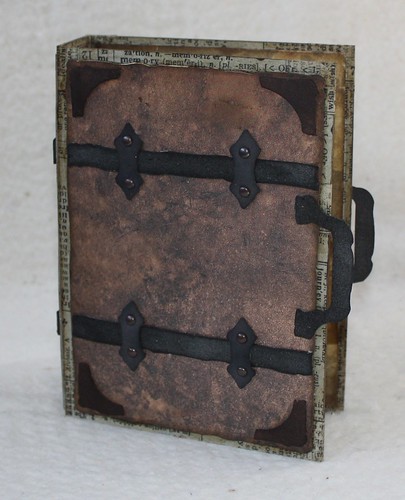
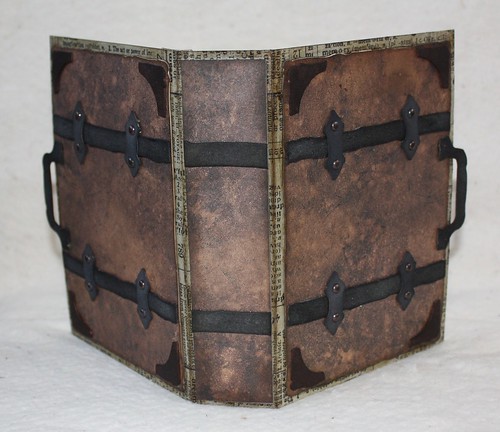
The cover is made from a sheet of thick cardboard, I used the backing board to a sketch pad cut down to 14" x 4.5".  It has then been scored at 4.5" and 6" to create a 1.5" width spine.  This is slightly larger than the valise die, and just big enough to fit a 5" x 6" glossy.  A decade ago digital photography was almost unheard of, so I have a handful of actual photo's I would like to preserve.

Valise Album


I used tissue tape on all the edges and to re-inforce where I scored the spine.  The interior of the binder has a world map glued into position, with another piece of tissue tape that has the dictionary definition of "journey" on it.

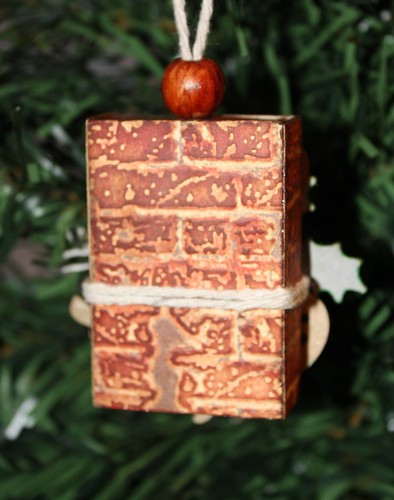
The exterior of the binder has the vintage valise pieces.  I had a piece of leathery looking paper in my stash that I used for the suitcase.  The bindings were made from some scraps of grungepaper, inked with black distress ink, and the whole binder has had liberal applications of walnut stain ink.

Valise Album


I was inspired to create this by the Simon Says Stamp and Show challenge theme this week which was travel.  I didn't get enough time to even start on the inside of the album pages, so I'm just entering the binder and I'll fill in the pages over the coming weeks.

Wednesday, August 3, 2011

Bigsby's Christmas Wish

Mouse Dreams


Technique:  Papercraft

Materials:
matchboxes
masking tape
corrugated card
various complimentary cards and papers
Rock Candy Stickles
miniature wooden spools
embroidery thread
adhesive
string
buttons
Distress Inks

Tools:
Sizzix Big Shot
Tim Holtz Texture Fade, woodgrain
Martha Stewart Holly Punch


Mouse Dreams
This is the card as it will be given, with the easel laying flat.

I had so much fun making this little card!  He measures a wee 4" x 4" in total, so the design space was quite limited, but the multi layers gave me a lot of area to work with.  The entire card was inspired by the digi Bigsby's Christmas Wish, I wanted to create a diorama effect, so that the corrugated card with woodgrain gave the appearance of being the floorboard that Bigsby's bed was on.


Mouse Dreams
The interior of the card, when completely opened.

There were a lot of steps to this card, I hope I don't bore you!  First step was to line both sides of the corrugated card (as you will see both sides).  The uppermost surface is covered with woodgrain.  This was done using Tim Holtz wood grain texture fade and a piece of manila card, and then inked with burlap, walnut stain and vintage photo distress inks with a coat of rock candy Stickles to blend the colours and give it a little sparkle.  The other surfaces are covered with a textured rich brown paper.


Mouse Dreams


The sides and drawers of the matchbox are covered with small strips of manila card that have been inked with walnut stain.  I have used gel medium as the adhesive for all the major construction as it forms a very strong bond, yet it still has some flexibility to it.  Once the strips had been adhered to the match boxes and completely dried, a little sanding around the edges further added to the distressed look.  The handles are made from a jewellery toggle.  I drilled a hole through the front of the drawer and pushed through the little ring on the end of the toggle and secured it in place with a jump ring.  I've seen a few matchbox drawers that use beads as the handle, but I keep my fingernails trimmed very short so I needed something easy to grip.

Next step was to join the matchboxes together so that when the card was glued on top they didn't jiggle about and move out of place.  Looking at the photo you can see that on each side the matchboxes are arranged so that you have one short side (which acts as a drawer) and one long side.  Tape them together and then glue the 4" pieces of corrugated card into place to make a sandwich.

That's the base constructed, which gives you a 4" by 4" surface to decorate.  The easel portion of the card is manila card inked with walnut stain, and the frame is the same textured brown paper that I used to line the 'floor boards' with.  I felt this gave design continuity to the card as a whole.


Mouse Dreams


Bigsby has been coloured with Copic markers as follows;
Reds: R22, R24, R27, R29
Greens: G02, G03, G05, G07
Floorboards: E31, E33, E35
Walls: E11 then 'scumbled' with the colourless blender
Bigsby: E33, E35, E37, E29
Blues: B91, B93, B95, B97
Greys: C0, C3, C5
Yellows: Y11, Y15, Y17

The 'floorboards' are decorated with a strip of corrugated card that has been brushed with white ink, topped with a torn strip of Dasher paper by Basic Grey.  A few buttons, a bit of string, some holly leaves and red seed beads.


Mouse Dreams


The little wooden spools were from my local craft store, I have inked them with walnut stain and wound a few strands of embroidery floss around the core.  The sentiment and calendar are Tim Holtz, stamped onto manila and aged with vintage photo distress ink, and a touch of gold glitter glue around the edges.  I love the tie in between the sentiment and Bigsby dreaming about cheese, so cute!

Challenges, a lot this week but a lot of work went into this one!

Simon Says Stamp - Christmas in August
ABC Christmas Challenge - Make a gift or gift box (this is a combination card and gift box with four little drawers for gifts)
Sew Many Challenges - Anything Goes 
Stamps + Fun = Creativity - Christmas 
Christmas Crafting - Cute Christmas 
Paperplay Challenges - Christmas in August
Little Red Wagon - Put a critter on it 
Fussy and Fancy - Christmas in July 
Creative Belli - Non Paper Materials 

Last but not least, naturally I had to enter into into Karen's Doodles Challenge, as that is where the lovely Bigsby comes from.  Their challenge this week was to use it up.  Lots of recycled elements in this card, the matchboxes, the corrugated card was from an old cardboard box, the scraps of embroidery thread, and old buttons.

Monday, August 1, 2011

Steampunk Tag

Steampunk Tag


Technique:  Papercraft

Materials:
Scarlett West digi
Copics Markers
Skin: E0000, E00, E02
Golden Brown: Y23, Y26, Y28
Leather Brown: E31, E33, E35, E37, E29
Green: YG61, YG63, YG67
Black: C0, C3, C5, C7
Steampunk Debutante paper by Graphic 45
Distress Inks;
* Vintage Photo
* Antique Linen
* Black Soot
* Walnut Stain
Vintage Photo Stickles
Copper Gel Pen
cardstock
craft metal
metallic copper embossing powder

Tools:
Sizzix Big Shot
Tim Holtz Alterations die, Tag and Booksplates
Cuttlebug embossing folder, Clockworks
Spellbinders Spritely Sprockets
Steampunk Charity Wings rubber stamp set by the Rubber Cafe
heat gun

Did I mention my love for all things steampunkery? :0)

This tag I made specifically for the Simon Says Stamp and Show challenge this week, the theme of which was to show a tag

Do you remember when you first started papercrafting?  You were probably like me and started with very limited supplies, and even a spending spree only meant getting a few prized tools and materials.  Slowly, over time, the collection grows and grows and you can start making what you envision in your head without need for substitution or compromise.  That's been the case with this tag.  First came the Big Shot, then some distress inks, some dies, some embossing folders, and the rubber stamps, don't even get me started on Copics, do you know how long it takes to build up a colour library when you budget to buy 3 at a time LOL.

The main image is called Scarlett West from Kenny K.  No doubt you will get bored with how many times I will use this particularly lovely!

The tag is made using a Tim Holtz die, tag and bookplates, I use this all the time, well worth the investment.  The cog pattern on the background is made with a Cuttlebug embossing folder I am beginning to prefer these over other brands as they are considerably larger.  No need to butcher the folder apart to fit in a tag.  The embossed areas are inked with antique linen and vintage photo distress inks.

The wings and sentiment come from a set by Rubber Cafe called Steampunk Charity Wings, it's one that I can see myself using again and again.  The set was designed especially to support an organization called Charity Wings which is a California Non-Profit Organization that serves as a resource for Crafters and Artists that want to raise money and awareness for charity.


The sentiment is a quote by Orville Wright which reads "If birds can glide for long periods of time why can't I?"  The wings were stamped in vintage photo and then embossed with copper embossing powder.

The cogs are cut from card using a Spellbinders die, Sprightly Sprockets.  Inked with vintage photo, embossed with copper embossing powder, inked again with soot black, and then given a sprinkle of vintage photo Stickles.  The larger of the cogs has been attached with a brad that has likewise been embossed with copper and kissed with Stickles.


Steampunk Gears


Do you ever wish companies would make things just for you?  I wish Texture Fades embossing folders were larger and I wish Spellbinders would make steel rule dies so I could cut chunky materials.  What would you wish for?

Monday, July 25, 2011

Happy Birthday To Ewe

Happy Birthday To Ewe


Technique: Papercraft

Materials:
600gsm card
Distress Inks:
* Antique Linen
cord and ribbon
charm
Happy Birthday to Ewe digital stamp
Religious Christmas Herd paper
1/8" inch hole punch
black card
velcro dots

Tools:
Sizzix Big Shot
Box with Scallop Flap Scoreboard Die
2" scallop circle die

I bought this scoreboard die months ago thinking I would use it all the time, but this is the first time!  It's a great size, idealt for storing a pack of gum, or breath mints, or a travel pack of tissues, or band-aids, or for discreetly storing feminine products.  You could put a mini sewing kit in there, it's big enough to hold an ATC, and of course it's the perfect size for gift cards, it's shameful that I haven't made anything with this die yet!

My middle daughter will be 19 in a few days (July is a busy month for me with 4 birthdays in total).  I knew that Cuddly Buddly had an awesome range of digi stamps that use the word "ewe" instead of "you" so when I found the Religious Christmas Herd paper it was a match made in heaven!


The scoreboard dies are intended to cut and score quite thick materials.  If you run regular paper through it will cut it, but it's not thick enough to have the score lines imprinted (you can buy a score mat separately).  I used 600gsm card, which is about as thick as you can get without getting into foamcore.  Using spray adhesive I attached the sheep paper to one side and then ran it through and cut out the die.  The edges and inside have all been inked with Antique Linen distress ink, which matches the paper beautifully.  It's then a simple matter to fold along the scored lines and glue the edges to form the envelope shape.

I have used a 1/8" hole punch in the top through which I have strung some black cord so it looks like a mini purse.  A velcro dot under the flap and on the front edge of the purse ensures it will stay closed.  A 1/4" band of black card has been wrapped around the top of the purse, which acts as the base for the digi and embellishments.  This can be removed, if desired, without damaging the purse. Finish with a bow, a charm and the "ewe" digi of your choice!


Happy Birthday To Ewe


Challenges:

Cuddly Buddly - add a charm
Simon Says Stamp and Show - anything goes
Craft Us Crazy - anything goes

Monday, July 18, 2011

Santa's Chimney Matchbox Ornament

Edwin Matchbox Ornament


Technique:  Papercraft

Materials:
matchbox
manila card
brick texture embossing folder
Copic Markers
silver gel pen
glitter glue
wooden bead
string
Distress Inks
* Frayed Burlap
* Fired Brick
* Aged Mahogany
* Walnut Stain
* Peeled Paint

Tools:
Tim Holtz Texture Fade
* brick wall
Tim Holtz Movers and Shapers die
* mini flourish
Sizzix Big Shot
scissors
Martha Stewart Holly Punch
Magnolia Mini World rubber stamp

The challenge at Winter Wonderland this week was give it a little lift, by using wet or dry embossing.

Part of what I enjoy about the challenges is choosing something that is out of the ordinary to work with, try and do something unexpected, so I had it in my head that I wanted to use the brick texture fade for this and be a little different.  But how?  The other thing I love about the challenges is how it gets my creative juices pumping!  In my head I have half a dozen different ways to use the brick texture in a Christmas project, but I had been wanting to make a matchbox ornament for weeks, so....

I inked the raised side of the texture fade with frayed burlap before putting the paper in and running it through the machine, to get some ink deep into the crevasses.  Then the embossed areas are inked with fired brick, walnut stain, aged mahogany and a little more frayed burlap.  It's then cut into small rectangles and glued on all four sides of a regular size match box.  Looks just like a chimney!


Matchbox Ornament
The back of the ornament showcases the brick texture.

Once the "chimney" has been made, the rest is just a matter of laying embellishments until you get the result that you want.  I used a corrugated card mini flourish, a Christmas ticket by Tim Holtz, some string, a silver tree charm and a sprig of holly with a splash of glitter glue.  The image is a Magnolia Mini World, and wow they are so teeny that they make the brush nib on a copic look like an oversized crayon! 

The inner tray of the matchbox is coloured with brown copics, as is the bead, which is threaded through the top with string to act as a hanger for the tree.  Small treats can be placed inside and hung on the tree.  I had so much fun with this that I plan to make a *lot* more like this!  Fairly quick to put together, very inexpensive, and the scope for creativity is enormous!

Challenge entries:

Winter Wonderland, use wet or dry embossing.
Simon Says Stamp and Show is show some embossing, it's going in there too!

Wednesday, July 13, 2011

Vintage Sewing Tag

Vintage Sewing Tag

Technique: Papercraft

Materials:
600 gsm card stock
old sewing pattern
adhesive
muslin
Distress Inks:
* Antique Linen
* Bundled Sage
* Brushed Corduroy
scraps of lace
ephemera, embellishments etc

Tools:
Sizzix Big Shot Machine
Tim Holtz Alterations
* Tag and Book Plate die
* Tattered Florals die

This week's challenge at Simon Says Stamp is to Show Some Stitching

I covered a piece of card stock with several layers of an old sewing pattern before putting it through the Sizzix to cut the tag out.  Once cut I have distressed it with a little Brushed Corduroy.

I found this gorgeous postcard here, the site is worth the visit for all the other lovely vintage images freely available.


I printed the postcard on linen paper so that it had a fabric look.  Cut a piece of muslin slightly larger than the postcard, and glue that to a piece of ordinary white paper, then glue the post card in position on that so you have a three layer sandwich, then using a sewing machine zig zag around the edges to secure.  Tear away the base paper and pull out loose muslin threads until you have a fringed effect.  Distress the stitching and the muslin with antique linen.

The lace flowers are died with Antique Linen and Bundled Sage and glued into position on the card.  The button card that you can see peeking out from behind the postcard is an actual vintage button card, tattered and torn, from my grandmother's button collection.

The flower is made using layers of muslin and tissue paper from the sewing pattern and the Tattered Floral die.  I have about 9 layers, alternating between tissue, plain white muslin, and muslin dyed with Antique Linen.  The strips of fabric at the top of the tag are also muslin dyed with Antique Linen, love that colour!  The button that forms the centre of the flower is from my collection.

Wednesday, July 6, 2011

Christmas Carols Gift Box

Christmas Carols Box


Technique:  Papercrafting

Materials:
a box to decorate
adhesive
music paper
Distress Inks:
* Aged Mahogany
* Bundled Sage
* Vintage Photo
* Peeled Paint
acrylic paints
gold spray paint
crackle medium
fine sandpaper
600gsm card stock

Tools:
Sizzix Big Shot
Tim Holtz Alterations
* Carved Ornaments
* Mini Flourish
scissors
paintbrushes
paper distressing tool

This week's challenge at Simon Says Stamp and Show is to Show a Flourish.

A few weeks ago the family had Domino Pizza delivered, and as soon as it was delivered I eyed the little dipper box on top and thought to myself,  "I can't wait to decorate that!"  The next day I went to my local Domino store and the kind manager there gave me a few brand new boxes for me to play with.  That's what I have used for this project.

Dominoes Box


The box has a lovely parchment colour to it so I chose a paper that complimented that.  I have used a scrap book paper with music, Kaisercraft I think it might be, any sheet music will do.  Cut strips for the sides and lid, distress the edges and ink with Vintage Photo and glue into position. 

Altered Box


Using the card stock as your base, cut two mini flourishes and one small carved ornament.  Spray the flourishes with gold paint.  Paint the carved ornament with red acrylic, and when dry ink with with Aged Mahogany and apply a coat of crackle medium.  Allow to dry thoroughly then sand lightly with fine sand paper and rub some gold acrylic paint into the cracks.

 The sentiment is by Tim Holtz, inked with Bundled Sage and Peeled Paint.

Christmas Carols Box

Wednesday, June 29, 2011

Shabby Snowman

Shabby Snowman


Technique:  Papercraft

Materials:
corrugated card
acrylic paints
blue mica (or perfect pearls)
glitter
music paper
craft snow
snow sprinkles
crackle medium
glossy accents
Distress Ink
* Faded Denim

Tools:
Tim Holtz Alterations
* Winter Wonderland die
* Tags and Bookplates die
Movers and Shapers die
* JOY
Sizzix Big Shot

The challenge at Simon Says Stamp and Show this week is to Show a Word

The tag is made from corrugated card and the top layer is peeled back to shabby it up and show the corrugations underneath. You will notice from the photo below that I have left the part that sits under the snowman's belly intact, to allow for smooth adhesion of the layers that will be applied there.  It's then painted with white acrylic paint, faded denim distress ink, pthlao blue acrylic paint,and blue mica.

Shabby Snowman Parts

Cut three snowmen from corrugated card, cutting JOY into the belly of one and cutting out an oval in the belly of the other, and reserving the last to cut out a hat, a nose and an arm.  Cut an oval out of music paper and glue that down under where the belly will be, then glue the snowman with the oval in his belly over the top of that.

Dry brush the entire piece with craft snow, piling it up in places where it would build up naturally, such as the top of the hat, and make a nice pile of it inside his belly oval, but not that high that you can't glue the top snowman into place.

Paint the snowman's spare parts and paint the snowman with the joyful belly. Apply a coat of crackle medium to the snowman and let that dry completely, then highlight the cracks with faded denim ink, this gives it an icy look. Glue the joyful snowman and all the pieces into place with glossy accents and brush again with craft snow, piling it up again around the spaces in the word JOY. Add a touch of glitter for some sparkle, I also added some snow 'sprinkles' which is essentially a white, non sparkly glitter that looks like snow.

Try as I might I couldn't get the camera to pick up all the details, the crackle on the snowman glitters like ice, the snow drifts inside his belly sparkle, the blue mica shimmers which is a lovely contrast to the matte snow sprinkles.  The whole tag has such lovely texture, I wish it snowed here in South Australia!

Wednesday, June 22, 2011

Silver Swirl Carved Ornament

Silver Swirl Carved Ornament

Technique:  Papercrafting

Materials:
600 gsm card stock
background paper
adhesive
Distress Inks
* Faded Denim
* Stormy Sky
Number 10 crochet thread
craft metal sheet
snowflake sequins
Perfect Pearls
silver ink

Tools:
Sizzix Big Shot
Tim Holtz Alterations
* Carved Ornaments
* Mini Flourish
1.5mm crochet hook

The challenge at Simon Says Stamp and Show this week is to Show Some Metal.  As expected many of the DT examples and entries have a vintage meets industrial come grungy feel as is true to the Tim Holtz style.  I wanted to do something a little different, and use plenty of Tim Holtz tools and techniques, but come up with something unexpected.

Cover both sides of plain card stock with a background paper, I chose a dictionary paper with Christmas definitions, but I plan to do others with music paper in a red and gold theme, lots of scope for creativity.  When it's properly dry run it through the Sizzix with the carved ornament die.  Ink up the edges with distress inks, I wanted a blue and silver theme so I have used stormy sky and faded denim. 

I have made my own home made version of Perfect Pearls using white pearl cosmetic mica (think mineral make up), added to a mixture of water with just a few drops of gloss medium to act as a fixative.  Once upon a time I taught soap making and I have copious amounts of cosmetic glitter and mica in a vast array of colours sitting on the shelf doing nothing.  I imagine for most its simply easier to use Perfect Pearls or Glimmer Mist or similar product.  The front and back of the ornament are spritz with a white pearl glimmer.  Finally, ink the edges with silver ink, I used Versacolour for the metallic inks, I love their thick, sticky texture.

Adhere a piece of silver craft metal to an offcut of card stock and run it through the Sizzix using the mini flourish die to create the silver flourish.

Make one snowflake following the directions below.  The original pattern can be found here.

Ch 4, sl st into 1st ch OR make magic ring.

Round 1: Ch 5 (counts as 1 dc and ch 2), sc in ring, *ch 2, dc in ring, ch 2, sc in ring; repeat from * 5 times; ch 2, sl st in 3rd ch of starting ch 5 for a total of 6 petals. Do not pull magic circle too tight.
Round 2: In same ch as sl st, work: sc, ch 3, sc in 2nd ch from hook, ch 1, dc, ch 2, sl st in top of dc just worked, ch 3, sc in 2nd ch from hook, ch 1, sc, ch 3, sc in 2nd ch from hook, ch 1; in next dc and in each of next 5 dc around work: *sc, ch 3, sc in 2nd ch from hook, ch 1, dc, ch 2, sl st in top of dc just made, ch 3, sc in 2nd ch from hook, ch 1, sc, ch 3, sc in 2nd ch from hook, ch 1; sl st in starting sc of this row; bind off. Weave in ends.

Finishing is simply a matter of adhering the layers onto the base ornament and adding a bit of bling.

Wednesday, June 15, 2011

White Rabbit Belated Birthday Card

belatedrabbit

Technique: Papercraft

Materials:
210gsm card stock, cream
Tim Holtz Distress Inks:
* Vintage Photo
linen paper
Graphic 45 Halloween in Wonderland Papers
* Jaberwocky
* Curiouser and Curiouser
Christina Re "faux" wax seal
glue stick or similar adhesive

Tools:
printer
photo editing software, I use Gimp because it's free
paper distressing tool
Alice In Wonderland brush, free download from here
Beyond Wonderland font, free download from here

This week's challenge over at Simon Says Stamp and Show is to Show Your Distressed/Torn Edges. Once again I really enjoyed this challenge, because what I started with was so different to what I ended with, and what I thought I wanted to make was nothing like what I actually made!

The other thing I love about the challenges is figuring out what I can do for little or no expense.  It's not that I am a tightwad (well maybe a little) but money I don't spend on something I can make myself is money I can spend on something else I can't, such as a die for my sizzix!  In this case I could spend $30 on an Alice rubber stamp set, or download the photoshop brush set for free, which then allows me to resize, recolour and re-edit any way I see fit.  Digital 'stamping' is limited by what you can run through your printer, but that still leaves an enormous scope for creativity.

The first thing I started with was an image of the white rabbit printed onto linen paper.  I knew that I wanted him to be on a scroll or banner.  Initially I fooled around with making him a banner with a fringed bottom, but the scroll looked nicer.  It's roughed up around the edges with the paper distressing tool and then inked vintage photo before curling up the short edges to create the scroll.

The rest is really just a matter of layering and assembly.  The card is an easel card made from 210gsm weight cream card, aged with vintage photo.  Then a layer of Curiouser and Curiouser, distressed and aged.  Then a piece of Jabberwocky was torn for the front and inside panel, and (you guessed it) aged with vintage photo ink.

The sentiment was perfect for a belated birthday, it's printed out on linen paper using the font Beyond Wonderland.  A little white rabbit card cut from the Jabberwocky paper acts as the prop for the easel card when it's open to prevent it from closing shut.  The faux wax seal was the finishing touch.

I played around with lace and flowers and flourishes, but I liked the clean, masculine feel.

Tuesday, June 7, 2011

Halloween in Wonderland Tag

Fears and Dreams Tag


Technique:  Papercraft

Materials:
tag
Tim Holtz Distress Inks:
* Aged Mahogany
* Spiced Marmalade
* Vintage Photo
* Walnut Stain
* Sage Green
* Peeled Paint
Wonderland Classifieds paper by Graphic 45
double sided adhesive foam
embellishments
ribbon

Tools:
Sizzix Big Shot
Tim Holtz Texture Fade:
* Halloween Night & Poison
paper distress tool
blending tools
scissors
stapler

This week's challenge over at Simon Says Stamp and Show is to Show a Tag.  I have been dreaming about my Halloween in Wonderland paper from Graphic 45 all week, so this was the excuse I needed to play.

The base tag was made out of left overs from last week's project, which was 600gsm inked with sage green and peeled paint and then splattered with droplets of water.  After die cutting my tag, I than ran it through the Big Shot using the Halloween Night Texture Fade to emboss.  The raised areas are inked with spiced marmalade, vintage photo and walnut stain.

Alice is cut from the Wonderland Classifieds paper.  I cut away her broomstick because I made a little one to replace it.  I also cut a slit across her arm where the broom handle sits so I could slide in the little wooden one I made.  The image of Alice is already yellow with some red distress so I didn't add anything further to her.

The sentiment is a Tim Holtz stamp, inked with Aged Mahogany and roughed up around the edges.  I think this sentiment is perfect for the Alice theme, as I think both her fears and dreams lay down the rabbit hole.  The poison comes from a piece of grungepaper embossed with the Poison label Texture Fade.  First I inked the texture fade with black and then ran through the grungepaper, then inked it with a little red and green.


Fears and Dreams Tag

Tuesday, May 31, 2011

Show Your Favourite Stamp

Christmas Miracle Tag


Technique:  Stamping, Papercraft

Materials:
600gsm card stock
Tim Holtz Distress Inks:
* Bundled Sage
* Peeled Paint
* Walnut Stain
* Vintage Photo
* Aged Mahogany
Metallic Gold Ink

Tools:
Tim Holtz Christmas Miracle ATC Stamp
Tim Holtz Tag and Bookplates die
Glitz Distressing Stamp, or other sheet music stamp
paper distressing tool
scissors

This week's challenge over at Simon Says Stamp and Show was to show your favourite stamp.  Well I certainly didn't have the dilemma that the design team did, as I  have so few stamps to choose from (I could count them on one hand), however the postman  just brought me a package with the following goodies:

Tim Holtz Christmas Miracle ATC Stamp
Tim Holtz Tag and Bookplates die
Glitz Distressing Stamp

So the challenge for me, is not how to choose my favourite stamp, but how to use one of the only stamps I have in my possesion! :0)

The ATC stamps are a perfect size for showcasing on a tag, so I didn't have to think too hard about what to create  I used 600gsm cardstock as I prefer the durability over the manila tags.  The die creates a #8 size tag.

Ink the edges with Bundled Sage, coming well into the centre of the tag, then with Peeled Paint, and lastly  just the edges with Walnut Stain.  Wet your fingers with a mist spray and allow the droplets to fall onto the tag, this creates the lovely water stained effect.  Dry thoroughly.

Using metallic gold ink, stamp the background with the music sheet stamp.  Set aside to dry.

The ATC stamp is my first 'real' rubber stamp, as in red rubber, the few others that I have are the clear cling acrylic.  They do feel different to use.  I know last week I said I didn't like using the distress inks for inking, but I used the Black Soot ink today to put my ATC onto a piece of manilla card, and it worked beautifully.  I guess the different stamp mediums take up ink differently.

Heat set the image then cut out the stamp and distress the edges with the paper tool, and ink with Vintage Photo and Aged Mahogany.  Dog ear the upper right hand corner and ink with gold.

The strip of paper between the tag and the stamp was a free Christmas paper that you can download here.  Tear a strip and ink up the edges with Vintage Photo, and then just a smudge of metallic gold.

On top of that is a strip of music paper printed onto vellum.  I used We Wish You A Merry Christmas, but use whatever you like the most.  I cut a strip just slighly smaller than the strip of printed paper in the previous step, and I didn't ink it at all, just roughed up the edges with the paper tool.

The gold ink on the tag should be dry by now, so go ahead and glue on the torn strip of printed paper, and then the strip of printed vellum, and then the ATC image can be glued down.

If you have Tim Holtz calender stamps you can use one of those, I don't, so I found this fabulous vintage calender at Wyldhare's Hollow and used the December plate printed onto manila card.  Rough it up and ink with some Vintage Photo.  I attached this to the tag with a strip of double sided foam adhesive, to give it a little height.


Before you pack your inks away, use the Aged Mahogany and the Peeled Paint to colour two strips of white ribbon.  Using the Distress Inks to dye your own ribbon means you always have the exact shade you need.

I think one of the parts I enjoy the most is choosing the bling, but it is also one of the hardest aspects for me because I am very much a minimalist and less is always more to the extent that I often worry I am being too barren.  For this tag I used two staples and a paperclip as attachment bling, a few gold jingle bells, and of course the hand dyed ribbon with a few strands of gold crochet thread for sparkle.

I had a lot of fun making this tag, and I am really enjoying the challenges, each one teaches me something new.  Today I learned that:

1)  It's harder to tell when metallic inks are dry because they remain shiny.  I had to hide two little smudges on the tag, but shhh I won't tell if you won't!  

2)  Red rubber stamps feel different to stamp with than the clear acrylic type.  One of the acrylic stamps I have is by Kaisercraft, and it's a little 'squishy', that is if you press hard the detail squishes and you get a blurred image.  The red rubber seems to be able to tolerate a much firmer touch.

3)  There are some items I will try and substitute or find alternatives for, but I will never, ever regret investing in my Distress Inks!

There are lots of things I wanted to do differently, but lacked the tools.  For example, I have no embossing powders, no perfect pearls or stickles, a limited palette of distress inks and four rubber stamps!  But that's part of the challenge for me too, finding a way to work within my limitations.  This also counts as my first ever rubber stamped project, will I look back in a year and cringe? :o)

Thankyou to Simon Says Stamp, and bless the design team for wading through my terribly long posts!

Tuesday, May 24, 2011

Vecchi Style "Tagelope"

Tagelope


Technique: Stamping, Papercraft

Materials
manila tag
Tim Holtz Distress Inks
* Walnut Stain
* Vintage Photo
* Victorian Velvet
* Peeled Paint
ribbon
scrap of grungepaper
scraps of coloured paper
Ranger Blending Tool
glue
fine tip black marker
button embellishment
crackle medium

Tools:
Sizzix Big Shot die cutter
Tim Holtz Tattered Floral die
scissors

This week's challenge at Simon Says Stamp and Show was to show some Wendy Vecchi style. Being relatively new to the world of stampology I wasn't familiar with her style so I spent some time over on her blog.

I spent an evening pouring over her work and taking it all in. I like a lot of her stuff, but I am not a fan of the work that she covers with tags and labels that say the word ART. Putting a tag on your artwork that says ART is the artistic version of this:


True art, like true sex appeal, is something that comes as an expression of ourselves.  It needs no label.

Heh, now that I have alienated a large majority of Wendy Vecchi fans, there was lots of stuff I did like on the blog, and it was one of her tutorial posts on how to make a mini gift envelope that I used as my inspiration for my project.

The Vecchi Style "Tagelope"

The project calls for a #8 manila tag which measures 6 1/4" by 3 1/8".  My local newsagency sells these for a few cents each, so I had plenty of those on standby.

Score 2" down from the top of the tag, and 1 1/4" inches from the bottom.  This creates the envelope, or tagelope as I have dubbed it!  With Victorian Velvet and a blender tool, ink the edges and over the entire tag, making sure to get some into the score lines.  The pink ink over the manila envelope creates a lovely apricot colour, which I wanted as the paper I chose for the flowers had touches of apricot.  Distress the edges with Vintage Photo, and again very lightly with Walnut Stain.

Wendy used a rubber stamp with a mattress ticking type pattern to stamp onto her tag.  I didn't have any such implement, so I used a piece of mesh, the type that florists use in arrangements.  I inked one side with Walnut Stain and placed it over the card, and used a brayer to transfer the pattern.

I was really happy with the effect that it gave.

Mesh Tag

Use a fine tip black marker to pen in 'stitches' around the edge of the card.  Use the smallest flower on Tattered Floral die to create two flowers from scrap paper.  I used some scrap booking paper that had dots (Wendy seems to love dots), you can use card or whatever you like.  Distress the edges with Victorian Velvet, then lightly Walnut Stain for added emphasis.

Use the large daisy on the Tattered Floral die to cut one flower from grunge paper.  Cut two petals individually to create leaves and ink with Peeled Paint.

Thread the ribbon through the hole in the tag and create a bow at the bottom.  Glue the leaves and flower into place and glue a button into the centre of the flower.  Add a touch of crackle medium to the leaves and petals of the flower.  I use Jo Sonja as it a lot more versatile than buying crackle paints, but use what you are comfortable with.

Overall I felt it was a great challenge, as what is more challenging than trying to emulate a style that you aren't familiar or comfortable with.

The tag in the photo was my third attempt, the first two ended up in the trash, but were valuable learning experiences.  I learned that:

a)  I don't like inking detailed stamps with Distress Ink.  It goes fuzzy and bleeds upon stamping, I much prefer a stickier, thicker ink like Versa, which gives a beautiful crisp image.

b)  If using all waterbased inks, make sure that any detailed stamping gets done after all the blending, as the blending pads can smudge them!

c)  Make sure I clean my craft sheet as I go, so that I am not transferring ink smudges to clean work.

Wednesday, May 18, 2011

Soup Recipe Card


Technique:  Papercraft
Materials:
corrugated card
recipe card
vintage images (see below)
string
paperclips
Tim Holtz Distress Inks:
* Vintage Photo
* Soot Black
blending tool
scissors
glue dots
chipboard letters
1200 grade sandpaper

Tools
steel ruler
stanley knife
cutting mat
scissors

The inspiration behind this one was the Simon Says Stamp and Show Challenge, the criteria this week being an "old wives tale".  I took a day mulling over what an old wives' tale actually is, and which one I liked the most.  The DT over at Simon Says have used a combination of old wives' tales, superstitions and proverbs, so I felt comfortable choosing "Too Many Cooks Spoil The Broth" as my challenge entry.

I love these challenges as they really get the creative juices flowing.  I'm a pretty practical person, and whilst I can admire art in all it's forms, when it comes to making something myself the first question I usually ask is "what will I do with it once it's done".  If it's just going to become another object to dust on cleaning day, then I will rethink it's purpose.  I love beauty and functionality.  So for this project I thought the theme I chose really suited a series of vintage style recipe cards.

Method:

Use a recipe index card as a template to cut the base from corrugated card.  If you have a tab style die cut you could use this also, or you could cut one directly from a manila folder, which ever suits you best.

The recipe card itself was a lot of fun to create.  Start with a regular recipe card and trim it down so that it is nicely framed by the backing card. Using a lead pencil, cover the card in cursive writing, then sand it back to really dull and fade the writing.  Finally, use Vintage Photo distress ink to age the edges.

Print the image below twice, one quite large so it forms the title on the side, and a second time at a smaller scale to put in behind the image of the girl.  Distress and age both until you have an effect you are happy with.  I find that distressing the edges helps each layer to pop out from the one below.


The main image that I used of the girl is from a vintage embroidery pattern I found on Tipnut.  There's six in the collection, all of which I plan to use to make subsequent recipe cards.


Ink chipboard letters with Soot Black Distress Ink.  Play around with the layers until you get a design you are happy with and put together with glue dots, staples, paper clips and string.