Showing posts with label sizzix. Show all posts

Wednesday, May 25, 2011

Sparkling Snowman Ornament

Sparkling Snowman Ornament


Technique: Die Cutting/General Crafting

Materials:
1.5mm balsa wood
glitter
pva glue
white acrylic paint
scrap card or grungepaper

Tools:
Sizzix Big Shot die cutter machine
Winter Wonder die
paintbrush

The sizzix machine, and any dies that you use, do require an initial financial outlay, but once you have them you can produce ornaments for very little cost using a vast array of materials that you probably already have or can obtain cheaply.

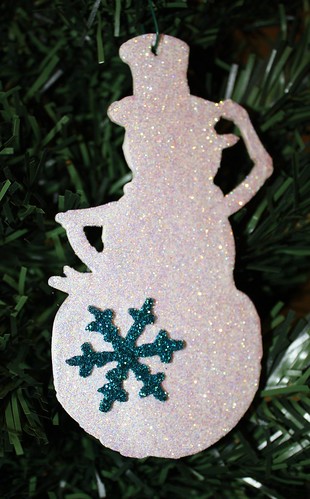
For this ornament I chose balsa wood for the base once again. It's light weight, it's only $2 for a sheet that will yield half a dozen ornaments, and goes through the die cutting machine easily.

Cut one snowman from the balsa wood, this acts as the base. Give each side a coat of white acrylic and allow to dry. Working on one side at a time, apply a light coat of glue and then glitter.

Cut one snowflake from the same die with grungepaper. As much as I love balsa wood it doesn't cope with the small, intricate dies very well, so grungepaper is a better choice there (or card stock if that is what you have to hand).

Give the snowflake a coat of blue paint or ink if you prefer, and once dry as above, apply a coat of glue then blue glitter.

Attach the snowflake to the snowman with glue, and punch a hole in his hat for a hanger. I found it difficult to capture the sparkle that this ornament has on film, but it really is dazzling.

Monday, May 9, 2011

Snowflake Embossed Carved Ornament

Snowflake Joy Ornament


Technique:  Die Cutting/Scrapbooking

Materials:
1.5mm balsa wood
adhesive craft metal

Tools
snowflake texture plate or embossing folder
Sizzix Big Shot Die Cutter
Tim Holtz Carved Ornament Die
"JOY" Movers and Shakers Die

What a stunningly simple ornament this turned out to be!

Cover both sides of the balsa wood with the craft metal.  Run it through the die cutter to get the carved ornament shape, then run it through again to emboss with the snowflake pattern.  Punch a hole in the top and hang.  Did I mention I love my Big Shot?

If you have never seen nor used it before, craft metal is very thin metal that has an adhesive backing.  It's around 4 or 5 times thicker than tin foil, but it has a similar appearance.  You could try this using tin foil, in fact I am going to do just that and report my findings, but for this project I used adhesive craft metal.

You can buy embossing folders that are especially designed for use in die cutting machines to emboss a texture into your chosen material.  I am a huge fan of using what you have, or buying products and tools that have multiple applications rather than needing to buy lots of individual items each with their own specific single use.  So, to emboss, I used a Fiskar texture plate that I had purchased years ago for a scrapbooking ornament.

For those who have a Bigshot, the 'sandwich' I used was the adapter plate with no tabs, cutting mat, fiskars texture plate, ornament, then topped off with a cutting pad.

Saturday, May 7, 2011

Vintage Bird Cage Ornament

Vintage Butterfly Cage


Technique:  Die Cutting/Scrapbooking

Materials:
1.5mm balsa wood
'decor' crackle medium
acrylic paints
antiquing medium
silk flowers and leaves
butterfly embellishment
pva glue
fine grade sandpaper
matte varnish

Tools:
Sizzix Big Shot die cutting machine
Tim Holtz Alterations Caged Bird die

Oh I love my die cutter indeed I do! Just for fun I entered this project into the "Anything Goes" Simon Says Stamp and Show Challenge.

Cut 2 bird cages from balsa wood and glue together.  You could use just one thickness, or use chipboard/cardstock if you prefer, but I love working with the balsa.

When dry, apply two coats of base colour, front and back.  I used Jo Sonja Antique Green.

There are different types of crackle mediums and paints available, and they can create different types of aging in your work.  For this project I used Jo Sonja Decor Crackle Medium, which is a 'sandwich' crackle.  This means you apply a base coat, then a coat of crackle medium, then a contrasting top coat, and the crackle medium will cause the top coat to crack as it dries, allowing the base coat to show through.  Apply a coat of crackle medium according to the directions on bottle, and then your top coat.  I chose a plain white for my project because I planned to antique it.  Allow to dry overnight.

Using the sandpaper, distress the cage further.  Go a bit heavier in some spots to let more base coat show through, attack the edges, you don't have to be delicate!  When you have the appearance you are happy with, you can age it further by using an antiquing medium.  Again there are lots of ways you can antique a project.  You can mix a little drying retarder with burnt umber acrylic paint and rub that over your project to age and darken it.  You can buy ready made antiquing liquids that are primarily just a mixture of drying retarder and acrylic paint.  For this project I used a Tim Holtz Distress Ink to add a dark tinge to the edges.  It's subtle but it's there, shame on me for not taking before and after photos to show you.

Once the whole lot is dry, give front and back a coat of matte varnish.  When that is dry, use hot glue to attach your embellishments.  Hang and admire!