Showing posts with label papercraft. Show all posts

Sunday, January 7, 2018

Santa's Secret Window Frame Ornament


I know that Christmas is over and everyone has packed away their tree, however it is a great time to get junky ornaments at a clearance price and repurpose them into something nicer.

For this project I used the Tim Holtz Window and Window Box die to cut the frame from thick card stock which I painted with acrylics. I printed the Santa image (below) twice and used one for the background image and the other I cut away the background and used foam dots to layer him onto the background to give Santa some 'pop'. The little gem on the front was repurposed from a junky ornament.


If you would like full step-by-step directions on how to create this ornament you can find them on this page.


Entering this into the following challenges:

Crafter's Castle: Anything Goes
Crafty Hazelnuts Christmas Challenge: Anything Goes


Sunday, September 16, 2012

Tea For You And Me

Teapot


I feel like I have almost forgotten what life was like without my digital die cutter!  This gorgeous project is called Tea For You And Me and comes from SVG Cuts.  There's a lot of pieces that come together, but it's pretty straight forward and Mary at SVG Cuts always does a fantastic step by step video tutorial to take out the guesswork.  Once the machine had done all the cutting I sat and watched a movie while I glued the pieces together, and by the end of the film it was done.

The teapot measures just over 6" tall and lid comes off to reveal a spacious cavity inside that could be used for holding teabags or loose tea.  I think it would also make a fabulous potpourri holder. 


Teapot 

The teapot base is made from plain manila folder cardstock, inked up with Tea Stain Distress Ink.  The pattern paper overlay is from the Sweet Nothings collection by Kaisercraft, and the lace and ribbon trim came from my local haberdashery store, hand dyed with distress inks.

As usual, sharing this with the fabulous folks at Make It Monday, where it's always anything goes :o)
Also linking to the Anything But A Card challenge blog.


Monday, September 12, 2011

Chocolate Belly Band for Blokes

Blokes Choc


Technique:  Papercraft

Stamps & Images:
Sitting Santa Flippin Decoupage

Pens and Inks:
Peeled Paint Distress Ink

Papers:
American Crafts Crimson Weave
We R Memory Keepers White Christmas
sports pages from the newspaper

For the longest time I was a Christmas Grinch.  I hated Christmas, I felt the yearly ritual of buying socks, jocks and chocolate was a farce.  Office parties, end of school get togethers, Secret Santa, I hated it all.

That has all changed now, and I realized that for me, if I gave a meaningless gift (generic junk or gift cards) then the gesture was meaningless because I wasn't giving of myself, I was only giving of my wallet, and I begrudged the financial obligation.

So now, I love gifts that I can make quickly and easily, that don't break the budget, but have meaning for both myself and the recipient.  It's doubly good if I can give something that makes the recipient laugh or smile, because that's the best gift of all :o)

I am going to make a stash of these chocolate belly bands for last minute gifts, stocking stuffers and basket fillers, door and raffle prize donations and secret santa swaps.  The construction itself is very simple, intentionally so, I wanted these to be quick to make, easy to give and fun to receive. 

The image I chose features Santa having "a break" while reading the paper, so I picked up on the paper theme and carried that throughout the project.  Santa is placed on a "naughty or nice" list taken from a We R Memory Keepers paper called White Christmas. The edges have been inked with Peeled Paint distress ink before being placed on a red belly band which is slipped over a block of chocolate that has been wrapped in the sports pages from the weekend paper, giving this a distinctly masculine feel.

On the back is the sentiment which reads:


Blokes Choc


Thanks for looking and I hope your sense of humour is as warped as mine and you got a good giggle out of this :o)

Challenges:
Winter Wonderland:  Santa Clause is Coming to Town
Totally Gorjuss:  It's a Man Thing 
Cards for Men:  Anything but a square 
The Corrosive Challenge Blog:  Funny or Punny

Saturday, September 10, 2011

Recycled CD Ornament

Recycled CD Ornament


Technique:  Papercraft

Stamps:
Drew's Cupcake digi by Designed to Delight
Two Apples digi by Designed to Delight

Pens & Inks:
Reds:
Greens:
Denim Blue: B91, B93, B95
Sky Blue: B24, B26, B28
Flesh: E0000, E000, E02
Red: R22, R24, R27
Green: G03, G05, G07
Grey: C0, C3, C5, C7, C9
Bundled Sage Distress Ink
clear Spica Pen
glitter gel pens

Papers:
Waiting for Santa Collection by Webster's Pages

Other:
old CD
wide double sided tape
double sided foam adhesive
ribbon
Sparkly Fluff
Rock Candy Stickles

We have stacks and stacks of old compact discs lying about the place, quite literally in the hundreds I would guess, which predate the portable hard drives that now store all our data.  I have been itching to find a way to use one, this challenge was perfect :o)

Using the CD as a template, cut two circles from your designer paper.  I used the Waiting for Santa collection by Webster's Pages, the paper has ornaments with the alphabet and drawn lines giving a very school book type feel, and this is going to be an ornament for my son's teacher.

I used strip of double sided tape on each side of the CD to secure the ribbon into place, sorry for the terrible photo, I should have done the non reflective side first, but I wanted to show you how I secured the ribbon.

Recycled CD Ornament


Once the ribbon was secure I covered one side with double sided tape and stuck the first circle of paper into position. 


Recycled CD Ornament


The edges were trimmed with scissors, and then I took an emery board to the edges and lightly sanded to remove any overhang still remaining and smooth the edges.

Recycled CD Ornament


Both sides of the CD are covered in the same way, then the edges inked with Bundled Sage distress ink.

One side of the ornament has the Drew with Cupcake digi sitting to one side, I've used sparkly fluff and glitter glue to make it look less like a birthday cupcake and a little more Christmas-y.  I haven't put on much in the way of embellishments, because the blank space you see there next to Drew, will be where my son writes a personal message to his teacher.

The other side of the ornament has a Christmas wreath made from apples (apple for the teacher).  I used Gimp to make the background on the apples digi transparent, and then used Word to fiddle about until I had a wreath shape I was happy with and then after printing and colouring, fussy cut it to make a photo frame.

Recycled CD Ornament


The finishing touch is a double bow on each side, made from the same ribbon as was used to create the hanger, but a thinner version. 


Challenges:
Christmas Stamping All Year Long:  Teacher's Pet
ABC Christmas Challenge: R is for Recycled plus Ribbon or Rhinestone
Crafty Ribbons Challenge:  Christmas Cheer in September 
Papertake Weekly:  Anything Goes

Saturday, August 6, 2011

Steampunk Birthday Card

Steampunk Card

Technique:  Papercraft

Materials:
Scarlett West digi
Copics Markers
Skin: E0000, E00, E02
Golden Brown: Y23, Y26, Y28
Leather Brown: E31, E33, E35, E37, E29
Black: C0, C3, C5, C7
Steampunk Debutante paper by Graphic 45
Distress Inks;
* Vintage Photo
* Antique Linen
* Black Soot
* Walnut Stain
Vintage Photo Stickles
Copper Gel Pen
cardstock
craft metal
metallic copper embossing powder

Tools:
Sizzix Big Shot
Cuttlebug embossing folder, Clockworks
Spellbinders Spritely Sprockets
Steampunk rubber stamp set by the Rubber Cafe


I've been in love with steampunk long before it was cool.  Way back in 2001 a PC game called Arcanum: Of Steamworks and Magick Obscura was released and since then I have been in love with all things steampunkery.  So this recent steampunk trend has been a dream come true for me, a way to embrace and explore a theme that previously wasn't available to mainstream crafting.

There have been a lot of steampunk digital stamps released lately, but many of them have been too 'cutesy' for my taste. The recent releases by Kenny K are right up my alley though! Edgy, sexy but still a little gritty.

I made this card for a friend of my husband, who has been adopted by us all as a family member, it was his birthday today! He has been admiring my colouring lately, and Kenny K's images are perfect for male cards. The sentiment inside reads:

"You can't turn back the clock, but you can wind it up again..."

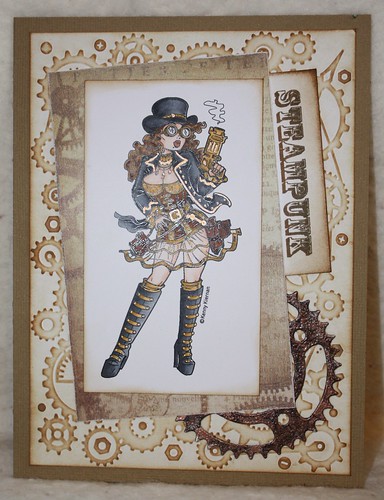
Now that I have bored you all with my personal rantings, the card was a pretty easy one to construct. The background paper is a piece of white card put through the sizzix in the clockworks embossing folder, then highlighted with antique linen and vintage photo distress inks.

The gear in the lower corner is a cut using the spritely sprocket die set. I used a piece of craft metal, which is embossed with copper embossing powder, which is then inked with black ink to grunge it up and age it, with a sprinkle of vintage photo Stickles.

Steampunk Card
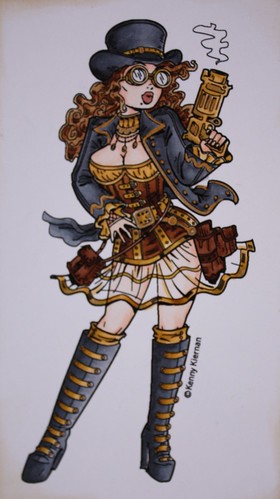
This photo has been taken with the flash on so that the light reflects, not so good for the paper but it shows the shimmer from the copper gel pen on her outfit and gear.

The "steampunk" tag sticking out the side of the main image is from the Steampunk set by the Rubber Cafe, inked with vintage photo and walnut stain. The paper behind the main image is from the Steampunk Debutante range by Graphic 45.

Scarlett West by Kenny K

Challenges

iCopic Challenge: skin tones (Kenny K's girls show so much flesh!)
Kenny K's Crafty Girls: metal embellishment

Wednesday, February 9, 2011

Paper Heart

paper heart


Technique: Cut & Paste

Materials:
old book
paper clips

Tools:
stapler
ruler
craft knife or rotary cutter

This project is so simple it hardly needs a tutorial! I used an old romance novel, but you could use any paper you like.

Cut 11 strips of paper one inch wide and six inches long.

Fold one strip in half and using a hole punch, place a hole up near the folded edge, this is the hanging strip.

Take two strips and put them to one side, they will remain six inches long.

Crop 1/2 an inch off two strips, so they are 5 1/2 inches long.
Crop 1 inch off two strips, so they are 5 inches long.
Crop 1 1/2 inches off two strips, so they are 4 1/2 inches long.
Crop 2 inches off two strips, so they are 4 inches long.

Starting with one of the longest strips of paper and ending with the shortest, make two piles. Take one pile, and ensuring that all the short edges are flush with each other, paperclip it into position about 3/4" down from the folded edge of the hanging strip. Repeat with the other side.

Gather all the short ends and make them flush and paperclip into position at the bottom of the hanging strip, you should be able to see the heart shape forming now. Fiddle around with the paperclips until you have the shape that you want. Having the short edges further away from each other will give you a more elongated heart, bringing them closer together will give you a wider heart. When you are pleased with your shape, hold the sections in place with your fingers, remove the paperclips and staple to secure.

Loop some string through the punched hole on the hanging strip.

Monday, January 10, 2011

Recycled Card Ornament

Recycled Card Ornament


Techique Used: Papercraft

Materials:
old christmas cards
pva glue
pencil

Tools
scissors
hole punch
glass or jar that is approx 1.5" in diameter
letter opener

Using the glass or jar lid trace two circles onto one of the backing sides of the christmas cards to use as a template. One one of the circles draw an equilateral triangle. Believe it or not this is the hardest part of the whole craft! An equilateral triangle has sides of the same length and it's angles are 60 degrees. I used a small protractor to measure off the angles and cut the triangle, but you could also use a ruler and fiddle around until you found the exact measurement for each side for the side of circle that you drew. Once you have the triangle drawn, cut that out.

You should now have one circle template and one triangle template. Draw 8 circles onto the printed sides of the cards, if you are using cards that have people or scenes depicted on them rather than just patterns place the template carefully to ensure you get parts of the images that you find most pleasing. Cut out the circles, trying to follow the lines as closely as possible and avoid jagged edges.

Now place the triangle over each circle and line up carefully so that the points are all touching the edge of the circle and score the lines with a letter opener or something similar. This scoring provides the line for folding, you should now be able to fold up three 'flaps' on each circle. Do this for all eight. Working in pairs glue two edges together and allow a few minutes to dry. Glue two pair together, which will form the top and bottom, and let dry briefly before gluing the top and bottom sections together.

To hang, you can either use a hole punch as I did to make a hole for a hanging wire, or knot a piece of thin cord and place the knotted end of the loop between the two halves before gluing together.

You can make this ornament bigger by using more circles and having 5 across the top and bottom parts of the ornament, and ten across the middle band, for a total of 20 circles.

Tuesday, January 4, 2011

Quilled Snowflake

Quilled Snowflake


Technique Used: Quilling

Materials:
white quilling paper strips
quilling tool
pva glue
adhesive spray
fine glitter

Tools:
quilling tool

From the strips, cut the following:
one 6-inch-long strip (center round);
eight 3-inch-long strips (arms);
four 6-inch-long strips (scrolls);
four 3-inch-long strips (teardrops);
four 2-inch-long strips (marquise shapes)

For the centre round: Using a quilling tool, begin rolling a 6-inch strip from one end. Roll strip into a tight circle. Finished center round should be 1/2 inch wide. Use a dot of glue to secure end; let glue set.

For arms: Roll one end of a 3-inch strip around quilling tool twice. At opposite end, roll strip around tool until finished arm is 1 inch long, with a small scroll at one end and a larger scroll at the other. Make eight of these. Glue arms together in pairs so that the they are mirror images of each other and allow a few minutes to dry. Glue the large scrolls of the arms in place around the center circle.

For scrolls: Fold a 6-inch strip in half. Roll each end to the center so that it resembles a heart shape. Make four of these. Glue the bottoms of scrolls to bottoms of arms near the center round, awhat you are doing here is lining up the middle section where you creased with the large scrolls of the arms. Let glue set. Gently extend the heart shaped scrolls open and ahere these to the arm sides of scrolls to arms.

For teardrops: Using a 3-inch strip, make a 1/2-inch round. The length of paper used here is pretty short, and when allowed to unwind naturally it will be much smaller than 1/2 inch. What i did here was to wind up a tight coil from the strip, then open it up fully and rewind it loosely by hand. Place the loose coil into the 1/2" circle on the quilling board and glue end down. Allow a few minutes to set, then recoil the centre with the quilling tool. Pinch one side into a point. Make four.

Glue the teardrops between rolled ends of scrolls.

For marquise shapes: Using a 2-inch strip, make a 1/4-inch round. Pinch opposite sides into points. I used the same technique here as previous for the 3" strips. Coil, unwind to relax the paper, recoil loosely with your fingers and then place in the quilling board to set into the correct size.

This is the working sketch I used to help with the placement of the pieces.

Let ornament dry overnight. Spray one side of ornament with adhesive and sprinkle with glitter; let dry. Turn over ornament and repeat on opposite side.

Whilst making this ornament I reminded myself that the only woman capable of creating a perfect snowflake was Mother Nature!