Showing posts with label gingerbread ornament. Show all posts

Tuesday, September 20, 2011

Paperclay Gingerbread Ornament

Gingerbread Heart Ornament


Technique:  Stamping

Materials:
air drying paperclay
Gingerbread House Heart by High Hopes rubber stamp
acrylic paints
drying retarder (or stain of your choice)
ribbon, felt & adhesive

This was a very simple ornament to make.  I often prefer working with paperclay because you can use it instantly, it doesn't require conditioning like polymer clay, and there's no baking, no need for separate equipment, no toxicity etc.

Tthought I should add a little more info on the paperclay as a few have never worked with it before.  I use a brand called Darwi, mostly because that is what is available here, but there is also Creative Paperclay and I think even companies like Crayola make a version branded for children.

Paperclay doesn't require any firing, depending on the thickness it will air dry in around 24 hours.  As soon as you open the packet put it in a zip loc bag and only take out as much as you will need.  I find it easier to work with if I wet my hands first, and you will notice that you get a fine, silky "slip" on your hands the same way as you would with real clay.  It needs minimal kneading to get it to soften, and any tears or splits while you are working with it can be quickly and easily repaired with a damp brush.

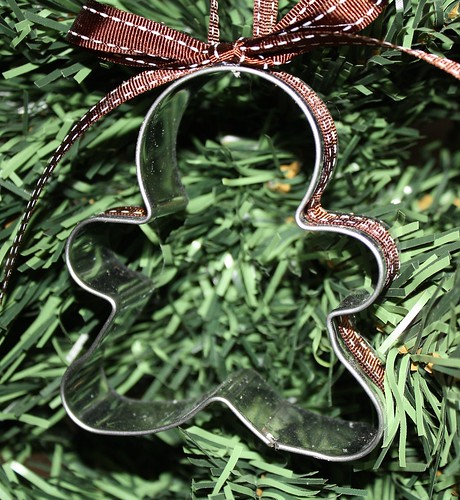
To make this ornament, roll out a piece of paperclay on a baking sheet or non stick craft mat  with a rolling pin.  Use a firm pressure to stamp your image directly onto the clay.  I used a mounted red rubber stamp  from High Hopes and got a nice, deep, clean impression.  I haven't tried acrylic stamps, so I can't vouch for the success of those, they don't tend to be as deep so it may now give as good as an impression.

With a sharp knife or scalpel cut around the outside of the stamped image, depending on the stamp you used you could use a cookie cutter for this step.  Set aside to dry over night.

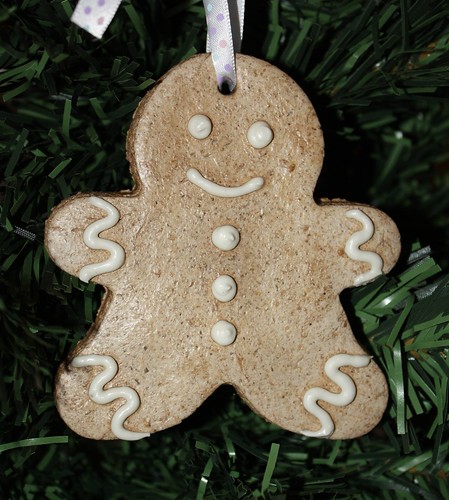
Once thoroughly dry the paperclay can be painted.  I gave mine a base coat of a brown biscuit colour and then when that was dry, I mixed a little burnt umber paint with some drying retarder so that I could use it as a stain (which is primarily what ready bought stains are, a colour medium with a drying retarder so you have time to work with it).  Using a soft cloth I rubbed it over the entire 'cookie' making sure it sat heavily in the stamped image to create a contrast.

Once dry I finished with a few coats of spray varnish, adding a ribbon at the back to hang it on the tree and covering the back with brown felt for neatness.

Challenges:

Make It Monday #55:  Anything Goes
Simon Says Stamp:  Sing It (I'll Be Home for Christmas)
High Hopes Stamps:  Home For The Holidays

For more information on paperclay and other air drying clay, The New Clay News is an excellent place to start.

Monday, April 11, 2011

Gingerbread Cookie Cutter Ornmanet

Gingerbread Cookie Cutter Ornament


Technique: General Crafting

Materials:
cookie cutter
raffia, ribbon and other embellishments

Tools:
scissors
hot glue gun

After playing around with the salt dough yesterday, I realized that the cookie cutters themselves could be dressed up to make ornaments in their own right. I simply glued ribbon around the wide edge of the cookie cutter and put a ribbon bow on top of the gingerbread's head, but you could be as elaborate as you wish.

Wednesday, March 30, 2011

Gingerbread Cookie Ornament

Gingerbread Salt Dough


Technique: Salt Dough

Materials:
all purpose flour
salt
wallpaper paste
acrylic paints
polyeurethane

Tools:
cookie cutter
paintbrushes
oven

Salt Dough Recipe
2 cups all purpose flour
1 cup salt
1/2 cup ground allspice
2 tspn wallpaper paste
1/2 cup water

Combine all the ingredients and knead until smooth, approximately 10 minutes. Allspice is a combination of nutmeg, ginger and cinnamon that has a wonderful gingerbread smell. If you can't find it commercially prepared, you can substitute in half a cup of cinnamon. I'm not typically a fan of salt dough, although cheap to make it doesn't have the versatility of polymer clay, however this recipe is excellent for making "cookies".

You can treat this salt dough exactly as you would roll out cookie dough.  Roll it to the desired thickness, usually about 1/4" thick and use cookie cutters to form shapes.  Use a straw to push a hole in the top of the cookie for hanging later.  Lay on a baking tray and bake in an oven at around 250F/120C for an hour, turn and cook for another hour. Let cool in the oven.  After baking they should be dry, light and have a hollow sound when tapped.

Once the cookies are fully dried and cooled you can paint and decorate however you wish.  For best results and a cookie that will last many years, give several coats of varnish, making sure you coat inside the hanging hole also.  Salt is a humectant, and will draw any moisture in the air to the dough causing it to soften, it is essential to seal it properly to prevent your cookie from going soggy.

If you would like to have iced cookies, rather than simply painting them, products such as Jo Sonja Texture paste has the consistency of royal icing and can be tinted with acrylic paints and piped onto your cookies. Modeling materials such as paperclay can be rolled out and used just like fondant.

For my gingerbread man I used texture paste which pipes beautifully and let it dry overnight. I then sealed front and back with two coats of Modge Podge.

Below you can see a different variation using a star cookie cutter. I coated the front with a white sprinkle and then sealed with Modge Podge.

Gingerbread Salt Dough Star

Saturday, January 29, 2011

Distressed Gingerbread Cookie

Distressed Ginger Ornament


Technique: Sewing, Painting

Materials:
calico fabric
acrylic paints
buttons
"jingle" bell
embroidery floss
scrap plaid fabric
wire
sandpaper
quilt batting
sea sponge
sandpaper

Tools:
sewing machine
sewing needle
hot glue gun
stippling or stencilling brush
thin paint brush
pinkingshears

Cut two 5" squares from the calico and one or two 5" squares from the batting (depending on thickness of batting and how thick you would like your cookie). Make a sandwich from the calico and batting so that you have one layer of calico, one or two layers of batting and then a layer of calico. Using a large glass or a circle template draw a circle onto the calico. Take 'sandwich' to sewing machine and sew along the drawn line. Cut circle out with pinkingshears.

Now that you have your base cookie, it's time to get creative. Using two or three different tones of brown and the sea sponge dapple over the cookie, being sure to get into the groove caused by the sewing and the edges. Allow to dry overnight. Using the sandpaper distress the top of the cookie, be light in some areas, firmer in others. Scrunch the cookie up to force creases and sand right over the top of the scrunched fabric. When you have finished sanding, wipe over the cookie with a damp sponge.

Using the stencilling brush and a little red paint, dry brush in high lights for the cheeks. Using the thin brush and white acrylic thinned down a little, draw the wavy line around the outside of the cookie. When dry sew on the buttons for eyes and the jingle bell for a nose. Use either black paint or black embroidery floss for the eye brows to give the cookie a worried look (she's a distressed cookie, get it?!)

Make a loop from the wire and push the ends into the top of the cookie between the layers of batting and calico, then bend the tips so that it doesn't just slip right out again. Cut a strip from the plaid fabric and form a bow, then adhere using hot glue.