These wooden clothes pin or peg dolls are easy to put together and provide a lot of scope for creativity.
Here in Australia you can purchase the special split leg clothes pins or pegs, called dolly pegs, from Spotlight, Lincraft and various other outlets. If you are very lucky you might also find a supplier who stocks the matching wooden beads that are intended for use as the head. I couldn't find them anywhere, so I improvised with a wooden bead that I drilled to fit.
The first step is to drill a hole at the "shoulder". You can see here in the photo below where it starts to taper inward, that's where you want to drill so that when you put through the arms they are proportionately a correct distance from the head.

Once you have drilled, paint the bead and upper body in flesh tone.
Cut an 8" piece of firm but flexible wire, thick gauge beading wire works well for this project. This will form the arm. Wrap it tightly in flesh coloured embroidery floss, covering the entire length of wire. I secured each end with a bit of sticky tape, these ends will get tucked in so you won't see the tape. Insert the wrapped wire through the hole you made at the shoulders.

Once through, make sure that it is centred evenly, then fold the wire back in on itself, tucking the cut ends into the armholes. Each arm should now be just under 2" in length.

Starting to take shape already! Some doll artists wrap the arms with a colour of embroidery floss that compliments the dolls' outfit, I like to use a chenille stick. Start with the end butted up close to the shoulder, then start wrapping at the wrist, back along the length of chenille back to the body, leaving about half an inch at the end.

Repeat on both sides, and then twist the ends at the back of the body.

Take the bead off the top of the peg and insert the doll into an egg carton so you can paint the legs. You could have done this stage earlier when you were painting the torso, but often I won't know what colour the legs are going to be until well into the design process, in this case I painted them flesh tone. You can see in the photo below how I have twisted the chenille sticks at the back of the body too.

While the legs are drying we can paint the face. There are many different ways you can put faces on your dolls, or you can omit the faces altogether and just leave the bead blank. I painted two blue ovals for the eyes. For the cheeks I took a stiff stippling brush and put the teensiest bit of pink on the bristles and then brushed off most of the excess colour on the paper towel. I then lightly brushed circles over the cheeks. This technique is called dry brushing.

Add two little white dots for highlights on the eyes.

Eyelashes are just short strokes with brown paint. I decided to leave this doll without a mouth.

There are many different ways you can give your doll hair. There are synthetic curls you can buy from craft stores, string, raffia, threads and yarns. I love using yarns with verigated colours and different textures to get interesting locks. The yarn I used here is a soft, fluffy yarn with cream and warm brown, with a gold thread running through.
To make the 'wig', wrap the yarn around your hand several times and tie off in the middle, as shown below.

Glue to the top of the head using hot glue, and trim the ends. Here you can see that I have painted her shoes on also. I leave gluing her head on until she is dressed, as some clothes have a narrow neck that won't fit over her head.

This is as far as I will go with constructing the doll until her outfit is completed and she is dressed. Once she has clothes on I will have a better idea of how to do her hair to suit the style of the outfit, but there you have it, the basics of creating clothes pin dolls.
This is what the doll looked like when she was finished.
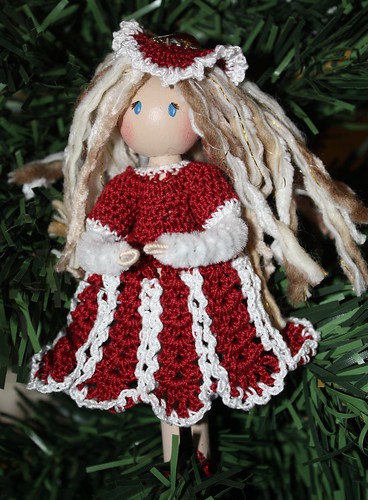
The Clothes Pin Dolls group on Flickr is a wonderful source of inspiration.
She is adorable. I like her outfit. Where did you fine a crochet pattern to fit her?
ReplyDeleteHere is the original post for this doll, including the pattern link: http://morganisedchaos.blogspot.com.au/2011/05/candy-cane-pin-up-doll.html
ReplyDeleteWhat brush did you use to paint the oval eyes?
ReplyDeleteMy apologies for the delay in replying, for some reason this question didn't come through to my emails. The brush I used is called a size 0 pointer, which is essentially just a very fine, short tipped brush.
Deletewhat size bead was used for the head?
ReplyDeleteThe bead is about an inch across. It was just a standard wooden bead with a small hole, I had to use a dremel tool to both enlarge the hole on the bead and file down the top of the peg to make it fit. There are wooden beads that you can get that are especially designed to fit on the top of these types of pegs, however they aren't available locally to me, so this was my makeshift solution.
ReplyDeleteDarrrrling! Thanx so much for posting this!
ReplyDeleteWMC
What did you use to drill the holes for the arms? Don't want to have to buy an expensive drill lol
ReplyDeleteloved your tutorial-explanation extremely clear- will be starting my clothes pin doll collection soon-ty again- Merry Christmas
ReplyDeleteLove this but you have said 'flesh coloured' when what you mean is white. There are many different skin tones. I know you will not in any way have intended this, but I feel that you should maybe amend this.
ReplyDeleteWomen who have worn plus size clothing most of their lives know that shopping for clothes can be a frustrating experience. Generally speaking, when you go to town to visit the one store that exclusively carries plus size clothing, you do not like many of the styles that are available to you, or worse, you find something you like, but they do not have it in your size. plus size flare jeans
ReplyDelete