If you want to watch the preview of her album you can view it on You Tube here.
The envelope and card kits she uses come from Michael's. The cards measure 5" x 6 1/2", with the matching envelope measuring 7 1/4" x 5 1/4". These are not available in Australia, and the closest we can get is the C6 card size which measures 105mm x 150mm (pretty close to 4 1/8" x 5 7/8") with the matching envelope measuring 4 1/2" x 6 5/16". As you can see that is a sizable difference, which if course is going to mean an adjustment throughout to many of the measurements.
So this post follows Kathy Orta's instructions but converting them down to a C6 size for those of us who can only get access to that. I am sure you are all capable of doing this without someone telling you how, this is mostly so when I make another one (and I plan to make several), I have all the measurements recorded.
This mini will be smaller than the original so on most pages and page inserts it won't take a standard 4" x 6" photo, but it will take the 3.5" x 5" print which is the next size down. Of course you can always custom size and crop your own photos according to your own needs, but the 3.5" x 5" (or 9 x 13cm) print size option should be readily available worldwide in any photo store. You can, however, put a simple mat on as many of the pages as you want, which will (just) take a 4" x 6" photo.
December Daily Part One
You can watch Kathy Orta's original video on how to make part one of the December Daily here. Watching her video is essential for understanding how the album is constructed, I am merely giving my measurements for using a smaller C6 size envelope and card.
Card Page One
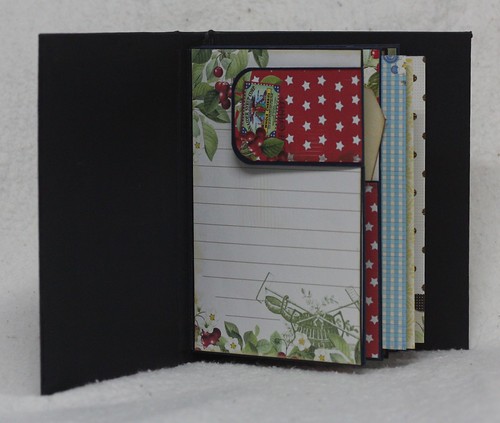
The measurements for this page remained the same as the original. Go ahead and make the cuts at 2"and trim down to 3". Trim the corners as desired. Adhere together as shown and then trim off 1/2" off the side that doesn't have flaps. Your card should measure 3 5/8" across. This gives room for the hidden hinge binding and still allows your card to fit in nice and flush.
Card Page Two
Trim the card at 1/2" to the right hand side of the scored edge. Keep the piece you trimmed off and put it aside to make a pocket later.
Envelope Page One
Go ahead and seal the envelope as instructed. Trim a sliver off one end, and then trim the other end so that the envelope measures 4 1/8" across (the same width as the card).
Envelope Page Two
Adhere the flap of your second envelope to the first envelope page as instructed. Trim the second envelope so that it too measures 4 1/8" across.
Pocket One
Take the extra piece you trimmed away while making the second card page and trim it so it measures 5 1/8" along the long edge. When directed, score each edge at 1/2" and adhere as shown to create the pocket. This creates a pocket 4 1/8" wide (same width as the card) and 3 5/8" high
Twin Pocket (Variation)
I felt that given the reduced overall size of the album that the twin pockets were a bit too small to have any practical function, so I adjusted it to make one large side loading pocket. I wanted a pocket that measured 6 1/4" x 2 1/4", so I cut a piece of cardstock at 7 1/4" x 2 3/4" and scored at 1/2" on three sides.
December Daily Part Two
You can watch Kathy Orta's original video for part two of the December Daily here. Watching her video is essential for understanding how the album is constructed, I am merely giving my measurements for using a smaller C6 size envelope and card.
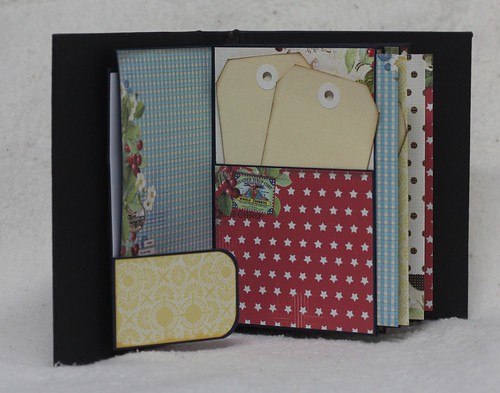
The Envelope Pages
Adhere the two envelopes together as shown. Place envelopes into your paper trimmer and line up so the edge of the envelope is just a smidge over the 5" marker (this is where Kathy lines hers up to the 5 3/4" mark). This should place the fold line for the envelope flap directly on the half inch marker, giving you a half inch flap when you trim.
In the original version the envelopes are then folded in on each other, and the top facing envelope is trimmed down to 4" in width. This is a reduction of 1 1/4". We are actually going to trim off an extra 1/8" so that when our pages are all folded there is an even 1/2" spacing between the three pages. So we are going to trim off 1 3/8". You don't have to, you can keep the original measurement, but I am a kook for symmetry.
Slide the envelope into the trimmer so the bottom facing envelope is being cut and trim so that it is 4 1/8" wide.
The Middle Card Pocket
The original directions tell you to trim off 1/2" off one side, do this by lining up your card fold at the 3 5/8" mark. Score and assemble as directed. To attach this page to the envelope pages measure 5 3/8" up from the bottom (instead of the 6" in the original instructions).
The First Pocket
On the inside of the first page is a pocket, the original measures 5" x 5". Ours will measure a scant 4 1/16" x 3 1/2". Score on three sides at 1/2" and assemble.
Back Page Pocket
Cut one card in half as directed. Trim the long side of this piece to generous 5 1/6". Score at 1/2" on three sides and form a pocket.
Belly Band
For the belly band on the back of the middle page, take the bottom flap that you cut off to make the middle card pocket and score it at 1/4" at each end.
 |
| To show you just how versatile this album is, I constructed one that was only three pages . |
December Daily Part Three
You can watch Kathy Orta's original video for part three of the December Daily here. Watching her video is essential for understanding how the album is constructed, I am merely giving my measurements for using a smaller C6 size envelope and card.
First Envelope Page
Adhere the two flaps together as shown. Trim envelopes down to 4 1/8". Trim the excess off the flaps so it measures 1/2".
Envelope Half Pages
Seal the envelope as directed. Fold in half and trim along fold line. Trim a sliver off the closed end of each envelope half, which should make your envelope halves now 3 1/8" wide.
Assembling the two parts
Make a snip in the excess flap as shown at the halfway mark, which will be approx 3 3/16" (this measurement doesn't need to be precise). Attach the two half pages as shown.
Front Page Pocket/Sleeve (to insert the hidden hinge)
Cut a piece of pattern paper 3" x 7 1/4". Score half each at each short end and attach as shown.
Pocket on Inner Page
Cut a piece of cardstock 5 1/2" x 5 1/6". Score at 1/2" on 3 sides and fold to form pocket. Attach as shown. As this album is smaller than the original, and it already has so many pockets, I chose to omit the pocket here and simply mat with a piece of card cut at 6 1/4" x 4". This will allow me to put in a slightly trimmed 6" x 4" photo.
December Daily Hidden Hinge Binding Strip
You can watch Kathy Orta's original video on how to make the hidden hinge part of the December Daily here. Watching her video is essential for understanding how the album is constructed, I am merely giving my measurements for using a smaller C6 size envelope and card.
The only measurement here that is different is the height of the binding strip, which will be 6 1/4".
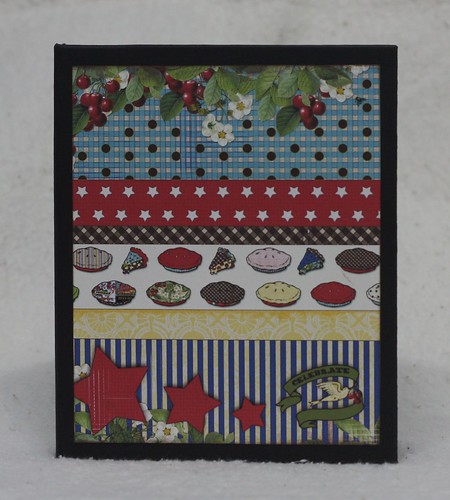
December Daily Album Cover
You can watch Kathy Orta's original video on how to make the album cover of the December Daily here. Watching her video is essential for understanding how the album is constructed, I am merely giving my measurements for using a smaller C6 size envelope and card.
There are three parts to the album cover... the back panel, the front panels and the side spines.
The original back panel is cut at 7 3/4" x 7 3/4" which works out to be 1/2" taller than the envelope used in the original. We can keep the same proportions. Our envelopes measure 4 1/2" x 6 5/16". Because this is the cover and 1/6" of an inch extra to the height of this album won't make any difference we are going to round these proportions up to 4 1/2" x 6 3/8". So we will cut our back panel piece to measure 6 7/8" x 6 7/8".
The original album front panel cover pieces are cut at 7 3/4" x 6" which works out to be 1/2" taller than the envelope and 3/4" wider than the original envelope. Once again we can keep these same proportions and cut two panels that measure 5" x 6 7/8".
The original side spine panel pieces measure 7 3/4" x 2". Ours will measure 6 7/8" x 2".
December Daily Album Cover - My Version
The original album cover is done in such a way that the pages interleave. I think this creates excess bulk in the centre of the album, we have six pages evenly spaced at either end, but in the centre those six pages overlap creating the bulk of 12 pages. Depending on how you load your pages this can create too much bulk in the centre, so I widened the cover to allow the pages to sit next to each other, rather than on top of each other.
There are three parts to the album cover... the back panel, the front panels and the side spines.
The original back panel is cut at 7 3/4" x 7 3/4" which works out to be 1/2" taller than the envelope used in the original. By increasing the width an extra inch to 8 3/4" this allows our finished pages (which measure 4 1/4" each, to sit side by side without overlap. So for my version I cut the back panel piece to measure 6 7/8" x 8 3/4" (this is an inch wider than the original width).
To compensate for the extra inch width to the back cover, we will add an extra half inch to each front flap, cutting two pieces at 6 7/8 x 5 1/2".
The original side spine panel pieces measure 7 3/4" x 2". Ours will measure 6 7/8" x 2".
I'm using over and landed on your blog and wowwww you make fantastic creation's!!!
ReplyDeleteI just walked through your blog and become immediately follower.