Technique: Stamping, Papercraft
Materials:
600gsm card stock
Tim Holtz Distress Inks:
* Bundled Sage
* Peeled Paint
* Walnut Stain
* Vintage Photo
* Aged Mahogany
Metallic Gold Ink
Tools:
Tim Holtz Christmas Miracle ATC Stamp
Tim Holtz Tag and Bookplates die
Glitz Distressing Stamp, or other sheet music stamp
paper distressing tool
scissors
This week's challenge over at Simon Says Stamp and Show was to show your favourite stamp. Well I certainly didn't have the dilemma that the design team did, as I have so few stamps to choose from (I could count them on one hand), however the postman just brought me a package with the following goodies:
Tim Holtz Christmas Miracle ATC Stamp
Tim Holtz Tag and Bookplates die
Glitz Distressing StampSo the challenge for me, is not how to choose my favourite stamp, but how to use one of the only stamps I have in my possesion! :0)
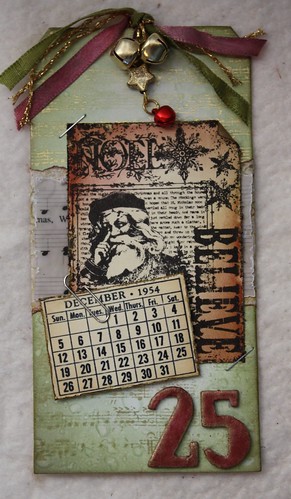
The ATC stamps are a perfect size for showcasing on a tag, so I didn't have to think too hard about what to create I used 600gsm cardstock as I prefer the durability over the manila tags. The die creates a #8 size tag.
Ink the edges with Bundled Sage, coming well into the centre of the tag, then with Peeled Paint, and lastly just the edges with Walnut Stain. Wet your fingers with a mist spray and allow the droplets to fall onto the tag, this creates the lovely water stained effect. Dry thoroughly.
Using metallic gold ink, stamp the background with the music sheet stamp. Set aside to dry.
The ATC stamp is my first 'real' rubber stamp, as in red rubber, the few others that I have are the clear cling acrylic. They do feel different to use. I know last week I said I didn't like using the distress inks for inking, but I used the Black Soot ink today to put my ATC onto a piece of manilla card, and it worked beautifully. I guess the different stamp mediums take up ink differently.
Heat set the image then cut out the stamp and distress the edges with the paper tool, and ink with Vintage Photo and Aged Mahogany. Dog ear the upper right hand corner and ink with gold.
The strip of paper between the tag and the stamp was a free Christmas paper that you can download here. Tear a strip and ink up the edges with Vintage Photo, and then just a smudge of metallic gold.
On top of that is a strip of music paper printed onto vellum. I used We Wish You A Merry Christmas, but use whatever you like the most. I cut a strip just slighly smaller than the strip of printed paper in the previous step, and I didn't ink it at all, just roughed up the edges with the paper tool.
The gold ink on the tag should be dry by now, so go ahead and glue on the torn strip of printed paper, and then the strip of printed vellum, and then the ATC image can be glued down.
If you have Tim Holtz calender stamps you can use one of those, I don't, so I found this fabulous vintage calender at Wyldhare's Hollow and used the December plate printed onto manila card. Rough it up and ink with some Vintage Photo. I attached this to the tag with a strip of double sided foam adhesive, to give it a little height.

Before you pack your inks away, use the Aged Mahogany and the Peeled Paint to colour two strips of white ribbon. Using the Distress Inks to dye your own ribbon means you always have the exact shade you need.
I think one of the parts I enjoy the most is choosing the bling, but it is also one of the hardest aspects for me because I am very much a minimalist and less is always more to the extent that I often worry I am being too barren. For this tag I used two staples and a paperclip as attachment bling, a few gold jingle bells, and of course the hand dyed ribbon with a few strands of gold crochet thread for sparkle.
I had a lot of fun making this tag, and I am really enjoying the challenges, each one teaches me something new. Today I learned that:
1) It's harder to tell when metallic inks are dry because they remain shiny. I had to hide two little smudges on the tag, but shhh I won't tell if you won't!
2) Red rubber stamps feel different to stamp with than the clear acrylic type. One of the acrylic stamps I have is by Kaisercraft, and it's a little 'squishy', that is if you press hard the detail squishes and you get a blurred image. The red rubber seems to be able to tolerate a much firmer touch.
3) There are some items I will try and substitute or find alternatives for, but I will never, ever regret investing in my Distress Inks!
There are lots of things I wanted to do differently, but lacked the tools. For example, I have no embossing powders, no perfect pearls or stickles, a limited palette of distress inks and four rubber stamps! But that's part of the challenge for me too, finding a way to work within my limitations. This also counts as my first ever rubber stamped project, will I look back in a year and cringe? :o)
Thankyou to Simon Says Stamp, and bless the design team for wading through my terribly long posts!
Hello! I think your Christmas tag is darling. I also LOVE Tim's vintage Santa stamps! Thanks for joining us at Simon Says Stamp and Show Challenge! <3 Candy
ReplyDeleteThanks you for joining us at the Simon Says Stamp and Show Challenge Blog. Thank you for sharing Your favourite stamp with us, I just love Christmas card, love the Vintagy Christmas man.wohooooo Hugs Terry xxxx
ReplyDelete