Technique: Stamping, Papercraft
Materials
manila tag
Tim Holtz Distress Inks
* Walnut Stain
* Vintage Photo
* Victorian Velvet
* Peeled Paint
ribbon
scrap of grungepaper
scraps of coloured paper
Ranger Blending Tool
glue
fine tip black marker
button embellishment
crackle medium
Tools:
Sizzix Big Shot die cutter
Tim Holtz Tattered Floral die
scissors
This week's challenge at Simon Says Stamp and Show was to show some Wendy Vecchi style. Being relatively new to the world of stampology I wasn't familiar with her style so I spent some time over on her blog.
I spent an evening pouring over her work and taking it all in. I like a lot of her stuff, but I am not a fan of the work that she covers with tags and labels that say the word ART. Putting a tag on your artwork that says ART is the artistic version of this:

True art, like true sex appeal, is something that comes as an expression of ourselves. It needs no label.
Heh, now that I have alienated a large majority of Wendy Vecchi fans, there was lots of stuff I did like on the blog, and it was one of her tutorial posts on how to make a mini gift envelope that I used as my inspiration for my project.
Heh, now that I have alienated a large majority of Wendy Vecchi fans, there was lots of stuff I did like on the blog, and it was one of her tutorial posts on how to make a mini gift envelope that I used as my inspiration for my project.
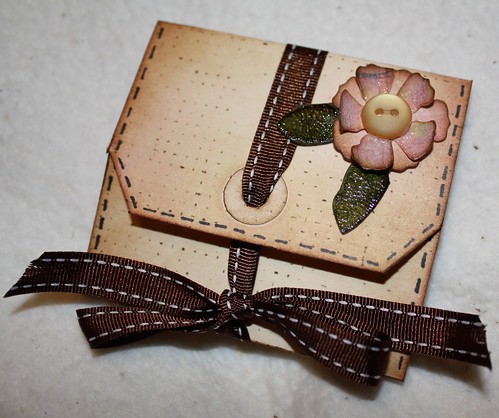
The Vecchi Style "Tagelope"
The project calls for a #8 manila tag which measures 6 1/4" by 3 1/8". My local newsagency sells these for a few cents each, so I had plenty of those on standby.
Score 2" down from the top of the tag, and 1 1/4" inches from the bottom. This creates the envelope, or tagelope as I have dubbed it! With Victorian Velvet and a blender tool, ink the edges and over the entire tag, making sure to get some into the score lines. The pink ink over the manila envelope creates a lovely apricot colour, which I wanted as the paper I chose for the flowers had touches of apricot. Distress the edges with Vintage Photo, and again very lightly with Walnut Stain.
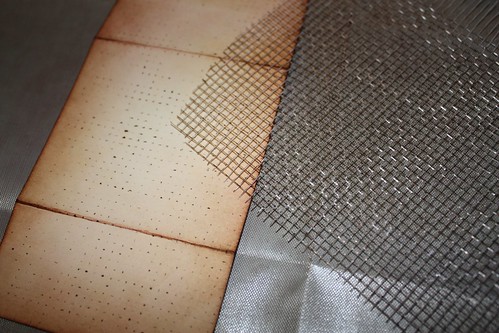
Wendy used a rubber stamp with a mattress ticking type pattern to stamp onto her tag. I didn't have any such implement, so I used a piece of mesh, the type that florists use in arrangements. I inked one side with Walnut Stain and placed it over the card, and used a brayer to transfer the pattern.
I was really happy with the effect that it gave.
Use a fine tip black marker to pen in 'stitches' around the edge of the card. Use the smallest flower on Tattered Floral die to create two flowers from scrap paper. I used some scrap booking paper that had dots (Wendy seems to love dots), you can use card or whatever you like. Distress the edges with Victorian Velvet, then lightly Walnut Stain for added emphasis.
Use the large daisy on the Tattered Floral die to cut one flower from grunge paper. Cut two petals individually to create leaves and ink with Peeled Paint.
Thread the ribbon through the hole in the tag and create a bow at the bottom. Glue the leaves and flower into place and glue a button into the centre of the flower. Add a touch of crackle medium to the leaves and petals of the flower. I use Jo Sonja as it a lot more versatile than buying crackle paints, but use what you are comfortable with.
Overall I felt it was a great challenge, as what is more challenging than trying to emulate a style that you aren't familiar or comfortable with.
Overall I felt it was a great challenge, as what is more challenging than trying to emulate a style that you aren't familiar or comfortable with.
The tag in the photo was my third attempt, the first two ended up in the trash, but were valuable learning experiences. I learned that:
a) I don't like inking detailed stamps with Distress Ink. It goes fuzzy and bleeds upon stamping, I much prefer a stickier, thicker ink like Versa, which gives a beautiful crisp image.
b) If using all waterbased inks, make sure that any detailed stamping gets done after all the blending, as the blending pads can smudge them!
c) Make sure I clean my craft sheet as I go, so that I am not transferring ink smudges to clean work.
Oh, isn't it frustrating when you pick up the smudges from your craft sheet??? I've done that far more times than I care to admit! (lol) A little tip, if I may? When you stamp using Distress Ink or waterbased inks, set the inks with your heat tool before proceeding - it does help.
ReplyDeleteYour "tagelope" is wonderful! Thanks for sharing it with us, on the Simon Says Stamp & Show Challenge!
Great tip, thankyou! :0)
ReplyDeleteThis is great! I like your "tagelope" and Tim's Tag die is the perfect size for this. thanks for sharing how to make it.
ReplyDeleteLove your tagalope Morgan! I'm forever picking up smudges from my fingers, my craft sheet..... Lol! x
ReplyDeleteOh my gosh, what a great idea!!! This is so cute! : )
ReplyDeleteThanks so much for entering the Simon Says Stamp & Show Challenge!!!
-Sarah
Love the tagalope and the screen effect. Thanks for playing along with Simon Says Stamp & Show challenge blog.
ReplyDeleteYour tagalope is darling. Love the technique for the screen effect...thanks for sharing that tip! Your piece is very "Wendy" and perfect for our Wendy Vecchi Style theme this week on Simon Says Stamp and Show Challenge. Thanks for sharing your piece with us! <3 Candy
ReplyDelete